Rösti | The Mighty Potato

Lupasin vaihteeksi jotain suolaista, joten saamanne pitää. Peruna on ikisuosikki, vaikka se välillä pääseekin unohtumaan. Peruna on nimittäin lohturuokien lohturuoka, pahan mielen karkottaja. Mietipä oikeastaan mitä tahansa lohturuokaklassikkoa: siellä se peruna säestää taustalla muusina, ranskalaisina, paistiperunoina, Hasselbackan sellaisina tai ihan vaan uusina perunoina voin kera. Hyvä perunamuusi pelastaa kuraisenkin päivän. Eräs ystäväni eläisi pelkällä perunamuusilla, jos se oli mahdollista. Tästä alkaakin sarja perunaa ylistäviä kirjoituksia, onhan tuo mukuloiden kuningas sellaisen ansainnut.

Peruna harvoin kuitenkaan on pääosassa lautasella, sillä se mielletään yleensä lisukkeeksi. Halusin tehdä kuitenkin ruoan, jossa peruna on pääraaka-aine ja saa siten päähuomion. Kauaa sellaista ei tarvinnut ideoida, ja pian suunnitelmissa olikin alppiklassikko rösti. Röstissä peruna pääsee hienosti esiin sekä maultaan että rakenteeltaan, koska perunasuikaleet kiinnittyvät tärkkelyksen voimalla yhteen.

wp-1485258053073.jpg

Röstiin, kuten harvaan muuhunkaan klassikkoon, ei tunnu olevan oikeaa reseptiä. Osa tekee röstin esikeitetyistä perunoista, osa raaoista. Osa käyttää jauhoisia perunoita, joku toinen taas kiinteitä. Joskus rösti ei sisällä muuta kuin perunaa ja rasvaa, toisinaan siihen lisätään sipulia tai juustoa tai pekonia. Silläkin riskillä, että mennään kauas autenttisesta, sekoitin tällä kertaa perunan sekaan emmentalia ja kevätsipulia.

En ole kokeillut raa’asta perunasta röstin tekemistä, koska isot pojat ja tytöt internetissä sanoivat, että silloin röstin suutuntuma voi olla turhan pureskeltava. Raasta perunasta tulisi varmasti kauniimman näköinen rösti, kun yksittäiset perunasuikaleet jäävät näkyviin, mutta tällä kertaa päätin pelata varman päälle ja esikeittelin perunat jo edellisenä päivänä. Perunat voi keittää myös vähän ennen paistamisajankohtaa, mutta niiden täytyy jäähtyä kokonaan ennen raastamista.

wp-1485258050739.jpg

Kokeilin muutamaa eri juustoa rösteissä ja ainakin omaan makuuni kävi parhaiten mieto emmental (mustaleima oli aivan liian voimakasta), mutta esimerkiksi Appenzeller toimii myös erinomaisesti. Perunan sekaan silppusin myös kevätsipulia, joka toimii perunan kanssa hienosti. Kevätsipulin taas voi hyvin korvata ruohosipulilla tai ohuesti viipaloidulla purjolla. Röstin sekaan tai päälle voi myös lisätä pekonia tai vihanneksia, mutta pidättäydyin toistaiseksi lisäyksistä.

Tarjoiluun kannattaa varata ranskankermaa tai smetanaa ja halutessaan lisää juustoa. Jääkapissa lojui vielä retiisejä, jotka ohueksi viipaloituina raikastivat röstiä entisestään.

Rösti
1 noin 20 cm rösti

Ainesosat
2 keskikokoista kiinteää perunaa
1 kevätsipuli tai pieni nippu ruohosipulia tai pala purjoa
20-50 g juustoraastetta (mieto emmental, appenzeller)
suolaa ja pippuria
voita paistamiseen

Tarjoiluun ranskankermaa, juustoa, viipaloituja kasviksia (esim. retiisiä)

  • Esikeitä perunoita kuorineen 15 minuuttia mielellään edellisenä päivänä. Laita perunat jääkaappiin yöksi. Jos keität perunat vasta juuri ennen paistamista, viilennä ne kylmässä vedessä.
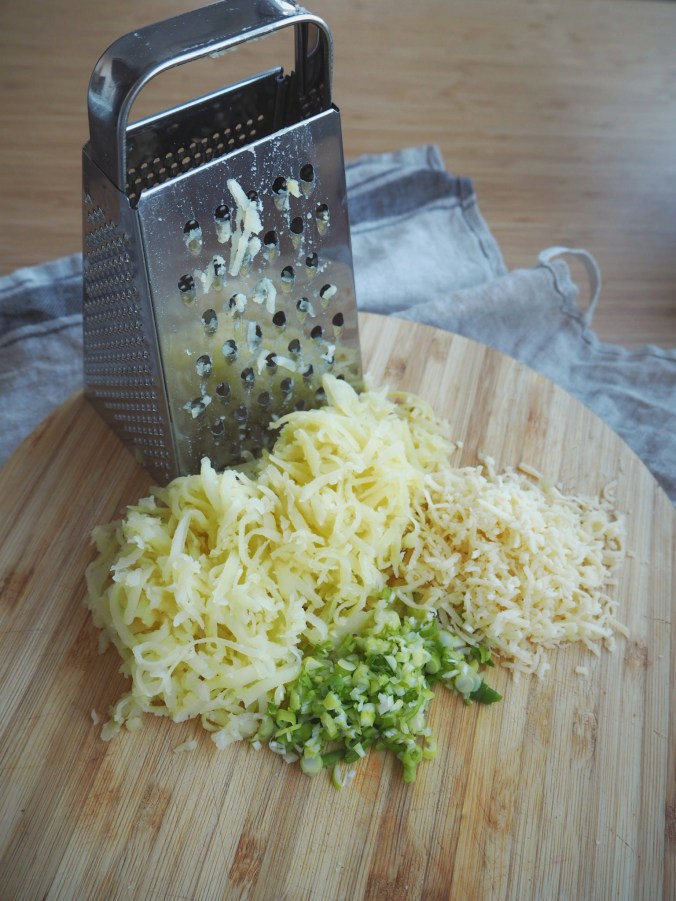
  • Kuori perunat ja raasta karkealla raastimella. Raasta myös juusto ja hienonna kevätsipuli.
  • Sekoita peruna, juustoraaste ja sipuli kulhossa ja mausta suolalla ja pippurilla.
  • Laita paistinpannu lämpiämään keskilämmölle (matalareunainen lettupannu on kätevin). Sulata voi kuumalla pannulla ja painele perunaseos pannulle lätyksi. Voit siistiä röstin reunoja paistamisen aikana. Paista ensimmäistä puolta 8-10 minuuttia. Irrota rösti pannusta varovasti työntämällä ohut lasta sen alle. Käännä rösti lautasen avulla ympäri ja paista toista puolta vielä viitisen minuuttia. Älä kääntele röstiä turhaan, koska sen paistopinta tarttuu helposti pannuun kiinni.
  • Tarjoile valmis rösti ranskankerman ja esimerkiksi viipaloidun retiisin kanssa.

Täytyy myöntää, että yllätyin itsekin kuinka hyvää röstistä tuli. Sellaisenaan se oli erinomainen lounas, mutta röstiä voi tehdä pienempinä lättyinä myös lisukkeeksi. Hapokas valkoviini sopii kylkeen myös paremmin kuin hyvin.

Onko röstit jo hallussa, vai mikä on sinun perunabravuurisi?

-Toni

wp-1485258055536.jpg

I promised you something savoury last time, so here goes. The potato is the original comfort food that accompanies basically every Western comfort food classic in different shapes: mash, fried, oven cooked or as just new potatoes in the summer. A pile of good potato mash is sure to vanquish any feelings of gloom or discomfort and replace them with a sense of security. A friend of mine would eat only potato mash if that was actually possible, and I understand her very well. This post will be the first one in a series about the mighty potato, the king of tubers, that truly deserves all the praise it can get.

The potato, however, rarely gets the limelight. It is almost always the sidekick to the main component of the meal. I wanted to reverse this pattern and make something where the potato is the star. I didn’t have to think for long before the idea of an Alpine classic creeped into my mind. Rösti is a great showcase for the humble potato: its flavour remains unmasked and the starchy quality of the potato gives the rösti its structure.

There doesn’t seem to be the original recipe for rösti, as is the case with most food classics. Some people make rösti out of parboiled potatoes, some use raw grated ‘tators. Some use floury potatoes, some use waxy.  Sometimes onion, cheese or bacon is added to the mixture, sometimes they are served on top of the rösti, and sometimes rösti is just potatoes and butter (or goose fat). I risked being called unauthentic and added Swiss cheese and spring onions to the mix this time around, and in my opinion it was a good decision.

I have only made rösti with parboiled potatoes, mainly because the big boys and girls on the internet told that even though raw grated potatoes do make a beautiful cake with the individual strands showing, the texture can be chewy. So I parboiled my potatoes the day before and chilled them in the fridge. If you boil the potatoes just before making the rösti, let them chill completely in cold water before grating.

I tried a couple of different cheeses and I liked mild Swiss cheese best in terms of flavour. Aged swiss was too strong and it covered all other flavours. Also Appenzeller would be an excellent choice. I chopped a spring onion into the mixture, but chives or a small piece of leek will work just as well. You can add bacon or vegetables to the mixture or serve them on the finished rösti.

I used sour cream for serving as well as some thinly sliced radish that happened to roll around my fridge. The combination was nicely fresh yet comforting at the same time.

Rösti
1 rösti approx. 20 cm

Ingredients
2 medium-sized potatoes
1 spring onion or a small bunch of chives or a piece of leek
20-50 g grated cheese (mild Swiss, Appenzeller)
salt and pepper
butter for frying

For serving: sour creme, cheese, sliced vegetables (radishes etc.)

  • Parboil the potatoes for 15 minutes with their skin on, preferably on the previous day, and chill the potatoes in the fridge. If you boil the potatoes just before making the rösti, let them cool completely in cold water.
  • Peel the potatoes and grate them into thin strips using a coarse grater. Grate the cheese too. Chop the spring onion, chives or leek into thin slices.
  • Mix the grated potatoes, grated cheese and onion in a bowl. Season with salt and pepper.
  • Place a small skillet (approx. 20cm) on medium heat. Melt a generous amount of butter in it. Form a loose disk of the potato mixture and put that on the skillet. Press down on the disk with a spatula to form the rösti cake. Let the first side cook for 8-10 minutes, then with the spatula carefully loosen the rösti from the skillet. Once the rösti is loose, flip it over with a help of a plate. Cook the other side for five more minutes. Do not flip the rösti more than once, because the surface easily sticks to the skillet.
  • Serve the rösti with sour cream and other toppings, for example thinly sliced radishes.

I have to say I’m surprised how good the rösti tasted. On its own the rösti makes a great lunch, but you can also make several smaller röstis and serve them as a side dish.

So how are your rösti-frying skills? Care to reveal your own potato bonanza?

-Toni

Puolukkaraakakakku | Lingonberry Raw Cake

Tiedän kyllä, että raakakakut ovat niin nähty, kokeilin itsekin sellaisen tekemistä muutama vuosi sitten. Silloin kakku oli sitruunapohjainen ja pohja sisälsi muun muassa kookosjauhoja. Tuntien hyydyttämisen jälkeen otin palan kakkua, jonka koostumus ja maku lähentelivät sahanpurua. Siihen jäivät raakakakkukokeilut pitkäksi aikaa.

wp-1484918966662.jpg

Viime viikolla ostin rasiallisen tuoreita taateleita, joita tarvitsin välipalapatukkoihin, jotka vilahtivat instagramin puolella (linkki tuossa oikeassa sivupalkissa.) Patukkoihin kului alle puoli pakettia taateleita, joten jäin miettimään käyttöä lopuille. Taatelit ovat suosittu ainesosa raakaleivonnassa, koska ne ovat luonnostaan hyvin makeita ja niiden maku on karamellinen. Lisäksi niiden erittäin tahmea rakenne auttaa pitämään leivokset kasassa.

Melkein kaikissa näkemissäni raakakakkujen pohjien resepteissä on ollut taateleita, joten lähdin itsekin sille tielle jälleen kerran. Päätin kuitenkin pitää reseptin hyvin yksinkertaisena ja käytin vain kaapeista jo löytyviä aineksia. Puolukkaakin riitti pakkasessa runsaasti, joten kakun makukin oli nopeasti päätetty.

Tämä kakku oli hyvin nopea tehdä, kun pähkinät oli liotettu yön yli. Lisäksi hyydyttämiseen menee vähintään neljä tuntia. Lisäksi täytyy mainita, että raakaleivonta on välineurheilua: lähes kaikkiin raakaresepteihin tarvitaan ”tehokas blenderi tai monitoimikone”. Itse sain tämän kakun aikaiseksi sauvasekoittimeni mukana tulleella monitoimikonelisäosalla. Joka tapauksessa pähkinöiden hienontamiseen tarvitaan jonkinlainen laite, käsipelillä ei saa tarpeeksi hienoa jälkeä.

No entä se maku ja rakenne? Parempi kuin ensimmäisellä yrityksellä, jopa miellyttävä. Puolukka saa happamuudelleen vastapainoa ja karamellisuutta taateleista ja vaahterasiirapista. Kakun rakenne on pehmeä, mutta ei sahanpuruinen. Parannusta aiempaan selvästi, joskaan en todellakaan voi väittää olevani raakaleipuri. Kyllä perinteiset kakut raa’at serkkunsa vielä voittavat, mutta mukavaa vaihtelua nämä ovat. Ravintosisältönsä puolesta raakakakku käy myös vaikka tuhdista välipalasta, tai vaikka lounaasta, joten niihin kannattaa suhtautua vähän eri tavalla, kuin perinteisiin leivonnaisiin.

Kakun lisäksi tein puolukkamehusta kastikkeen kakulle, mutta se vaatii kasaan keittämistä, joten se ei ole raakaa. Muutenhan kakku on gluteeniton, maidoton ja vegaaninen, eikä siihen ole käytetty lisättyä sokeria, joskin monet raaka-aineet sisältävät sokeria runsaasti.

wp-1484918969606.jpg

Puolukkaraakakakku
6-8 palaa/ 16 cm vuoka

Pohja
12 taatelia
2 dl kuorellisia manteleita

Täyte
2 dl puolukoita
3 dl cashew-pähkinöitä
½ dl vaahterasiirappi
½ dl kookosöljyä
½ tl vaniljajauhetta
5 taatelia

Kastike
1 dl puolukkamehua
½ makeutusta (käytin vaahterasiirappia ja kookossokeria)

  • Laita edellisenä iltana mantelit ja cashewit erikseen likoamaan runsaaseen veteen jääkaappiin.
  • Aloita pohjan tekeminen poistamalla taateleista kivet. Kaada manteleista vesi pois. Laita taatelit ja liotetut mantelit monitoimikoneeseen tai tehosekoittimeen ja jauha, kunnes massa on tasaista.
  • Pingota leivinpaperi irtopohjavuoan pohjan ja reunojen väliin. Kaada pohjamassa vuokaan ja painele taisaiseksi. Laita vuoka kylmään.
  • Putsaa monitoimikone tai tehosekoitin pikaisesti esim. talouspaperilla. Sulata kookosöljy vesihauteessa tai mikrossa (kuuma vesi hanasta riittää sulattamaan kookosöljyn). Poista taateleista kivet ja valuta cashew-pähkinöistä vesi pois. Laita kaikki täytteen ainesosat monitoimikoneeseen ja jauha tasaiseksi. Tähän voi mennä muutama minuutti, sammuta kone välillä, jos se kuumenee.
  • Kumoa täyte pohjan päälle ja tasoita. Laita vuoka kylmään vähintään neljäksi tunniksi. Viilennysaikaa voi lyhentää pitämällä kakkua pakkasessa.
  • Valmista kastike sekoittamalla mehu ja makeutus pienessä kattilassa. Kiehauta, laske lämpötilaa ja keitä kastiketta muutamia minuutteja, kunnes kastike tiivistyy siirappiseksi. Laita kastike kylmään.
  • Koristele valmis kakku niin halutessasi. Itse käytin puolukkajauhetta, pakastepuolukoita ja mantelilastuja.

Siinäpä se. Tällainen kakku ei vaadi juurikaan kokkaustaitoja, mutta kärsivällisyyttä kyllä hieman perinteistä kakkua enemmän. Oletko sinä maistanut tai tehnyt raakakakkuja? Onko hyviä makuehdotuksia?

Ensi kerralla voisi olla aika tehdä jotain suolaista pitkästä aikaa, pysy kanavalla!

-T

wp-1484918972388.jpg

Yes, I know, raw cakes have been around for ages. I even tried making one a couple years back. That cake was lemon flavoured and the crust contained coconut flour, among other things. After hours of setting, I ate a piece of that cake, and unfortunately the taste and texture were really close to sawdust. Needless to say, I did not try to make another one.

However, last week I bought a box of fresh dates for some nutty snack bars that you might have noticed on my Instagram (widget in the right column). I used less than half of the box for the bars, so I had to come up with an idea for the rest of the dates. Dates are a popular ingredient in raw baking for their high natural sugar content and caramel-like aroma. Also, their sicky texture helps to give shape to the cakes.

Almost all the raw cake recipes I have seen contain dates, so I decided to head that way too one more time. I wanted to keep the recipe very simple, and used only the things I already had in cupboards. I had lots of lingonberries in the freezer, so the choosing the flavour was easy.

This cake requires quite little time for the actual “baking”, once the nuts have been soaked overnight. Afterwards, it takes about four hours for the cake to set. One thing you need, however, is a powerful food processor or a blender to mince the nuts and make a smooth filling. I used the food processor accessory that came with my immersion blender, and that worked just fine.

‘Well how about the taste and texture’, you may ask. Better than my first try, quite pleasant even. The acidic lingonberry is nicely balanced with the deep caramel flavour of the dates and maple syrup. The texture is soft but not like sawdust. Overall, this was a clear improvement compared to my previous try, but I still can’t claim to be a raw baker. Traditional cakes still get to keep their throne in my book, but raw cakes are a nice variation. In terms of nutritional content, raw cakes resemble more healthy snacks than cakes and can even substitute a lunch, so they aren’t really the same thing as traditional pound cakes anyway.

I also made a sauce for the cake, but that required cooking and adding (coconut) sugar, so that is not raw. Otherwise, the cake is gluten and dairy free, vegan, and it contains no added sugar (though the ingredients are abundant with natural sugars).

Lingonberry Raw Cake
6-8 pieces / 16cm spring form

Crust
12 dates
2 dl almonds

Filling
2 dl lingonberries
3 dl cashew nuts
½ dl maple syrup
½ coconut oil
½ tsp. vanilla powder
5 dates

Sauce
1 dl lingonberry juice
½ dl sweeteners (I used maple syrup and coconut sugar)

  • Place the almonds and cashews in separate bowls, cover with water, and let soak in the fridge overnight.
  • Next day, start by making the crust. Remove the pits from the dates. Drain the almonds. Place the dates and almonds in the food processor and blitz for a couple of minutes until even.
  • Tighten a piece baking sheet between the bottom and the sides of a small spring form pan. Transfer the date and almond mass into the form and spread evenly and press down. Place the form in the fridge while you make the filling.
  • Clean the food processor quickly with piece of paper. Melt the coconut oil in the microwave or in a bain-marie (hot water from the tap is hot enough). Remove the pits from the dates. Place all of the ingredients in the food processor and blitz until smooth. This might take a while. If some of the filling sticks to the sides of the processor, stop and scrape the sides to make sure you get a smooth texture. You should also let your processor rest for a while, if it overheats.
  • When the filling is smooth, pour it into the form over the crust, smooth the surface with a spoon, and place the cake in the fridge or freezer. You should let the cake rest for at least four hours.
  • Make the sauce by combining the ingredients in a small sauce pot and bring the mixture into boil. Reduce heat and cook for a couple of minutes while mixing. The sauce is ready when it has reduced to a syrupy consistency. Place the sauce in the fridge to wait for the cake.
  • When the cake has set, you may decorate it as you like. I used lingonberry powder, lingonberries and almond flakes.

That’s it! This kind of cake doesn’t really require baking skills, but it does require patience. Have you tasted or made raw cakes? Any flavour suggestions you care to share?

Next time I’m planning to make something savoury, this blog has been so sweet recently. Stay tuned!

-T

Apricot Pie

Hei siellä ja hyvää vuotta 2017!

Joululoma hieman venähti, ja samalla menivätkin sitten uusivuosi ja synttäritkin. Kaikennäköistä pikku puhdetta on riittänyt tukholmanvisiitistä paluumuuttajien pikkujouluihin, synttärikakkuihin ja gyoziin. Osaltaan blogihiljaisuuteen on muuten vaikuttanut sekin, että joulun ja vuodenvaihteen aika on ruokapöydässä hyvin pitkälti perinteiden sanelemaa (ja hyvä niin), joten mitään kovin inspiroivaa ei ole tullutkaan hetkeen kokkailtua.
Koitan päästä vauhtiin pikkuhiljaa täälläkin, jos vaikka alkava vuosi saisi kiinnostumaan uusien ruokien kokeilusta jälleen. Kovasti ainakin kiinnostaisi jälleen Aasia.

Tänään pysytellään kuitenkin turvallisesti suorastaan perinteisessä leivonnassa. Työpaikalla saimme eräältä tavarantoimittajalta joululahjaksi megapurkin moscato-viiniin säilöttyjä aprikooseja. Oma osuuteni noista komean oransseista herkuista keikkui jääkaapissa muutaman viikon, ennen kuin keksin niille käyttöä. Tällä tavalla säilöttyjen aprikoosien maku on nimittäin erittäin makea ja yhtä aikaa karvasmantelinen, joten ihan mihin tahansa ne eivät sovellu.

wp-1484046817920.jpg

Päähäni oli kuitenkin jämähtänyt ajatus rahkapiirakasta, mikä on erikoista, sillä en yleensä pidä niistä erityisesti. Asiaan saattoi vaikuttaa se, että aprikoosit näyttivät samalta kuin ne luumut, joista Niisku leipoo Niiskuneidille piirakan yhdessä muumijaksossa, ja tuo piirakka näyttää erehdyttävästi rahkapiirakalta. Tämän epämääräisen mielikuvan takia päädyin sitten leipomaan itsekin rahkapiirakan. Muumeilla on pitkäaikaisia vaikutuksia selvästikin.

Piirakan pohja on kirjaimellisesti ja kuvainnollisesti perusta koko leipomukselle. Jos pohja on huono, ei hyväkään täyte pelasta piirakkaa. Valmiit pakastepohjat ajavat yleensä asiansa, mutta vilkaisu niiden ainesosiin on usein kivuliasta. Margariinipohjaisiahan ne melkein poikkeuksetta olevat ja melkein aina sisältävät palmuöljyä. Siksi teenkin melkeinpä aina piirakkapohjan itse voitaikinasta. Klassinen paté briseé on nimittäin hyvin helppo ja nopea tehdä, eikä se vaadi kuin voita, jauhoja ja kananmunan. Kananmunankin voi jättää pois ja korvata tilkalla vettä, jos haluaa murotaikinamaisen pohjan. Lisäksi täytyy sanoa, että voitaikinan nyppiminen on ehkä terapeuttisinta, mitä keittiössä voi tehdä.

Lueskelin erilaisia rahkapiirakoiden täytereseptejä, mutta koska eri reseptien sisältä vaihteli hyvin paljon, päädyin tekemään täytteen omin päin jääkaapin sisällöstä. Muutamassa kohtaamassani aprikoosipiirakkareseptissä aprikoosit kehotettiin karamellisoimaan pannulla, minkä olisin ilomielin tehnytkin, jos aprikoosit olisivat olleet tuoreita. En nimittäin usko, että pehmeät säilötyt aprikoosit olisivat kestäneet paistamista ainakaan nätteinä.

Rahkapiirakan voi tietenkin myös tehdä melkeinpä mistä tahansa hedelmästä tai marjasta. Mustikkarahkapiirakka on tietenkin ansaitusti klassikko, mutta esimerkiksi puolukoita voisi kokeilla myös. Jos käytät tuoreita hedelmiä, kannattaa ne ehkä esikypsentää ennen piirakan päälle latomista, etteivät vaan jää raaoiksi.

wp-1484046814875.jpg


Aprikoosirahkapiirakka

Pohja
150 g voita
200 g jauhoja
1 rkl sokeria
ripaus suolaa
1 kananmuna tai tilkka kylmää vettä

Täyte
1 prk maitorahkaa
2 rkl turkkilaista jogurttia
1 rkl ranskankermaa
1 kananmuna
1 rkl sokeria
1 sitruunan kuori ja puolikkaan mehu
1-2 tölkkiä säilöttyjä aprikooseja

  • Aloita pohjasta. Kuutioi kylmä voi kulhoon. Kaada mukaan jauhot, sokeri ja suola. Upota kädet seokseen ja ala nyppiä voita ja jauhoja sekaisin. Aluksi se tuntuu hankalalta, mutta pikkuhiljaa taikinasta muodostuu pientä murua eikä sormissa tunnu enää isoja voiklimppejä. Sekoita mukaan kanamuna (tai tilkka kylmää vettä) ja sekoita tasaiseksi. Kananmunan kosteus saa taikinaan kertymään yhteen palloksi. Kokoa taikina yhteen ja kääri pallo kelmuun ja laita puoleksi tuntia jääkaappiin.
  • Laita uuni lämpiämään 175-asteiseksi.
  • Ota taikina jääkaapista ja muotoile siitä kiekko. Aseta kiekko noin 24 cm piirakkavuokaan ja painele taikina koko vuokaan, myös reunoille. Tee pohjaan runsaasti reikiä haarukalla ja laita pohja esikypsymään uuniin noin 10 minuutiksi, tai kunnes reunat saavat hieman väriä. Ota pohja jäähtymään hetkeksi.
  • Sekoita täytteen ainesosat kulhossa aprikooseja lukuun ottamatta. Kaada täyte pohjan päälle ja asettele lopuksi aprikoosit täytteen päälle. Laita piirakka uuniin noin 15-20 minuutiksi, tai kunnes täyte on jämähtänyt ja hedelmät tuntuvat pehmeiltä.
  • Anna piirakan jäähtyä kokonaan ennen leikkaamista. Tarjoa vaikkapa kermavaahdon tai turkkilaisen jogurtin kera.

Tällä piirakalla alkoi siis vuosi täällä, toivottavasti maistuu!

Nähdään pian!

-Toni

wp-1484047340654.jpg

Hapan mutta täyteläinen jogurtti passaa täydellisesti piirakan pariksi | Sour but velvety yoghurt is a perferct paring for the pie

Hey there and happy new year!

The Christmas holidays dragged on a bit, and suddenly it was new year, and then my birthday. I’ve been quite busy with some little things, like a visit to Stockholm, and making birthday cakes and gyozas and such. Also the nature of Christmas time cooking has had its part in the radio silence; the food served during the holidays is pretty much dictated by tradition (which is great), so I haven’t really been cooking anything that inspiring. I’m trying to get back on the wagon, so to speak, and maybe the new year will come with some fresh ideas. For example, Asia has been interesting me a lot lately.

However, today I’m staying in the traditional, Western comfort zone. While working before Christmas, we received a present from one of the suppliers: a giant jar of apricots preserved in moscato wine. My portion of those deeply orange balls of splendour had been hanging out in my fridge with no allocated task, so I had to come up with a mission for them. Apricots preserved like this have a strong bitter almond-y flavour, so they need a certain kind of flavour pairings.

After looking at the apricots for a while, an image popped up in my mind: a creamy pie with deep orange hemispheres all around. I found it strange, as I usually don’t even like quark pies that much. I think it has to do with another image, one from Moomins. In one episode of the cartoon, Snork makes a pie of yellow plums for Snork Maiden to make up for being a jerk. Those yellow plums looked almost exactly like the apricots I had been staring at. Watching cartoons seems to have some serious long-terms effects.

The crust of a pie is both literally and metaphorically the base of the whole concept. It the crust is bad, even the best of fillings won’t save the day. Ready-made frozen crusts are usually quite good, but looking at their ingredient lists gives headache: they are based on margarine instead of butter, and usually contain lots of palm oil. That is why I always make the crust myself with paté brisée. The French classic is so easy and quick to make, that it really does not make any sense to buy the crust frozen. You’ll only need butter and flour, maybe an egg, but even that can be replaced with some cold water. Most importantly, pinching the butter and flour into little flakes is perhaps the most therapeutic thing one can do in the kitchen.

Never having baked a quark pie, I read some filling recipes online, but since they all seemed to differ, so I made one up using the stuff I had in the fridge. Some apricot pie recipes I read instructed to caramelise the apricots on a pot pan with sugar, and I would have loved to do that, but I didn’t dare since my preserved apricots were already soft. If you are using fresh fruit, feel free to caramelise them.

By the way, you can make this kind of a quark pie with any fruit or berry. Quark-bilberry pie is a classic, and deservedly so, but one could also experiment with lingonberries too. Using sour berries will probably need some additional sugar, though, to counter the acidity. If you are using fresh fruit, like apples, pears of stone fruits, I recommend cooking on the pan with some butter first before putting them in the pie.

Apricot Pie

Crust
150 g butter, cubed
200 g flour
1 tbsp. sugar
pinch of salt
1 egg or a splash of cold water

Filling
200 g quark
2 tbsp. Turkish yoghurt
1 tbsp. sour cream
1 egg
1 tbsp. sugar
zest of one lemon, and juice of a half a lemon
1-2 cans of preserved apricots

  • Start with the crust. Cube the cold butter into a bowl. Add the flour, salt and sugar. Stick your fingers in and start pinching the butter and flour together. It’s a bit sticky at first, but as you go on the butter will start to form little flakes. You are done when all of the butter has formed flakes or crumbs with the flour, and there are no big clumps of butter left. Add the egg or a spoonful of cold water and mix. The moisture will bring the dough together into a ball. Gather all the dough in a ball and wrap it in cling film and place in the fridge for about a half an hour.
  • Pre-heat the oven to 175 degrees Celsius.
  • Take out the sough and form a disc with it. Place the disc in pie dish and using your fingertips, spread the dough into an even layer, including the sides of dish. Make several holes in the bottom with a fork to prevent air pockets forming, and put the pie in the oven to pre-cook. Cook for about 10 minutes, or until the sides of the crust have turned lightly golden. Take the crust out and let cool down for a moment.
  • Mix all the ingredients of the filling in a bowl, excluding the fruits. Pour the filling on the crust and place the fruit on the filling. Put the pie in the oven for 15 to 20 minutes, or until the filling has set and the fruit are soft.
  • Let the pie cool down completely before cutting. Serve with whipped cream or Turkish yoghurt.

So, this pie started the year here, I hope you like it! I’m excited to get back to blogging again.

Seeya soon!

-Toni

wp-1484047343351.jpg

I just had to