Briossi-hampurilaissämpylät | Brioche Burger Buns

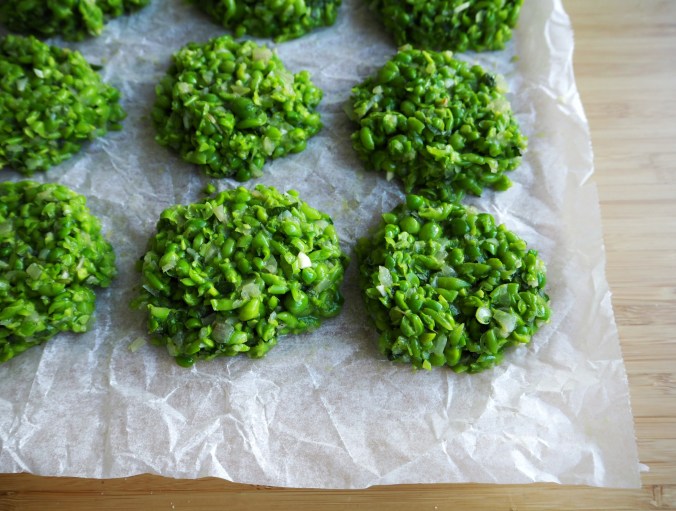
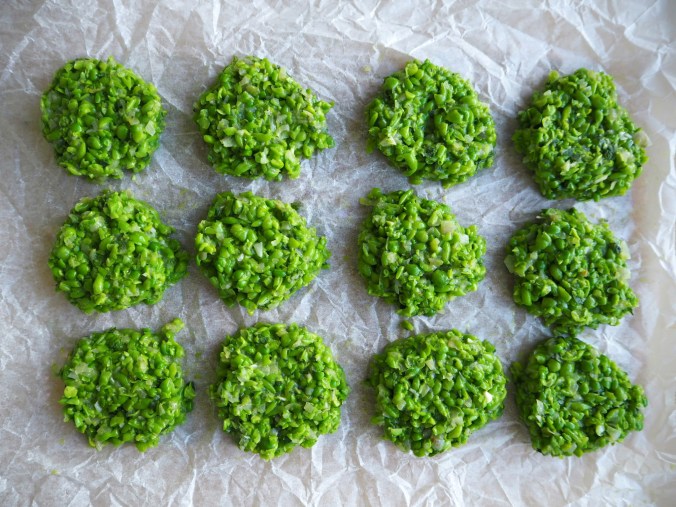
Viime aikoina olen tehnyt muutaman kerran hampurilaisia, kun lähikauppa alkoi myydä laadukasta pihvikarjan jauhelihaa. Pihvi, oli se sitten lihaa, kalaa, kanaa tai kasvispohjainen, on tietenkin jokaisen hampurilaisen tärkein osa, mutta samalla myös usein helpoin toteuttaa. Hyvä hampurilaissämpylä sen sijaan on toinen tarina.

OLYMPUS DIGITAL CAMERA

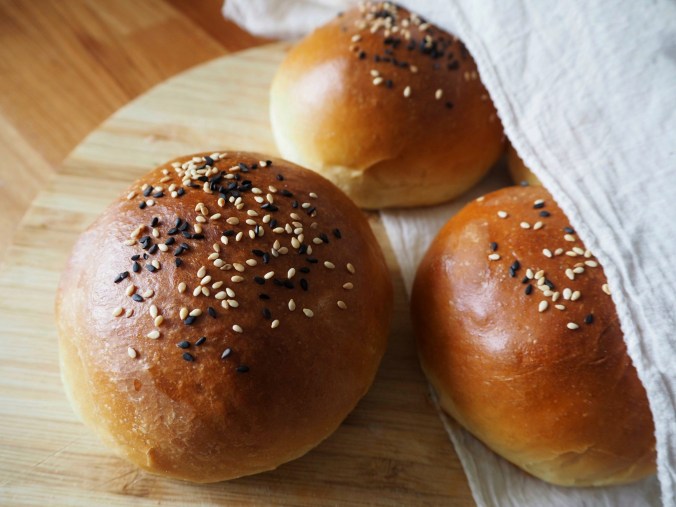
Hampurilaissämpylöitä kaupasta metsästävällä on yleensä huono tuuri: valmiit sämpylät ovat joko teollista mössöä tai sitten, hankalan muotoisia tai muuten epäsopivia hampurilaiskäyttöön. Maailmalla on käytetty vuosikausia hampurilaisiin briossi-tyyppisiä pullamaisia sämpylöitä, koska ne korostavat mukavasti miedolla makeudellaan hampurilaisen muita makuja. Lisäksi niiden jämäkämpi rakenne kestää raskaankin pihvin hyvin. Briossisämpylöitä vaan ei Suomessa ole juurikaan tullut vastaan.

OLYMPUS DIGITAL CAMERA

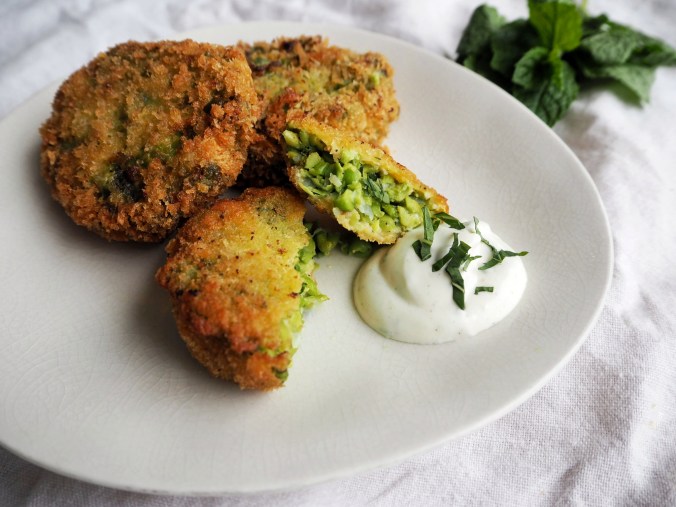
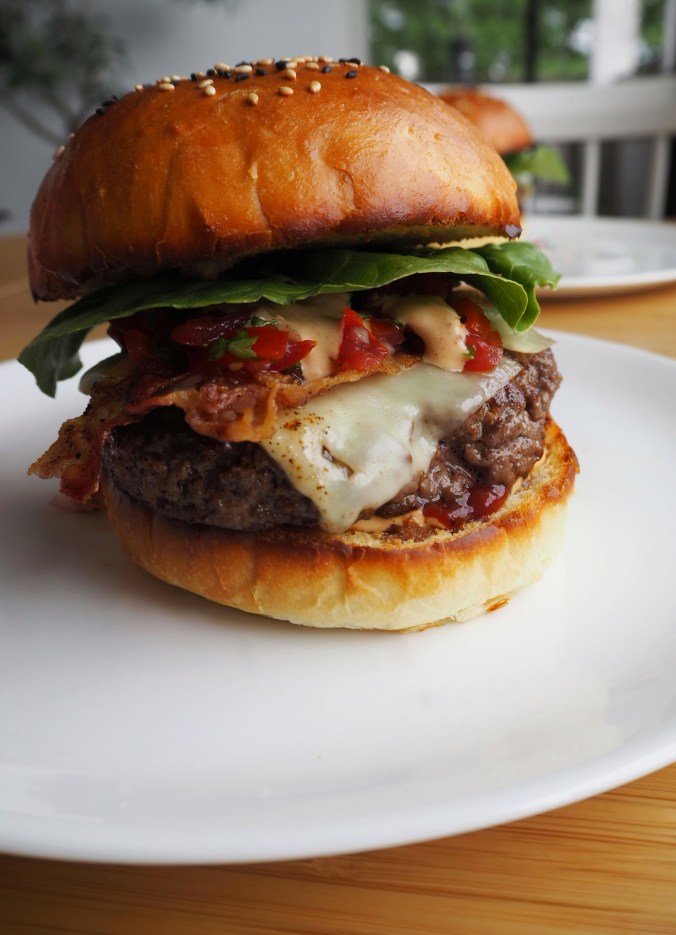
Tässä täyte-ehdotus | Here’s a finished example

Päätin sitten itse pyöräyttää sämpylät. Yhdistelin useita eri reseptejä ja päädyin tällaiseen, jossa on briossimaisia piirteitä, mutta se ei ole ihan täysiverinen briossi. Siinä nesteenä maitoa ja lisäksi maltillisesti voita ja öljyä, joten taikinaa on helppo käsitellä. Itse kohotin taikinaa ensimmäisen kerran yön yli jääkaapissa, mutta 2-3 tuntia huoneenlämmössä ajanee suunnilleen saman asian. Kylmäkohotuksella saa enemmän makua sämpylään, kun hiiva pääsee tekemään pidempään taikojaan, mutta hampurilaisessa on monta muutakin komponenttia tuomassa makua. Joka tapauksessa nämä pullat vaativat yhteensä vähintään 4 tunnin kohottelut, joten aikaa kannattaa varata.

Resepti on neljällä sämpylälle, mutta sen voi helposti tuplata isommalle porukalle.

OLYMPUS DIGITAL CAMERA

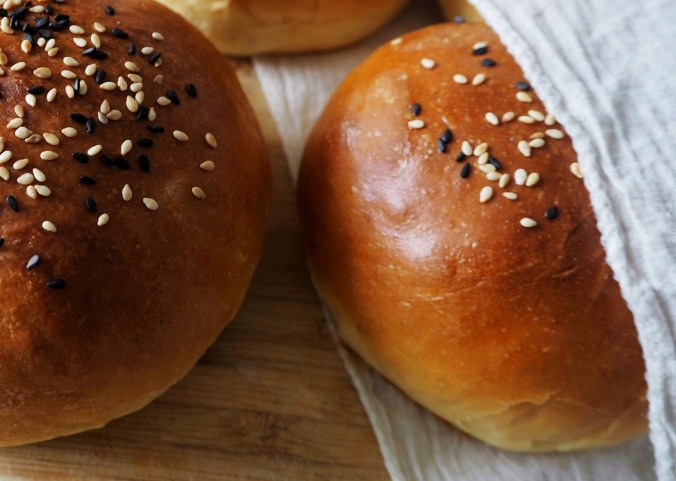
Briossimaiset hampurilaissämpylät
4 kpl

Ainesosat
1½ dl maitoa
2 tl kuivahiivaa
1 rkl sokeria
1 kananmuna
20 g voita
4½ dl vehnäjauhoja
1 rkl oliiviöljyä

Voiteluun
1 kananmuna
Seesaminsiemeniä

  • Lämmitä maito mikrossa tai liedellä 42-asteiseksi (eli selvästi lämpimän tuntuiseksi). Sekoita maitoon kuivahiiva ja sokeri.
  • Lisää kananmuna ja sekoita se maitoon. Pilko tai nypi voi pieniksi nokareiksi ja lisää maidon joukkoon.
  • Lisää jauho ja suola muutamassa erässä ja sekoita taikinaksi. Lisää öljy viimeiseksi ja taittele se taikinaan. Kumoa taikina jauhotetulle pöydälle ja vaivaa sitä ainakin 5 minuuttia tai kunnes taikina on mukavan elastista eikä tartu enää sormiin.
  • Laita taikina takaisin kulhoon ja peitä kelmulla. Laita jääkaappiin nousemaan yön yli. Kiireessä voit jättää taikinan nousemaan pariksi tunniksi huoneenlämpöön.
  • Ota noussut taikina pois kulhosta ja jaa se neljään osaan. Muotoile kustakin osasta sämpylä tekemällä käsistäsi kupin ja pyörittämällä taikinapalloa kuivaa pöytää vasten käsien muodostaman kupin alla. Taikinan pinta siliää ja kiristyy. Siirrä uunipellille ja peitä leivinliinalla. Toista lopuilla sämpylöillä. Jätä sämpylät nousemaan kahdeksi tunniksi.
  • Lämmitä uuni 200-asteiseksi. Riko voitelukananmunan rakenne ja voitele sämpylät kauttaaltaan. Ripottele päälle seesaminsiemeniä niin halutessasi. Paista sämpylöitä 10-15 minuuttia uunin keskitasolla tai kunnes ne ovat kauniin kullanruskeita.
  • Ota valmiit sämpylät uunista ja anna jäähtyä. Leikkaa jäähtyneet sämpylät halki ja paahda ne leivänpaahtimessa tai uunissa grillivastuksen alla ennen täyttämistä. Kokoa hampurilainen ja ahmi kitusiisi!

Juu, ei ole kovin perinteinen sämpylä, ei taatusti kovin nopea, mutta kannattaa kokeilla, koska hyvällä sämpylällä minkä tahansa hampparin voi upgreidata astetta paremmaksi. Lisäksi itsetehdyt briossisämpylät tuovat varmasti arvostusta vierailta grillijuhlissa.

Maukasta viikonloppua!

-Toni

OLYMPUS DIGITAL CAMERA

I’ve made hamburgers a couple of time lately since my local shop started selling quality ground beef. The patty, whether it’s beef, pork, chicken, fish or veggies, is the heart of the burger, but it’s often the easiest to make. A good bun, though, is a different story.

Here in Finland it’s basically impossible to buy good-quality hamburger buns anywhere: the store-bought buns are either the usual white fluff, or wrong sized or shaped, or just not great for burgers. The brioche bun has been the go-to bun for years now for top tier burger joints, and rightly so: their slightly sweet taste compliments the fillings and brings out their flavour. Additionally, they are structurally more sound and can handle even a thicker patty without becoming soggy. However, I’ve yet to encounter brioche buns available for purchase in Finland.

So, I decided to make my own brioche buns. I combined a couple of recipes and ended up with this bun, which has brioche-style characteristics but isn’t a full-blown brioche with obscene amounts of butter. The small amount of butter and some oil in the recipe make the dough easy to handle, and are of course good for the taste. I proofed the dough overnight in the fridge like I usually do with all breads. However, 2 or 3 hours in room temperature will get you there as well. The cold proofing creates more flavour as the yeast has more time to do its magic, but the burger has a lot of components rich in flavour so it’s not as crucial with this sort of buns. However you decide to proof your buns, it takes at least 4 hours, so be patient.

This recipe is for four buns, but it can easily be doubled to fit needs of a bigger crowd.

Brioche- style Hamburger Buns
4 buns

Ingredients
1½ dl milk
2 tsp. yeast
1 tbsp. sugar
1 egg
20 grams butter
4½ dl flour
1 tbsp. olive oil
1 tsp. salt

Finishing
1 egg for egg wash
Sesame seeds

  • Warm the milk to 42 degrees Celsius in the microwave or on the stove. Mix in the yeast and the sugar.
  • Add the egg and mix. Cube the butter and add to the milk.
  • Add the flour and salt in a couple batches and mix to form a dough. Finally, add the oil and fold it in.
  • Transfer the dough onto a table and knead for at least 5 minutes until the dough is nicely elastic and doesn’t stick to fingers. Place the dough back into the bowl and cover with cling film. Put the bowl in the fridge and proof the dough overnight. You can also proof the dough in room temperature for 2-3 hours, if you’re in a hurry.
  • Take the proofed dough out the bowl and divide into four balls. To shape the buns, make a cup out of your hands and use it to roll the ball of dough against a table. After a while, the bun will be nicely round and smooth. Place onto a baking sheet and cover with tea towel. Repeat with the remaining buns. Proof the buns again for about two hours in room temperature under the tea towel.
  • Pre-heat the oven to 200 degrees Celsius. Lightly whisk the egg and wash the buns with it. Sprinkle some sesame seeds on top, if desired. Bake the buns in the middle rack in the oven for 10 to 15 minutes, or until golden brown.
  • Take the buns out of the oven and let them cool. Before serving, slice the buns and toast them in a toaster or in the oven under the grill. Assemble with a patty and condiments of your choosing and devour!

Yeah, I know it’s not your ordinary breakfast roll recipe, and it’s not quick to make, but a superb bun upgrades your burger to a next level. Also, it’s a sure way to earn compliments in a barbecue party.

Enjoy your weekend!

-Toni


Raparperipaistos & Vaniljakastike | Rhubarb Crumble & Vanilla Custard

Varmoja kesän merkkejä on joka vuosi touko-kesäkuussa maasta ylös puskevat mehevät raparperit, ja myös niistä mesoavat suomalaiset. Joku media kertoi taannoin raparperipiirakan olevan joka vuosi alkukesästä etsityin resepti. Noh, lyödäänpäs nyt sitten lusikka tähän soppaan, tai siis vuokaan.

Raparperi on myös yksi kasviksista, joka on säilynyt sesonkiherkkuna globaalin elintarvikerallinkin aikana. Syynä siihen lienee raparperin totuttelemista vaativa hapan maku, oksaalihappopitoiset myrkylliset lehdet sekä se, että raparperi on parhaimmillaan vaan tässä alkukesästä, kun varret ovat vielä mureita eivätkä tuhottoman happamia.

OLYMPUS DIGITAL CAMERA

Sokeri mehustaa raparperit sopivasti ennen kypsennystä | Sugar draws out the juice in the rhubarb

Ulkomaisissa resepteissä raparperia näkee usein suolaisen ruoan lisäkkeenä tai mausteena, mutta Suomessa 99,8 % varsista taitaa mennä kurkusta alas vaniljajäätelön tai -kastikkeen kanssa. Maitotuotteiden syöminenhän liittyy pelkoon siitä, että oksaalihappo sitoo kalsiumia elimistöstä, jos sitä ei ole ravinnossa. Näinhän se ymmärtääkseni menee, mutta pelko on suurimmaksi osaksi kaiketi turha, koska suurin osa raparperin oksaalihaposta on lehdissä, joita ei syödä muutenkaan. Lisäksi raparperia syödään yleensä hyvin satunnaisesti, joten oksaalihappokertymästä ei tarvitse huolestua.

Tavallisin raparperiherkku on tietenkin se piirakka. Jotkut tekevät sen pilkotusta raparperista, toiset keittävät raparperin ensin kiisseliksi. Siinä lienevätkin piirakan tärkeimmät variantit, joten jätän piirakkaohjeet kunkin suvun salaisiksi resepteiksi. Kaurainen raparperipaistos sen sijaan on mukava herkku, jossa kauran pehmeä maku ja rapea rakenne yhdistyvät raparperin happamuuden ja makeuden kanssa oikein mainioksi yhdistelmäksi. Paistosta voi myös varioida loputtomasti lisäämällä kauden muita hedelmiä ja marjoja mukaan, tai muuttamalla murun maustamista. Erityisesti annosvuoissa tarjoiltuna tämä jälkkäri tuo jokaiselle syöjälle hyvän mielen, kun saa tuhota itse koko kulhon (saatan olla tosin yksin tämän tunteen kanssa). Lisäksi tämä herkku on gluteeniton, kunhan huolehtii, että kaurahiutaleet ja -jauhot ovat gluteenitonta sorttia.

OLYMPUS DIGITAL CAMERA

Valmiina, paikoillanne, uuniin! | Four cocottes reporting for duty, sir!

Bonuksena, tai oikeastaan vähintään yhtä tärkeänä palasena, on klassinen vaniljakastike. Jostain syystä en ollut viime vuosina tehnyt perinteistä vaniljakastiketta. Olen tyytynyt makeuttamaan jogurtti-ranskankermaseoksen ja maustamaan sen vaniljalla. Hyvää sekin on, mutta siitä uupuu aidon vaniljakastikkeen täyteläisyys ja pehmeys. Tämäkin kuitenkin on verrattain helppo valmistaa, kunhan vain jaksaa sekoittaa tarpeeksi, ettei maito pala pohjaan. Kastike hyytyy varsinaisesti kananmunan keltuaisilla, mutta ikään kuin vakuutuksena voi käyttää maissi- tai perunatärkkelystä. Lusikallinen tärkkelystä toimii stabilointiaineena ja helpottaa kastikkeen onnistumista. Hooceimmat kokit voivat jättää tärkkelykset pois, mutta ainakin ensikertalaisille suosittelen niiden käyttämistä, ettei tarvitse heittää pois juoksettunutta kastiketta.

OLYMPUS DIGITAL CAMERA

Raparperipaistokset & vaniljakastike
4 annosta

Ainekset
300 g kuorittua raparperia (noin 6-8 vartta)
1 dl ruskeaa sokeria (esim. kookossokeri)
25 g voita
2 dl isoja kaurahiutaleita
2 rkl kaurajauhoa (muukin jauho käy)
ripaus kanelia
ripaus muskottipähkinää
ripaus kardemummaa

Vaniljakastike
2 dl kuohukermaa
1 dl maitoa
3 kananmunan keltuaista
½ rkl maissitärkkelystä
2 rkl sokeria
reilu ripaus vaniljajauhetta tai puolikas vaniljatanko

  • Laita uuni lämpiämään 200-asteiseksi.
  • Kuori raparperit ja pilko ne puolen sentin paksuisiksi viipaleiksi. Laita raparperiviipaleet kulhoon ja kaada mukaan sokeri. Sekoita ja jätä mehustumaan siksi aikaa, kun teet kastikkeen ja murun.
  • Tee kastike. Mittaa kerma ja maito pieneen kattilaan. Laita mukaan vaniljajauhe. Jos käytät vaniljatankoa, halkaise se ja kaavi sisältä siemenet kerman sekaan. Kuumenna seos kiehuvaksi koko ajan sekoittaen, jotta maito ei pala pohjaan.
  • Sekoita toisessa kattilassa kananmunan keltuaiset, maissitärkkelys ja sokeri. Vatkaa kevyesti vispilällä. Kaada kattilaan kuuma kerma-maitoseos ja sekoita. Laita kattila liedelle, joka on miedolla lämmöllä. Sekoita jatkuvasti, kun kastike paksunee ja alkaa tarttua vispilään tai lusikkaan. Siirrä kastike kannuun tai kulhoon ja laita jääkaappiin tai pakastimeen jäähtymään.
  • Tee muru. Mittaa kulhoon kuutioitu voi, kaurahiutaleet, jauho, sokeri ja mausteet. Nypi seos sormin muromaiseksi massaksi.
  • Kokoa paistokset. Voit tehdä joko yhden ison tai neljä pientä paistosta. Kaada ensin mehustuneet raparperit mehuineen uunivuokaan tai annosvuokiin. Jaa sitten muruseos tasaisesti raparperien päälle. Sekoita kevyesti. Laita paistokset uuniin keskitasolle ja paista 20 minuuttia, tai kunnes raparperit ovat pehmenneet ja muru on saanut hieman väriä. Anna jäähtyä hetki ennen tarjoilua.
  • Tarjoile raparperipaistos jäähtyneen vaniljakastikkeen kanssa.

No, joko on naapurin ramppanperit nyysitty? Mites vaniljakastike, ostatko sen jatkossakin kylmähyllystä, vai aiotko kokeilla itse keittelemistä?

Kesäisin (sateisin) terveisin,
-Toni

Rhubarbs pushing their stalks through the soil towards to sky is a sure sign of the summer’s arrival, and so is the food media going bonkers over rhubarb recipes. Some Finnish food medium told recently that rhubarb pie is their most searched recipe every year in early June. Well, I can’t resist the temptation either, so here goes my rendition.

The rhubarb is one of the produce items that has resisted the global food market’s endeavours to have everything available always, and still today remains as a truly seasonal treat. The reason for the resistance might have something to do with the sour taste that requires some getting used to, the poisonous leaves containing ample amounts of oxalic acid, and the fact that the juicy stalks are at the best in early Summer, and later in the summer they get even more sour and bitter and fibrous.

I’ve encountered rhubarb used in savoury cooking mostly in recipes outside of Finland, but here rhubarb is almost exclusively shoved down the pie-hole covered in vanilla custard or ice cream. The reason people are eating rhubarb with dairy products is the fact that oxalic acid binds calcium from the body unless there is some available in the accompanying food. This is true, to my understanding, but still the fear is mostly misplaced: a vast majority of the oxalic acid in rhubarb is in the leaves (which are not to be eaten), and also the sporadic consumption of rhubarb prohibits dangerous amounts of oxalic acids building up in the body. So keep munching your rhubarbs (with moderation) without feelings of misplaced guilt.

The most usual rhubarb treat, and rightly so, is of course the Rhubarb Pie. Some people make the pie with chopped rhubarb, some boil the stalks into a compote before ladling onto a crust. That’s about the variation the pie will get you, so I’ll leave the rhubarb pie recipes as family secrets. However, a crumble with crunchy oats is a different story: a delightful dessert that combines the mellow taste and the wonderful crunch of the rolled oats with the tang of the rhubarb, all wrapped up in a comforting cocoon of sugar and vanilla sauce. (Well, that got a little out hand, pardon me.) Furthermore, this dish can be varied endlessly by adding other season fruits and berries, or changing the spices in the crumble. This treat is also more accommodating as it is gluten-free, as long as you make sure to use gluten-free rolled oats and oat flour.

As a bonus, or rather as equally important piece of the experience, I’ll give a recipe for a classic vanilla custard. I hadn’t made a real custard in years before now. I used to mix yoghurt, sour cream, sugar and vanilla and call that a vanilla sauce. Although that is good as well, the thick and soothing vanilla custard is in a league of its own. Custard seems to be regarded as something tricky to make, but I assure you it’s not that hard: you just need to make sure not burn the milk. The egg yolks do the emulsifying here, but adding a spoonful of corn starch to the yolks adds a layer of security (or stability, actually) and makes the creation of perfect custard that much more likely. The most hardcore cooks out there can skip the starch, but for all other I suggest adding a spoonful of insurance to the pot.

Rhubarb Crumble & Vanilla Custard
4 portions

Ingredients
300 g peeled rhubarb (about 6-8 stalks)
1 dl brown sugar (for example coconut sugar)
25 g butter
2 dl jumbo rolled oats
2 tbsp. oat flour (or other flour)
pinch of cinnamon
pinch of nutmeg
pinch of cardamom

Vanilla Custard
2 dl heavy cream
1 dl milk
3 egg yolks
½ tbsp. corn starch
2 tbsp. caster sugar
a generous pinch of vanilla powder or half of a vanilla pod

  • Pre-heat the oven to 200 degrees Celsius.
  • Peel the rhubarb and cut into half a centimetre thick slices. Put the slices in a bowl with the brown sugar and mix. Let sit while you make the custard and crumble.
  • Make the custard. Measure the cream and milk in a small saucepan. Add the vanilla. If using vanilla pod, cut it lengthwise and scrape the seeds into the cream. Put the mixture on heat and bring to a boil while mixing the whole time to prevent burning the milk. Remove from heat.
  • In another saucepan, whisk the egg yolks, corn starch and sugar lightly. Pour in the hot cream mixture, mix thoroughly and place on low heat. Whisk the sauce constantly until the sauce thickens and starts to cling to the whisk or the back of a spoon. Remove from heat, transfer into a bowl or a small jug and place in the fridge or freezer to cool down.
  • Make the crumble. Cube the butter into a bowl, measure in the rolled oats, flour, sugar and spices. Knead until an evenly textured crumble forms.
  • Assemble the portions. You can do one large pot or four small cocottes. Measure the rhubarb with the juice into the oven dish(es) and spread the crumble evenly on top. Mix lightly. Put the dish(es) into the oven and bake for about 20 minutes, or until the rhubarbs are soft and the crumble is nicely golden. Let cool for a while before serving with the cooled vanilla custard.

So, have you stolen borrowed your neighbour’s rhubarbs already? How about the custard, still reaching out for the ready-made carton in the supermarket, or do you make your own?

Summer (rain) greeting,
-Toni

Minttuiset hernekroketit | Pea and Mint Croquettes

Kesä näyttää viimein saapuvan pikkuhiljaa tänne pohjolaan. Sen mukana saapuu myös himo herneitä ja muita kesäisiä kasviksia kohtaan. Kesäinen sää saikin minut selailemaan pitkästä aikaa Ottolenghin Plenty More -opusta, joka on ainakin omasta mielestäni modernin kasvisruoan merkkiteoksia. Kyseisestä teoksesta on aiemminkin täällä vilahtaneet jo thaihenkinen linssisoppa ja vihreä papupata. Ottolenghin kasvisreseptit eivät ole sieltä yksinkertaisimmasta päästä, mutta vaivannäkö palkitaan komeasti välimerellisen muhkealla makumaailmalla.

OLYMPUS DIGITAL CAMERA

Tässä reseptissä on hieman erikoista se, että hernetäytteeseen laitetaan sideaineeksi vain yksi kananmuna. Täyte on siis hyvin irtonaista, mutta se pakastetaan käsiteltäviksi pihveiksi. Pakastaminen onkin tosi kätevä tapa käsitellä tällaisia raaka-aineita, mutta se vaatii luonnollisesti myös aikaa. Nämä kroketit voi kuitenkin tehdä paistamista vaille valmiiksi ja säilyttää pakkasessa vaikka kuinka pitkään.

OLYMPUS DIGITAL CAMERA

Tein kroketit kotimaisista pakasteherneistä, jotka kuulemma pakastetaan muutaman tunnin sisällä poiminnasta. Kroketit voi tietenkin kesän tullen tehdä tuoreista herneistä, mutta se vaatii jo vähän enemmän käsityötä kuorimiseen (ja myös rahallista panostusta). Mintuksi kannattaa valita ”vahvana minttuna” myytävä paksuruotinen yrtti, jossa on merkittävästi perinteistä minttua voimakkaampi maku. Jos vahvaa minttua ei kaupasta löydy, käytä hieman enemmän tavallista minttua.

Herne-minttukroketit
10-12 krokettia

Ainekset
2 pss (400 g) pakasteherneitä tai vastaava määrä tuoreita
2 salottisipulia
1 valkosipulinkynsi
1 rkl valkoviinietikkaa
pieni nippu vahvaa minttua
1 kananmuna
suolaa ja pippuria

Panerointiin ja friteeraukseen
2 kananmunaa
jauhoja
panko-korppujauhoja
1 litra rypsi/rapsiöljyä

Kastike
200 g ranskankermaa
2 rkl turkkilaista jogurttia
1 rkl oliiviöljyä
2 tl limemehua
suolaa ja pippuria
minttua

  • Tee ensin kroketit. Kuori ja silppua sipulit. Kuumenna tilkka oliiviöljyä paistinpannulla tai kasarissa keskilämmöllä ja lisää sipulit. Kuullota viitisen minuuttia, älä ruskista. Lisää ruokalusikallinen valkoviinietikkaa, sekoita ja hauduta vielä minuutti. Ota syrjään.
  • Sulata herneet. Laita herneet monitoimikoneeseen ja surauta sen verran, että herneiden rakenne rikkoutuu. Voit muussata herneitä kevyesti myös kulhossa perunanuijalla. Silppua mukaan kourallinen minttua. Lisää mukaan paistetut sipulit. Mausta suolalla ja pippurilla. Riko mukaan yksi kananmuna ja sekoita massa tasaiseksi.
  • Ota leikkuulauta tai muu astia, joka mahtuu pakkaseesi. Laita laudan päälle leivinpaperi. Lusikoi hernemassaa laudalle 10-12 keoksi ja painele kevyesti pihveiksi. Massa on hyvin irtonaista, joten sitä on helpointa siirrellä lusikalla. Laita hernekroketit pakkaseen ja anna niiden pakastua ainakin tunti, tai kunnes ne ovat kokonaan jähmettyneitä.
  • Ota kroketit pakkasesta. Ota esiin kolme kulhoa: laita yhteen reilu desi jauhoja, riko toiseen kananmunat ja vatkaa niiden rakenne rikki, ja kaada kolmanteen reilusti korppujauhoja. Paneroi kroketit yksi kerrallaan: pyörittele kroketti ensin kauttaaltaan jauhoissa, kasta sitten kananmunassa ja kuorruta lopuksi koko pihvi korppujauhoissa. Painele korppujauhot kunnolla kiinni krokettiin. Jos paistat kroketit heti, jätä ne sulamaan tunniksi huoneenlämpöön. Voit myös pakastaa ne ja paistaa tarvittaessa vaikka yksitellen.
  • Tee kastike tässä välissä: silppua muutama ruokalusikallinen minttua ja sekoita muiden ainesten kanssa pienessä kulhossa. Jätä jääkaappiin maustumaan.
  • Laita uuni lämpiämään 200-asteiseksi. Kaada öljy kattilaan ja laita kuumenemaan hellalle. Voit testata öljyn kuumuuden paistamalla leivänpalalla: jos öljyyn pudotettu leipä alkaa heti kuplia ja paistuu noin puolessa minuutissa kullanruskeaksi, öljy on tarpeeksi kuumaa. Paista kroketit kattilan koosta riippuen 2-4 kerrallaan. Paista muutama minuutti per puoli ja käännä pihvit reikäkauhaa tai pihtejä käyttäen. Kun kroketit ovat kullanruskeita, nosta ne talouspaperin päälle valumaan. Laita valutetut pihvit uuniin lautaselle tai uunivuokaan kypsymään loppuun samalla kun paistat loput kroketit. Laita lopuksi viimeisetkin kroketit uuniin vielä muutamaksi minuutiksi.
  • Tarjoa kroketit kastikkeen ja halutessasi lisäkkeen, esimerkiksi pitaleivän tai kuskusin kanssa.

Huom! Öljyn voi säästää ja käyttää ainakin vielä toisen kerran uudestaan. Säilytä käytetty öljy jääkaapissa. Älä kaada öljyä viemäriin, vaan kaada jäähtynyt öljy takaisin pulloonsa ja laita energiajätteeseen muovipussissa.

OLYMPUS DIGITAL CAMERA

OLYMPUS DIGITAL CAMERA


The summer is finally reaching the North (some days more than others), which made me want to eat all the wonderful summer vegetables. In these situations, I pick out Ottolenghi’s ‘Plenty More’ from the bookshelf. To me Plenty More is one of the quintessential modern vegetarian cook books that has a unique perspective on meat-free cooking. Ottolenghi doesn’t really substitute meat with anything but creates gorgeous Mediterranean inspired dishes that just don’t happen to include meat. I have previously shared with you a couple of the recipes from Plenty More: Thai Red Curry Soup and Broad Bean Stew. Ottolenghi’s recipes are not the simplest or the quickest, but the effort is rewarded with wonderfully sensory experience in the Mediterranean style.

I have made these pea croquettes a couple of times and they have always turned out perfect. The fresh combination of peas and mint balances the rich flavour of the deep frying nicely, so you don’t have to worry about feeling greasy after eating these. I have used deep frying quite a lot on this blog, but I like it as a method because it maximises flavour and keeps the food from drying out. You just have to make sure the oil is hot enough to make sure you don’t end up with greasy croquettes, as hot oil doesn’t absorb into the food. Also, make sure to drain the croquettes on some tissue paper to drain the excess oil.

The odd thing about this recipe is that there’s only one egg to bind the mass. Therefore, the filling will be very loose but the trick is to form the patties and put them in the freezer to become solid. Freezing is a super handy method for handling these kind of ingredients, but it takes some time to freeze the patties. However, you can make these croquettes ready for frying and store them in the freezer for days before cooking.

I made the croquettes with good-quality frozen peas. You can, of course, use fresh peas but they are not yet available here in Finland and they would be way too expensive since you need quite a lot. Also, the peeling takes a while too. I prefer to use strong mint for this recipe to really give the recipe the freshness it needs. The mint varieties with thick stalks are usually the strongest in flavour.

Pea and mint croquettes
10-12 croquettes

Ingredients
400 g frozen peas or fresh shelled peas
2 shallots
1 garlic clove
1 tbsp. white wine vinegar
a small bunch of strong mint
1 egg
salt and pepper

Coating and deep frying
2 eggs
flour
panko breadcrumbs
1 litre vegetable oil

Sauce
200 g sour cream
2 tbsp. Turkish yoghurt
1 tbsp. olive oil
2 tsp. lime juice
salt and pepper
mint

  • Make the croquettes first. Peel and mince the onions and garlic. Put a frying pan on medium heat and add some oil and minced onion and garlic. Cook the onions and garlic for about five minutes until translucent but not browned. Add a tablespoon of vinegar and stew for a minute, then set aside.
  • Thaw the peas. Place the peas into a food processor and blitz a couple of seconds just to break them down. Do not grind into paste. You can also lightly mash the peas in a bowl with a potato masher. Add the onions and a small bunch of minced mint. Season to taste with salt and pepper. Add the egg and mix.
  • Take out a cutting board or other tray that fits into your freezer, and line it with parchment paper. Spoon the pea mixture into 10 to 12 evenly sized dollops onto the board. Use wet fingers to pat them down to round croquettes, or patties, about 3cm thick. Put the croquettes into the freezer for at least on hour, or until firm.
  • Take the frozen croquettes out of the freezer. You’ll need three bowls for the coating: flour into one, break two eggs into the second, and a nice pile of breadcrumbs in the third. Coat the croquettes individually: first dip the croquette in flour, them dip it in the egg and make sure the egg covers the croquette, then roll the croquette in the breadcrumbs. Press the breadcrumbs tightly to the croquette so they stick nicely. Do the rest of the croquettes the same way.
  • If you are cooking the croquettes now, leave them to thaw in room temperature for about an hour. You can also put them back in the freezer and use later.
  • Make the sauce: mince some mint and mix with the rest of the ingredients in a small bowl. Season to taste with salt and pepper. Put the sauce in the fridge until needed.
  • Now for the cooking. Pre-heat your oven to 200 degrees Celsius. Pour the oil into a pan and place on medium-high heat. Wait until the oil is hot enough. You can test the oil with a piece of bread: drop the piece of bread in the oil. If the oil starts to bubble right away and the bread turns into nicely golden brown in about 30 seconds, the oil is hot enough.
  • Deep fry a couple croquettes at a time. Put them into the oil with a slotted spoon and fry for a couple of minutes before turning. Fry the other side for a couple of minutes too. The croquette should now be nicely golden brown. If the frying happens too fast, lower the temperature of the oil. If the croquettes don’t seem brown, crank up the heat. Take the cooked croquettes out of the oil with a slotted spoon and place on a plate with tissue paper to drain the excess fat. Then transfer the croquettes into the oven on a plate to keep warm while you cook the rest of the croquettes. Finally, put the last croquettes into the oven for a couple of minutes, then serve with the sauce and perhaps some pita bread or couscous. Enjoy!

NB! You can use the oil at least once for frying. Store the used oil in the fridge. When it’s time to dispose of the oil, do not pour it down the drain. Put it back into its bottle and dispose of according to local instruction.

OLYMPUS DIGITAL CAMERA