Hei siellä! Pientä eloa tännekin reseptin muodossa. Minulta on kyselty useampaan kertaan näiden suolaisten korvapuustien ohjetta, kun olen tehnyt niitä tarjottavaksi, joten ajattelin tallentaa reseptin tänne luettavaksi. Alkuperäinen resepti on Benjamina Ebuehin, kuten suurin osa lempiresepteistäni, mutta muutin tätä hieman sopimaan suomalaisen ruokakaupan ainesosatarjontaan. Alun perin reseptissä oli Marmite-levitettä ja Comté-juustoa, joita ei kyllä ihan joka kaupasta täällä pohjolassa saa, mutta gruyére ja misotahna pääsevät varmasti aika lähelle tarkoitettua makumaailmaa. Benjiltä on muuten tässä kuussa ilmestymässä uusi kirja ’I’ll Bring Dessert’ jota odotan jo innolla!
Nämä suolaiset pullat ovat upean pehmoisia ja täyteläisenmakuisia tarjottavia monenlaisissa juhlissa, koska ne ovat lihattomia, säilyvät huoneenlämmössä, ja ne voi tehdä tarvittaessa jo edellisenä päivänä ja säilyttää kannellisessa rasiassa.
Muutama huomio: – Jauhoksi kannattaa valita vahva jauho, eli sellainen, mistä leipoisit normaalisti leipää. – Kuivahiivan sijaan voi käyttää tuoretta hiivaa. Liuota se kädenlämpöiseen maitoon ennen sekoittamista jauhoihin. – Kevätsipulia on monenlaista tarjolla kaupoissa. Ohuet sipulit voi käyttää kokonaan, paksummista kannattaa käyttää vihreät ja vaaleanvihreät osat ja säästää valkoinen pää muuhun ruuanlaittoon. – Mison määrää voi säätää oman maun mukaan. Tavallisissa marketeissa on tarjolla yleensä juuri valkoista misoa, joka on vaaleanruskeaa väriltään. Etnisistä kaupoista saa sitten muitakin värejä, jotka toki myös sopivat tähän reseptiin tarvittaessa.
Täytteeksi: 150–200 g maustamatonta tuorejuustoa 1 rkl valkoista misotahnaa 150 g gruyérejuustoa raastettuna 1 nippu kevätsipulia mustapippuria myllystä
– Sekoita jauho, suola, sokeri ja kuivahiiva kulhossa. Lämmitä maito 40-asteiseksi ja kaada jauhojen joukkoon. Lisää joukkoon vatkattu kananmuna. Alusta taikinaa käsin tai yleiskoneella 6–8 minuuttia. Anna taikinan levätä 10 minuuttia, ja jatka sitten vaivaamista hetken aikaa. Lisää taikinan joukkoon pehmeä voi ja sekoita tasaiseksi. Peitä taikinakulho leivinliinalla ja jätä nousemaan vedottomaan paikkaan 1–2 tunniksi kunnes taikinan koko on tuplaantunut.
– Valmistele täytteet: sekoita tuorejuusto ja misotahna, raasta juusto ja hienonna kevätsipuli.
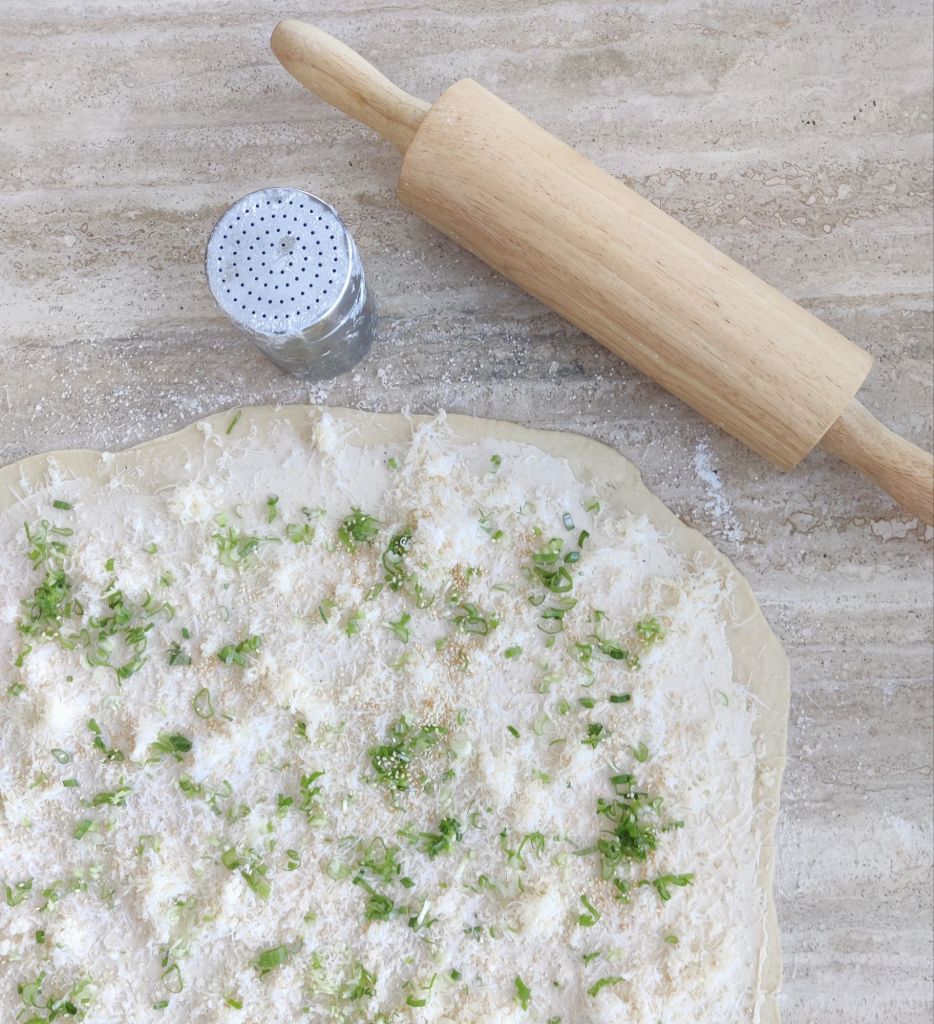
– Kumoa noussut taikina jauhotetulle työtasolle ja kaulitse noin 35 x 25 cm suorakaiteen muotoiseksi (kuten korvapuusteja tehdessä). Levitä taikinan päälle tasaisesti tuorejuusto, juustoraaste ja kevätsipuli. Rouhi päälle mustapippuria. Painele täytteitä hieman, jotta ne eivät liiku, kun rullaat taikinan.
– Rullaa pidemmän reunan mukaisesti taikina tiukalle rullalle. Leikkaa veitsellä tai taikinalastalla 12 yhtä suureen palaan. Asettele palat pystyyn (leikkauspinta ylöspäin) muffinssivuokaan tai paperisiin muffinssikuppeihin. Asettele kierteet uunipellille ja peitä leivinliinalla. Anna kierteiden nousta uudelleen lämpimässä paikassa 30–45 min.
– Lämmitä uuni 200-asteiseksi ja paista noin 20 min, kunnes kierteiden pinta on saanut kauniisti väriä. Jäähdytä liinan alla ja tarjoile lämpiminä tai viilentyneinä.
—
Hi there!
I’m back for a little something on here too in the form of a recipe. I’ve been asked several times for the recipe for these savory swirls when I’ve served them, so I thought I’d save the recipe here for everyone to read. The original recipe is by Benjamina Ebuehi, like most of my favorite recipes, but I’ve tweaked it slightly to fit the ingredients available in Finnish supermarkets. Originally, the recipe called for Marmite and Comté cheese, which you can’t quite find in every store here in the north, but Gruyére and miso paste should come pretty close to the intended flavor profile. By the way, Benji’s new book ’I’ll Bring Dessert’ is coming out this month, and I’m already looking forward to it!
These savory swirls are wonderfully soft and flavorful snacks for all sorts of parties because they are meat-free, keep well at room temperature, and can be made the day before and stored in a container with a lid.
A few notes:
It’s best to choose strong flour, the kind you would normally use for bread.
Instead of dry yeast, you can use fresh yeast. Dissolve it in lukewarm milk before mixing it into the flour.
There are various types of spring onions available in stores. You can use the thin ones whole, or if using the thicker ones, use the green and light green parts and save the white bulb for other cooking.
You can adjust the amount of miso according to your taste. Typically, regular supermarkets offer white miso, which is light brown in color. Asian shops may offer other colors, which can also work for this recipe if needed.
Spring onion & Gruyère twists 12 twists
Dough: 400 g wheat flour 1 bag dried yeast (10g) 1 tbsp sugar 1 tsp salt 2 dl milk 1 egg 50g butter, room temperature
Filling: 200 g cream cheese 1 tbsp white miso 150 g gruyere cheese, grated 1 bunch of spring onions black pepper
– Mix flour, salt, sugar, and dry yeast together in a bowl. Warm the milk to 40 degrees Celsius and mix it into the flour. Add in the beaten egg. Knead the dough by hand or with a stand mixer for 6-8 minutes. Let the dough rest for 10 minutes, then continue kneading for a while. Mix in the softened butter until smooth. Cover the dough bowl with a kitchen towel and let it rise in a draft-free place for 1-2 hours until doubled in size.
– Prepare the fillings: mix cream cheese and miso paste, grate the cheese, and finely chop spring onions.
– Turn out the risen dough onto a floured work surface and roll it out into a rectangle of about 35 x 25 cm (like when making cinnamon rolls). Spread the cream cheese, grated cheese, and spring onions evenly over the dough. Sprinkle with cracked black pepper. Press down on the fillings so they won’t move when rolling the dough.
– Roll the dough tightly into a log starting from the longer edge. Use a knife or dough scraper to cut it into 12 equal pieces. Place the pieces upright (cut side up) in a muffin tin or paper muffin cups. Arrange the twists on a baking sheet and cover with a kitchen towel. Let the swirls rise again in a warm place for 30-45 minutes.
– Preheat the oven to 200 degrees Celsius and bake for about 20 minutes until the swirls are golden brown. Cool under a cloth and serve warm or at room temperature.
Kevät vierähti jo pitkälle ja yllättävät toukohelteet räjäyttivät puistot vehreiksi. Vielä muutama viikko sitten sää oli hyvin erilainen, ja vappuna tehtiinkin ystävän kanssa japanilaishenkisiä gyoza-nyyttejä, jotka eivät ehkä ole sitä tyypillisintä helleruokaa, mutta eiköhän viileämpää säätä saavu tänne taas pian.
Nyyttejä syödään ympäri maailmaa, on muiden muassa italialaisia ravioleja, saksalaisia maultascheja, latinalaisia empanadoja ja lukemattomia erilaisia aasialaisia nyyttejä. Nyytit ovat siis täytettyjä pasta- tai taikinakuoria, jotka höyrytetään, keitetään tai paistetaan kypsäksi juuri ennen tarjoilua. Minulle tutuimpia ovat italialaisten lisäksi japanilaistyyliset gyoza-nyytit. Ne ovat itsessään jo muunnelma kiinalaisista jiaozi-nyyteistä, joskin japanilaistyylisesti maustettuna.
Gyozien valmistamisessa on kolme tärkeää mietittävää seikkaa: taikina, täyte ja kypsennystapa. Isoissa kaupungeissa aasialaisista ruokakaupoista löytää valmiita nyyttikuoria pakasteena, jotka vaan täytetään ja kypsennetään. Taikinan tekeminen itsekin on tosin hyvin helppoa, joten ilman visiittiä aasiakauppaankin pärjää. Itsetehdyn taikinan käsittelyssä voi lainata välineitä italialaisten nyyttivermeistä, eli pastakoneesta on suurta hyötyä taikinan kaulitsemisessa. Kärsivällinen kokki saa kyllä kaulimellakin hyvää jälkeä, joskaan ei ehkä yhtä ohutta.
Toinen seikka, tosin ehkä näistä kolmesta vähiten tärkeä, on täyte. Aasialaiset nyytit ovat käytännössä aina lihalla täytettyjä, mutta kokkausseuran vuoksi teimme kasvisnyyttejä. Olipa raaka-aine mikä tahansa, maustamiseen kannattaa kiinnittää huomiota, koska mauton täyte pilaa helposti koko kokemuksen. Valkosipulia, inkivääriä ja etikkaa ei siis kannata säästellä.
Kolmas kohta nyyttien tekemisessä on kypsennystapa. Vaihtoehtoja on aiemmin mainitut kolme: höyryttäminen, keittäminen ja paistaminen. Kuten otsikostakin japanin ravintolasanastoa osaava ymmärtää, nämä nyytit paistetaan, tai oikeastaan paistetaan ja sitten höyrytetään. Samat nyytit voi kuitenkin höyryttää bambuhöyryttimessä tai höyrytinkattilassa, tai keittää. Jokaisella tavalla tulee hieman erilaisia nyyttejä, koska taikina kypsyy eri tavalla, joten kannattaa kokeilla eri tapoja. Ohjeessa kuvattu paistamis-höyryttämistapa vaatii kannellisen kasarin, koska nyytit paistetaan ensin kasarissa ja höyrytetään heti perään kaatamalla kasariin kuumaa vettä ja painamalla kansi kiinni. Tapa on aluksi hieman pelottava, koska höyryä tulee paljon ja kovaäänisesti, mutta mitään kovin vaikeaa nyyttien paistaminen ei ole.
Älä asettele kuoria näin päällekkäin, nimim. käy huonosti | Don’t place the shells on top of each other, trust me.
Usein gyozia nautitaan alkupalana, mutta meillä on ollut tapana tehdä niin hervoton kasa kerralla, ettei kastikkeen lisäksi muuta ole tarvittu. Gyozat voi kuitenkin tarjoilla myös vaikka riisin tai kaalisalaatin kanssa tai ramen-nuudelien lisukkeena, jolloin pienempi määrä nyyttejä riittää. Kastike on tuttu jo ainakin kara-age -kanareseptistä, mutta se toimii kaikessa yksinkertaisuudessaan niin erinomaisesti, että mihinkäs sitä muuttamaan.
Vegaaniset Yaki Gyoza -nyytit Noin 30 nyyttiä
Ainekset
Taikinakuoret 3 dl vehnäjauhoja
1,5 dl kuumaa vettä
½ tl suolaa
Täyte ½ munakoiso
1 sipuli
kourallinen sieniä
pieni pala kaalia
1 valkosipulinkynsi
3 cm pala inkivääriä
soijaa
riisiviinietikkaa
ripaus chilijauhetta
öljyä paistamiseen
Aloita täytteestä. Kuori ja pilko munakoiso ja sipuli, putsaa, pilko sienet ja leikkaa kaali suikaleiksi. Raasta valkosipuli ja inkivääri. Hienonna kaikki hienoksi silpuksi. Voi hienontaa täytteen ainekset käsin veitsellä tai monitoimikoneella. Koneella täytteestä saa helpommin hienojakoisempaa, käsin hienonnettuna taas rustiikkisempaa. Sekoita kaikki ainekset lukuun ottamatta soijaa ja etikkaa.
Laita isohko paistinpannu kuumentumaan ja lorota sille kunnolla öljyä. Kun pannu on kuuma, kumoa täytteen ainekset pannulle ja paistele keskilämmöllä. Täyte on valmista, kun sen massa pienentynyt noin puoleen (veden haihtumisen vuoksi) ja tuoksu muuttuu täyteläiseksi. Mausta täyte soijalla ja etikalla makusi mukaan. Jätä jäähtymään.
Valmista taikina. Sekoita suola jauhoihin. Sekoita kuuma vesi jauhoihin ja sekoita tasaiseksi. Kerää taikina palloksi ja vaivaa kunnes taikina on kimmoisaa ja helposti käsiteltävää. Jos taikina ei meinaa pysyä kasassa, lisää jauhoja vähän kerrallaan. Jos taas taikina tuntuu kuivalta, lisää varovasti muutama lusikallinen vettä.
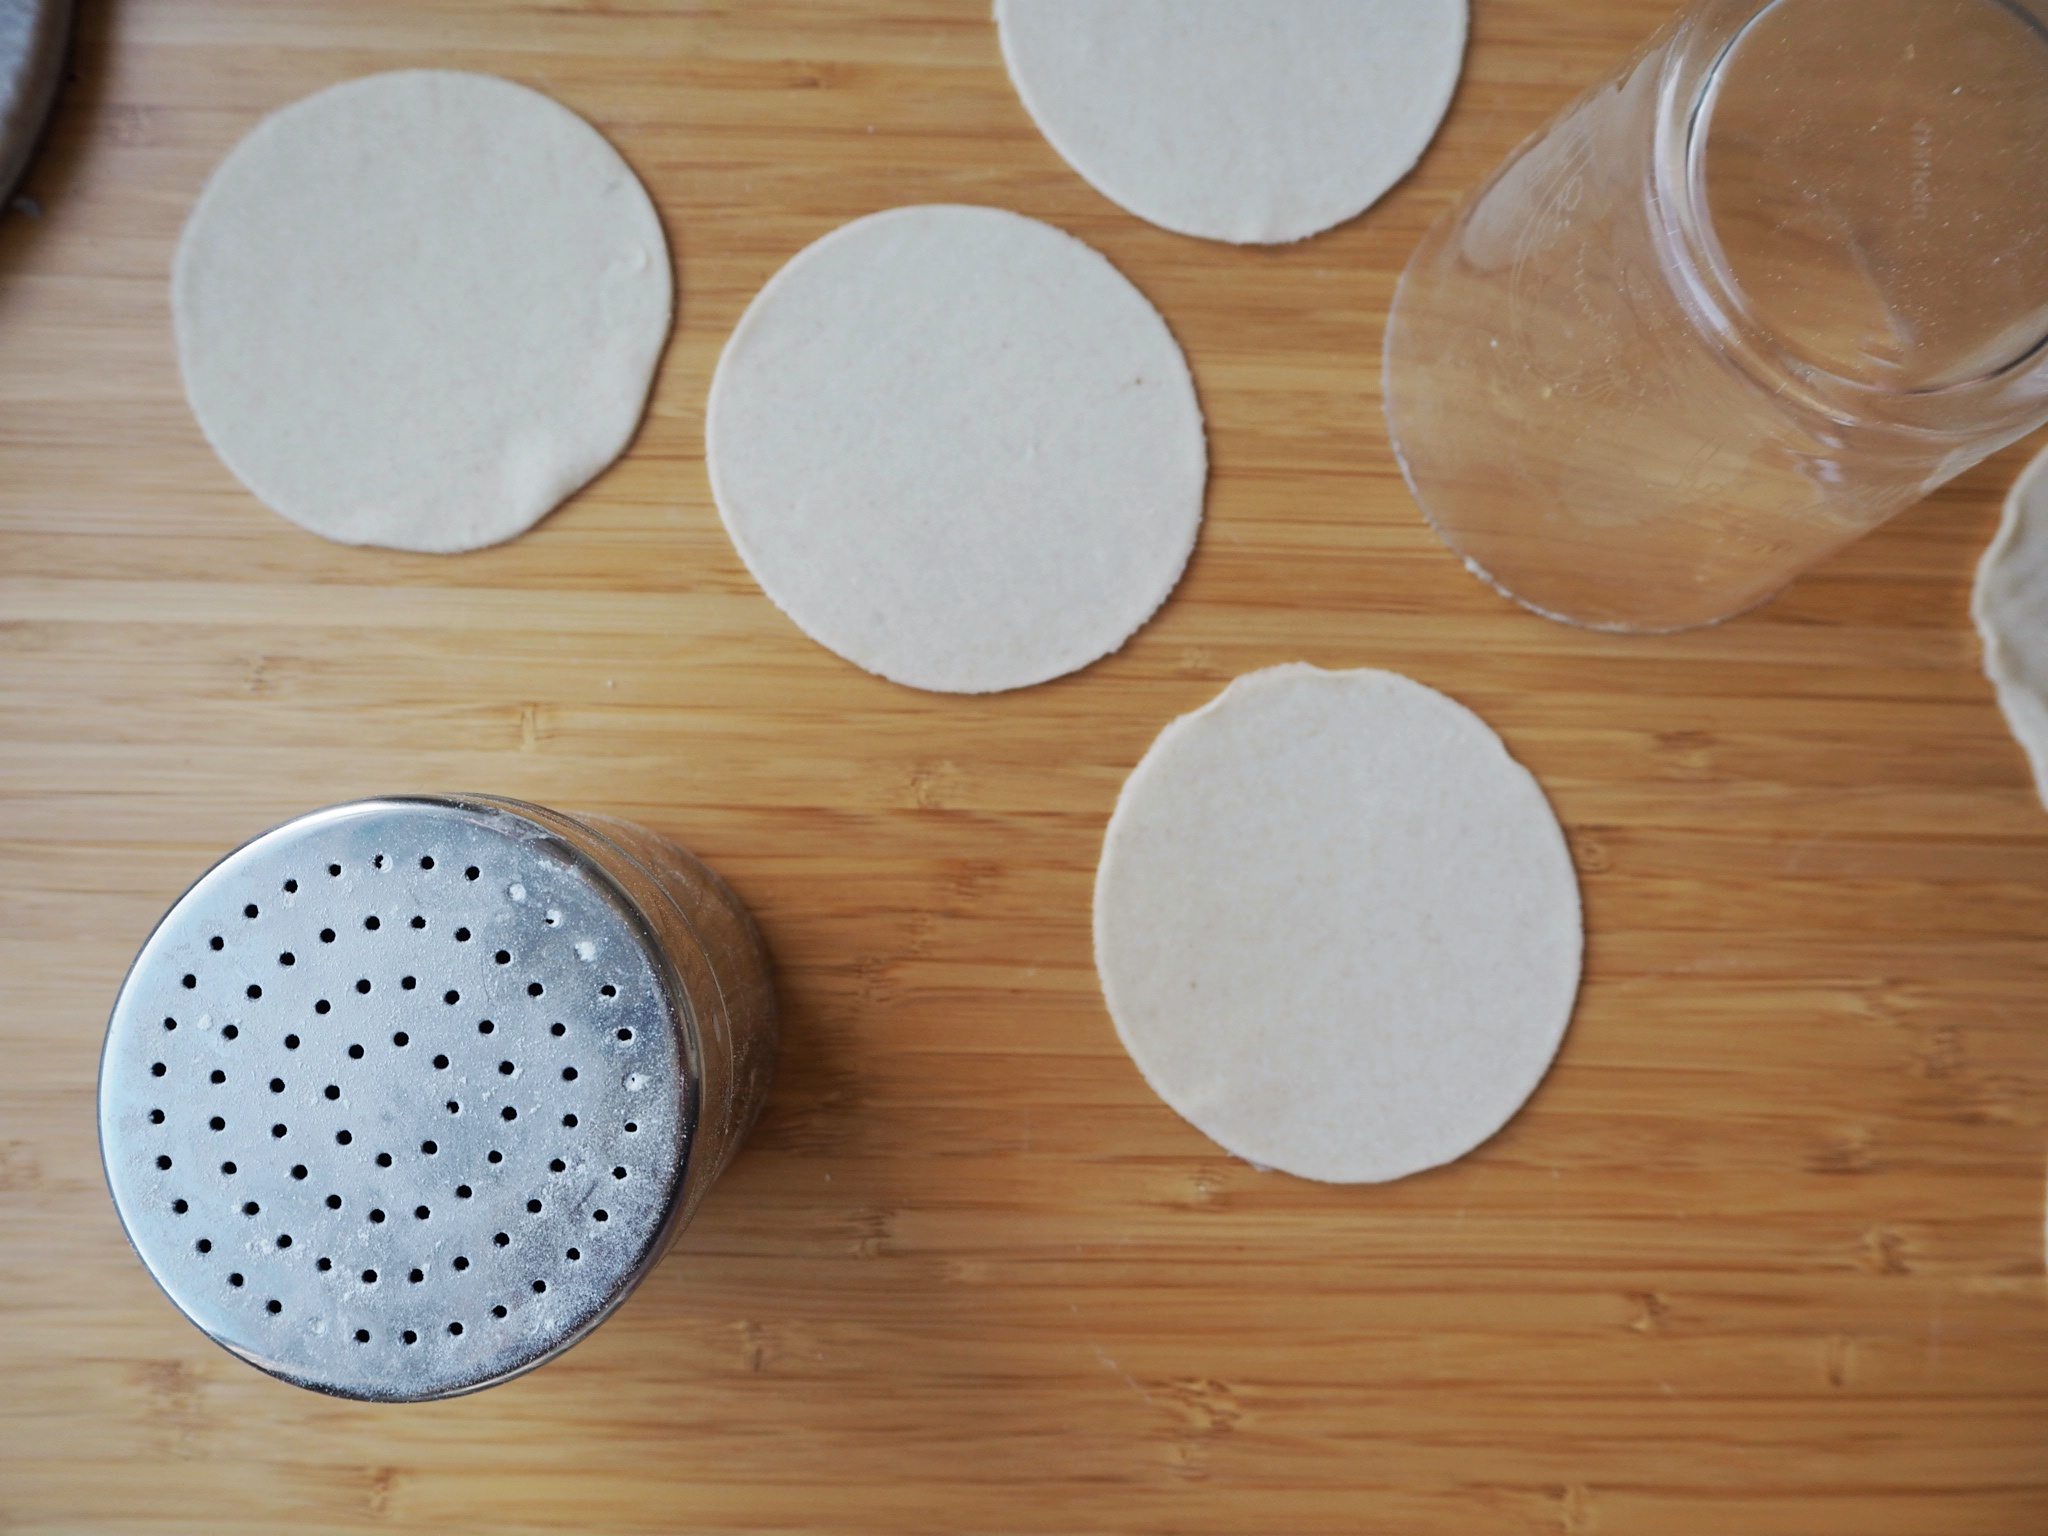
Jaa taikina neljään osaan ja laita taikinapallot leivinliinan alle, jotta ne eivät kuivu. Kaulitse taikina pallo kerrallaan muutaman millin paksuiseksi levyksi. Jos käytössäsi on pastakone, sitä kannattaa käyttää kaulimiseen. Omalla 9-asteisella pastakoneellani aloitin ajamalla taikinan läpi ykkösellä (eli paksuimmalla), taitoin nelinkerroin ja ajoin uudestaan. Tämän jälkeen jauhotus ja uusi ajo nelospaksuudella, ja lopuksi jauhotus ja ajo lopulliseen paksuuteen kuutosasetuksella. Liian ohueksi taikinaa ei kannata kaulita koneella tai käsin, koska paperimaisen taikinan käsittely on hyvin vaikeaa.
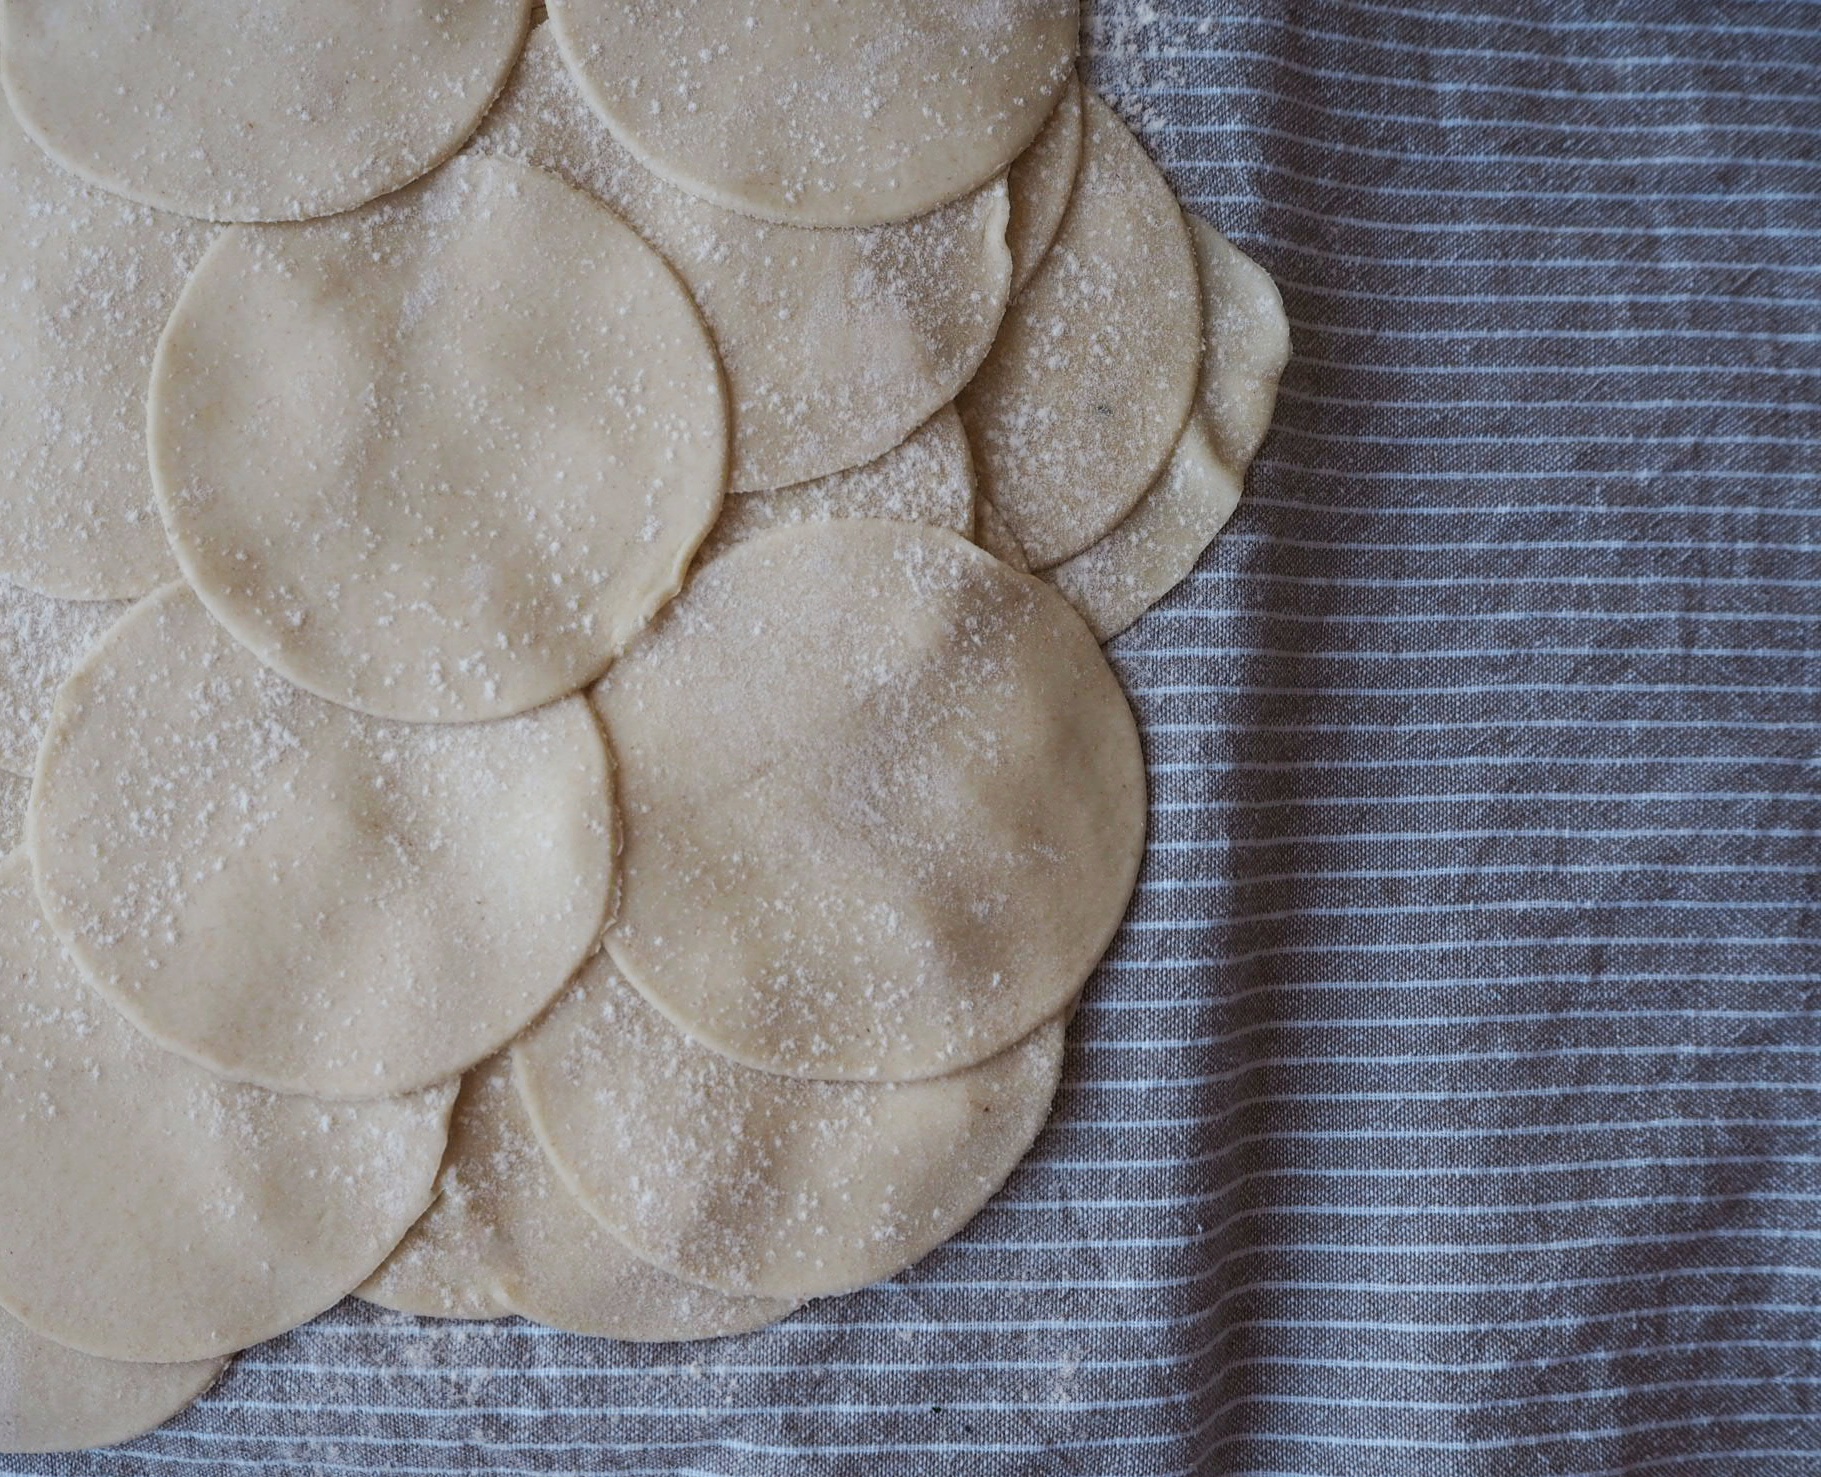
Leikkaa kaulitusta taikinasta noin 10cm rengasmuotilla pyöreitä kuoria. Itse käytin teräväreunaista juomalasia. Laita taikinapyörylät leivinliinan alle jauhotettuina odottamaan täyttämistä. EN suosittele asettamaan taikina kovin paljoa päällekkäin niin kuin kuvissa, koska ne tarttuvat helposti kiinni toisiinsa.
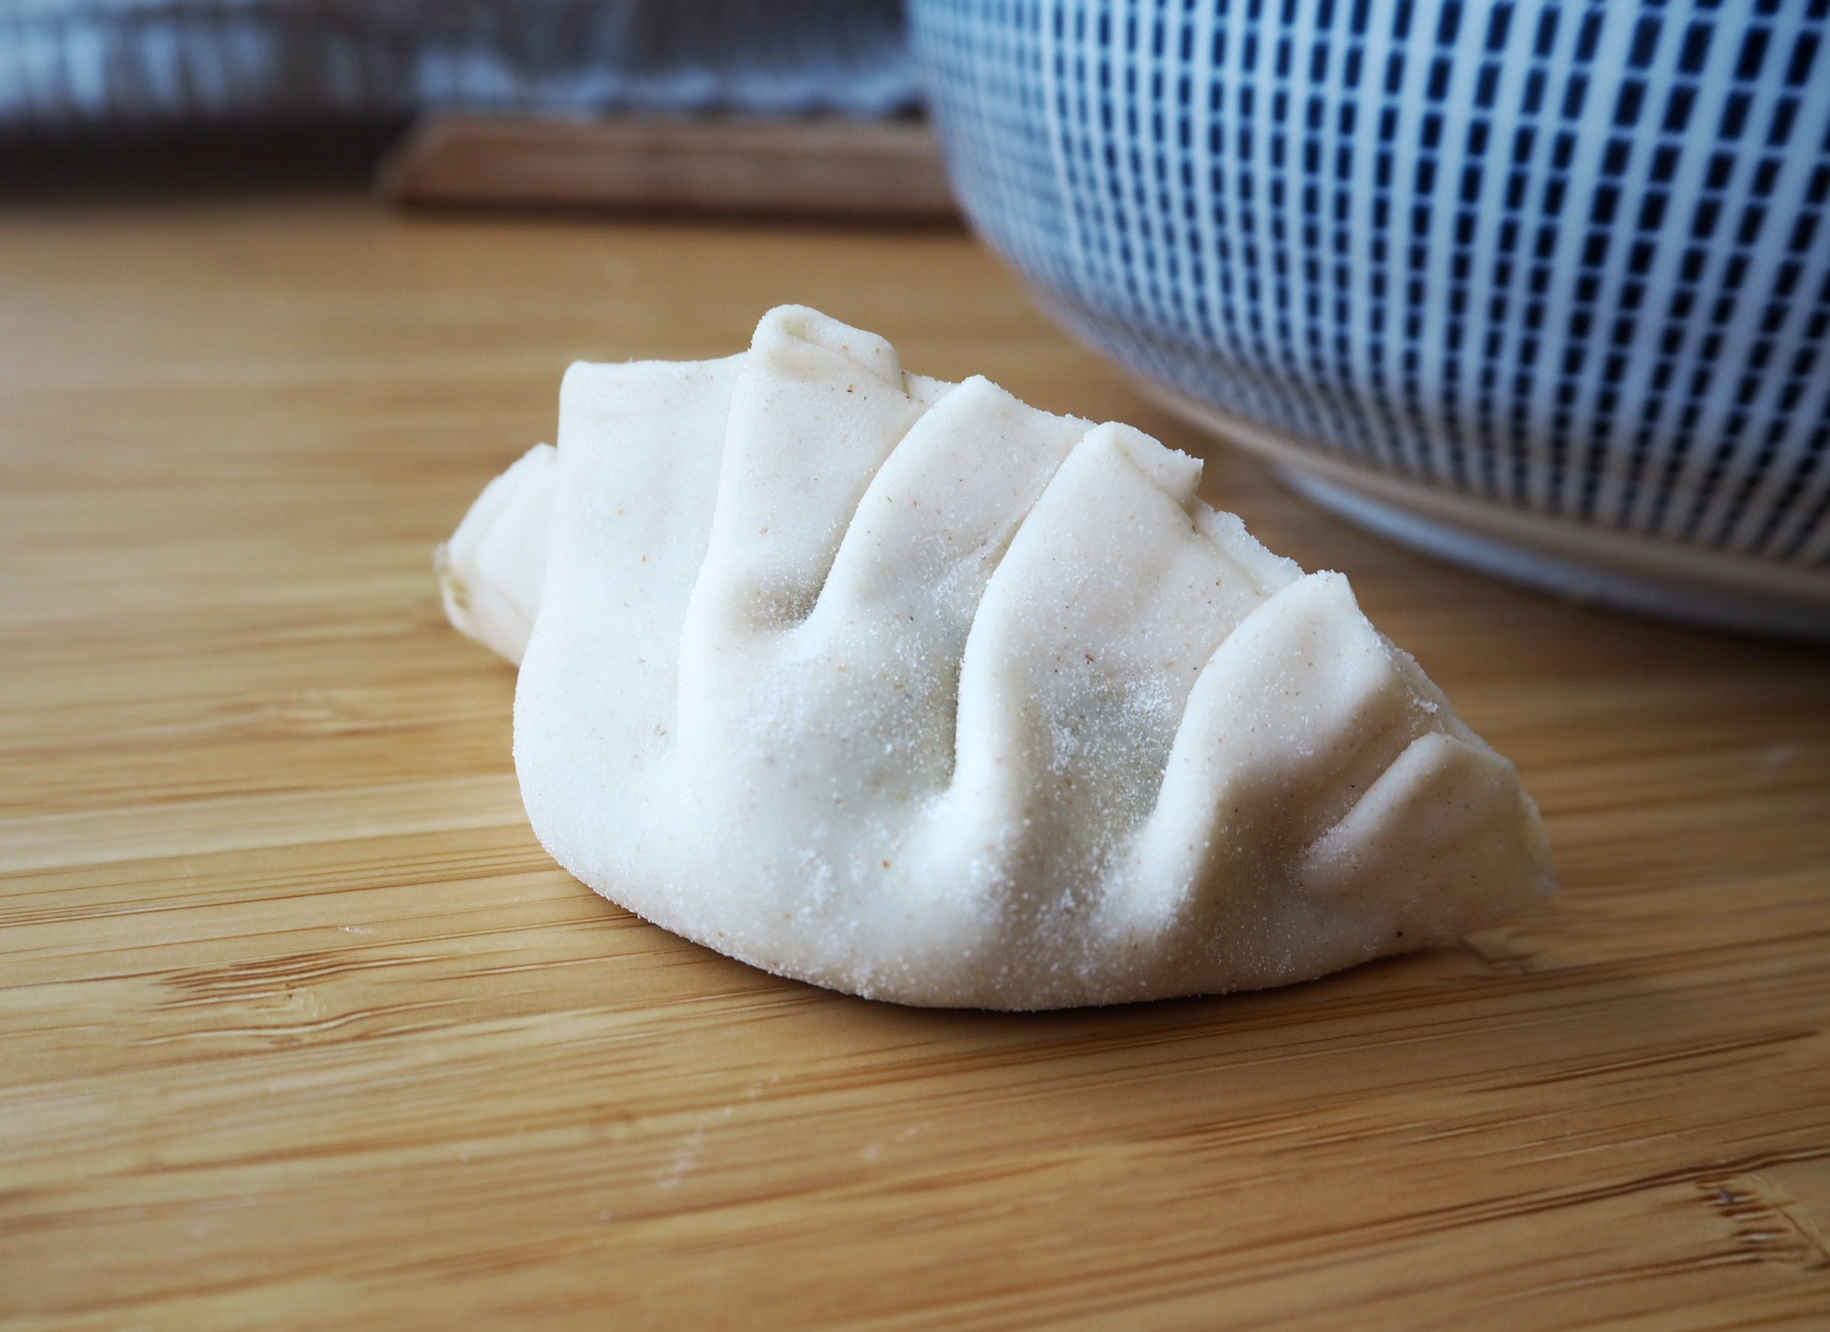
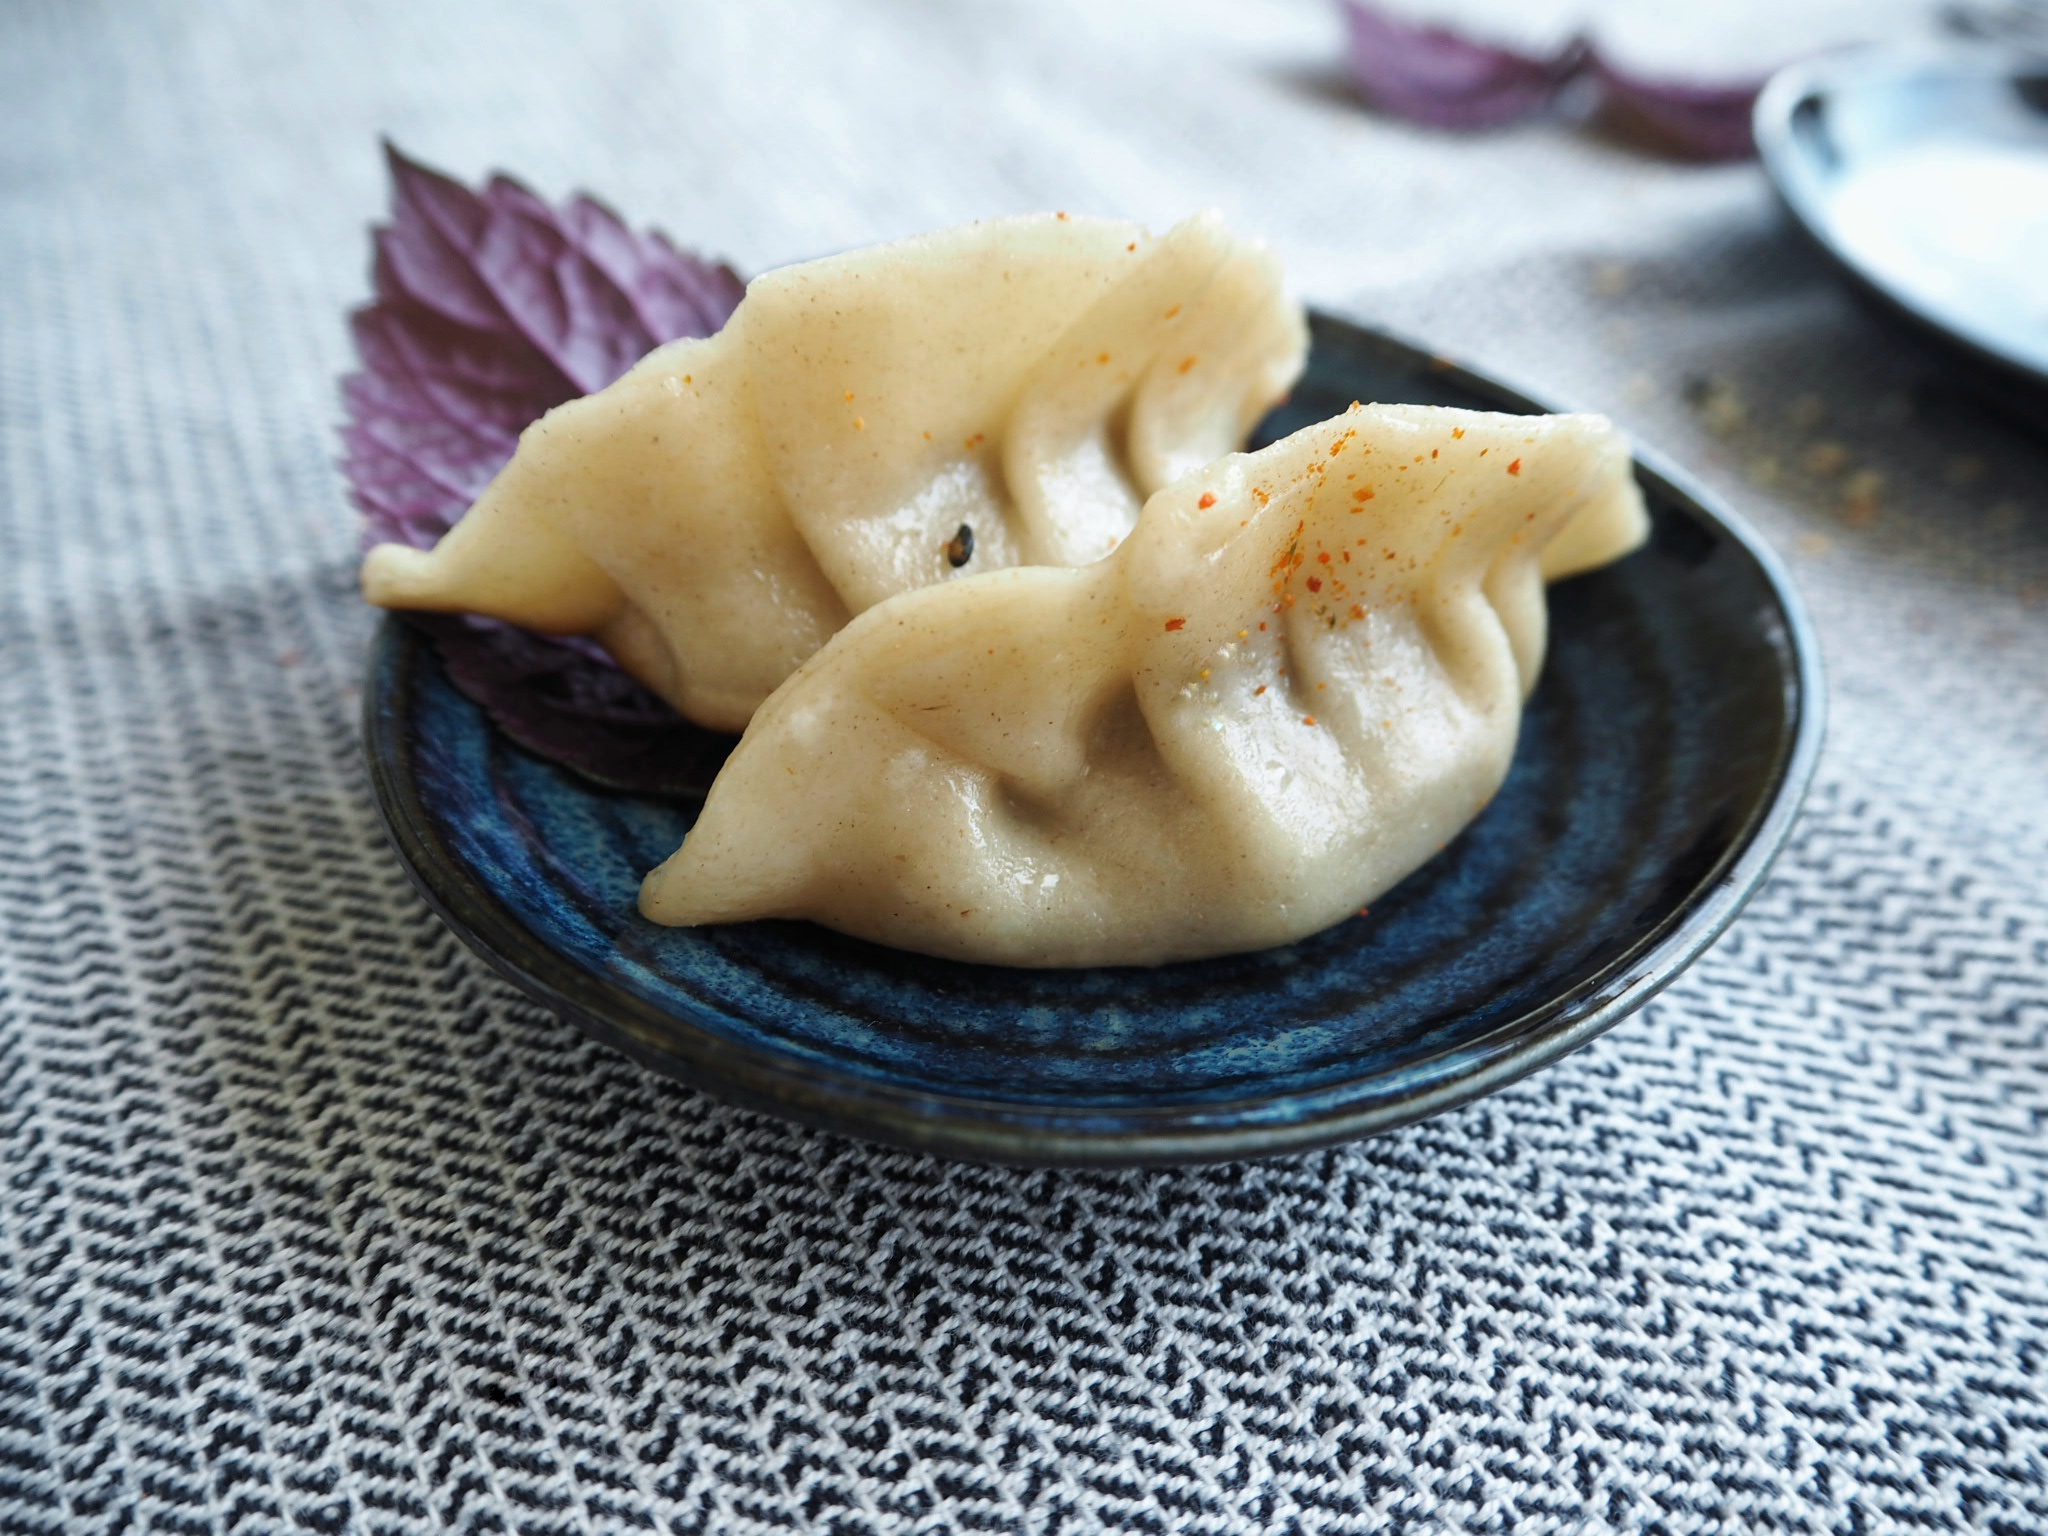
Aloita nyyttien kokoaminen. Ota yksi taikinakuori kämmenelle ja lusikoi sen keskelle teelusikallinen täytettä. Taita taikinakuori puoliksi puoliympyrän muotoon ja ala nipistää reunoja yhteen samalla rypyttäen päällimmäistä reunaa laskoksille. Aseta tämän jälkeen nyytti pystyyn pöydälle, jotta sille muodostuu tasainen pohja. Jos taikina tuntuu kuivalta eikä tartu kiinni, kostuta taikinan reunaa tipalla vettä. Alla olevalla videolla näytän miten itse taittelen nyytin kasaan. Aseta valmis nyytti liinan alle odottamaan kypsennystä.
Tee kaikki nyytit valmiiksi samalla tavalla.
Sekoita kastikkeen ainesosat pienessä kulhossa keskenään.
Paista nyytit juuri ennen tarjoilua. Paistamiseen tarvitset kannellisen kasarin ja kuumaa vettä esimerkiksi vedenkeittimestä. Kuumenna kasari keskilämmöllä ja kaada kasariin hieman öljyä. Aseta nyyttejä kasariin pystyyn sen verran kuin mukavasti mahtuu. Älä aseta nyyttejä kiinni toisiinsa, koska kypsyessään ne voivat tarttua kiinni kunnolla. Paista nyyttejä, kunnes niiden pohja on saanut kauniin ruskean värin.
Ota toiseen käteen kasarin kansi ja toiseen kuumaa vettä sisältävä kannu. Kaada nyyttien päälle kasariin noin desin verran vettä ja paina kasarin kansi saman tien kiinni. Paina kantta, jotta mahdollisimman paljon höyryä pysyisi kasarissa. Kun vesi on höyrystynyt (minuutin verran menee) ja nyytit ovat kypsyneet myös yläpinnaltaan, nostele ne lastalla varovasti pois kasarista. Pyyhkäise kasari puhtaaksi ja jatka paistamista samaan tapaan, kunnes kaikki nyytit on paistettu. Valmiita nyyttejä voi pitää uunissa sadassa asteessa lämpimänä, kun kypsennät loppuja nyyttejä.
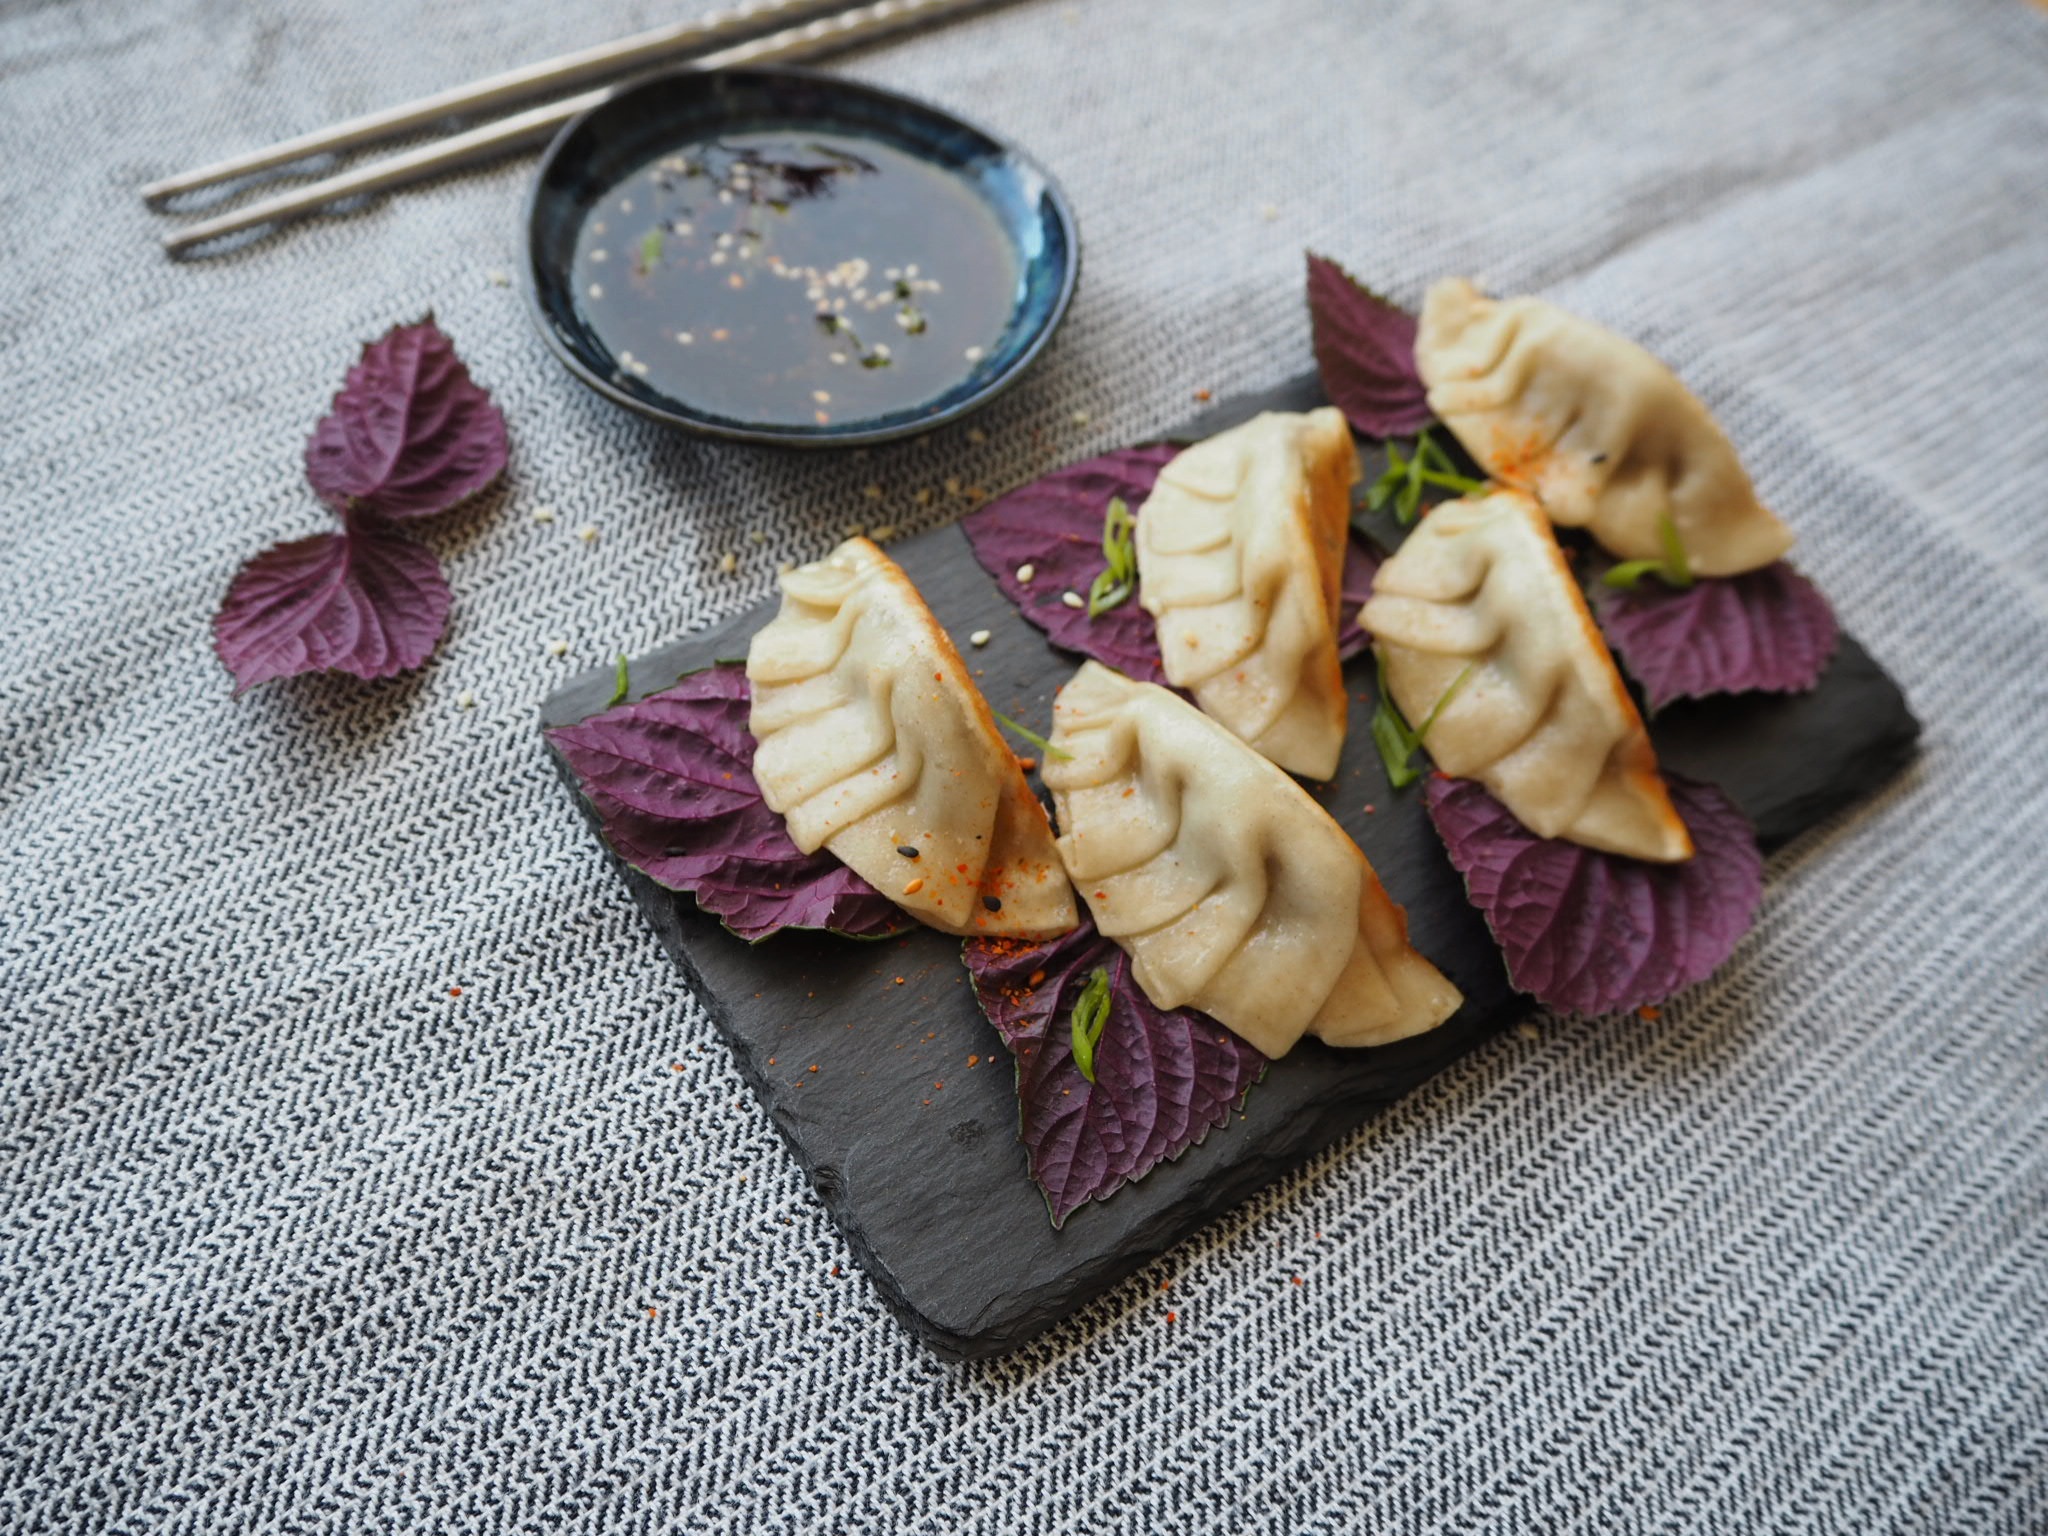
Tarjoile nyytit kastikkeen kanssa. Voit halutessasi koristella nyyttejä yrttisilpulla, shisolehdillä ja seesaminsiemenillä.
Asettele gyozat pannulle ilmavasti | Leave room around each little dumpling
Noin! Askarteluahan tämä ruokalaji vaatii, ja lisäksi vielä rämäpäisyyttä, että uskaltaa kaataa kuumaa vettä öljyä sisältävälle pannulla, mutta välillä on hyvä käydä reunalla. Jos höyryttäminen kasarissa kuulostaa liian hurjalta, niin paistamisen jälkeen nyytit voi nostella myös höyrytyskattilaan kypsymään loppuun.
Suddenly it’s summer and the unprecedented May heatwave made the parks and forests burst into full bloom basically overnight. Just a couple of weeks ago the weather was radically different, and we were cooking Japanese-style yaki gyoza with a friend of mine. They probably aren’t your go-to dish during summer heat, but I’m sure there will be cooler days to come.
Different kind of dumplings are known around the world, for example the Italians have ravioli, the German the Maultasche, the Latin countries make empanadas, and in Asia dumplings seem to be ubiquitous. In short, dumplings are dough parcels that are filled with something delicious and then cooked by boiling, steaming, or frying. I’ve been making these Japanese gyoza dumplings for years now with a friend of mine, and I dare say we’ve gotten quite good at it. Apparently, the Japanese imported the dumplings from China, where they are known as jiaozi.
There are three important choices to make with dumplings: the dough, the filling, and the cooking method. If you have access to an Asian food shop, they are bound to have frozen dumpling shells, that you only need to fill and cook. However, making the dough yourself is quite simple. If you have a pasta machine lying around, you can use it for gyozas too, but a rolling pin should be just fine as well.
The second choice is the filling. The Asians dumplings feature almost always a meat in the filling, but we’ve been making these as veggie dumplings. Whatever you choose to fill the dumplings with, pay attention to seasoning, because a bland filling will definitely ruin the whole experience. So don’t skimp on garlic, ginger, or vinegar.
The third point is the cooking method. As I mentioned, there are three options: boiling, steaming and frying. If you know your restaurant Japanese, you might have guessed from the heading that these dumplings will be fried. Or actually, fried and then steamed on the same pan. You can also boil or steam these dumplings, but be aware that every method renders different kind of end results, so I encourage you to experiment. The method described here involves using a cooking pan with a lid, because you first fry the dumplings on one side and then pour in hot water and use the lid to allow the steam to cook the rest of the dumplings. That may sound scary, and there is a lot of steam and crackling sounds, but it really isn’t that hard.
We have usually made so many dumplings in one sitting that we haven’t had a need for anything else. You can serve the dumplings with rice or cabbage salad, or as a side dish to ramen. The sauce is a the same as with the chicken kara-age since it’s so delicious and deliciously easy, so why bother changing something so perfect.
Vegan Yaki Gyoza Dumplings About 30 dumplings
Ingredients
Dough 3 dl wheat flour
1.5 dl hot water
½ tsp salt
Filling ½ eggplant
1 onion
handful of mushrooms
a small piece of cabbage
1 garlic clove
3 cm piece of ginger
soy sauce
rice wine vinegar
pinch of chili powder
oil for frying
Start by making the filling. Peel and mince the eggplant and onion, clean and dice the mushrooms and slice the cabbage. Grate the garlic and ginger. Mince everything finely. You can mince the filling ingredients by hand or use a food processor. Mix all ingredients, except the soy sauce and the vinegar.
Place a medium pan on medium heat and pour good amount of oil in it. When the pan is hot, add the minced vegetables. Cook on medium heat stirring every now and then. The filling is ready when its volume has been reduced to about half (because of evaporating water) and the aroma becomes almost meaty. Season the filling with soy sauce and vinegar and set aside to cool.
Make the dough. Mix the salt with the flour. Pour in the hot water and mix. Gather the dough into a ball and start kneading. If the dough is sticky, add a little flour. If the dough feels dry, add a small amount of water. You’ll know the drill. Knead until the dough feels smooth and springy.
Split the dough into four and place the four balls under a tea towel to prevent drying. Roll the dough on a floured table one ball at a time into a sheet abut 2mm thick. If you have a pasta machine, you should use that. My pasta machine has 9 thickness settings, I started with by passing the ball through one setting 1 (the thickest), folded it into four and repeated. Then I floured the dough and changed the setting to 2, then floured again and rolled with setting 4, and finally with setting 6. Don’t roll the dough too thin, as it will impossible to handle.
Cut round shapes from the sheet with a circular cutter (I used a drinking glass with a sharp edge and a 10cm diameter). Place the round shells on a floured tea towel and cover with another towel. I DO NOT recommend placing the shells on top of each other as they stick very easily. Been there, done that.
Start assembling the dumplings. Take a shell on a palm, place a teaspoonful of filling in the middle and fold the shell in two into a semicircle. Start pinching the edges together while pleating the top layer. If the edges won’t stick together, moisten the edge with a drop of water. Press the dumpling gently against the table to form a smooth base. See the video above to see how I make a dumpling. Cover the dumplings with a towel.
Repeat until all shells have been transformed into dumplings.
Mix the ingredients of the sauce in a bowl and set aside.
Cook the dumplings just before serving. You’ll need a large pan with a lid and hot water. Heat the pan on medium heat and pour in a little oil. Place the dumplings in the pan with the flat side down. Don’t let the dumplings touch each other or they will stick together. Fry the dumplings until their bottom is nicely golden brown.
Take the lid of the pan in one hand and a pitcher with the hot water in the other. Pour about a deciliter of water on the pan and press the lid down on the pan immediately. Keep pressing the lid on the pan to keep as much of the steam inside as possible. When the water has evaporated (takes about a minute) and the topside of the dumplings is cooked, lift them gently from the pan with spatula and wipe the pan clean. Repeat until all the dumplings are cooked. You can keep the cooked dumplings warm in the oven in about 100 degrees while you’re cooking the rest of the dumplings.
Serve the dumplings with the sauce. You can garnish the dumplings with minced herbs, scallions, sesame seeds or shiso leaves.
There you go! I’ll admit, it takes a quite a bit of patience and dexterity to make these, and a healthy dose of foolhardiness to pour boiling water on a pan with oil in it, but it’s good to straddle the edges of existence every once in a while, if you know what I mean. And if you’re concerned about the cooking method, you can first fry the bottom of the gyozas on the pan and then transfer them to a steamer to finish cooking. The choice is yours, and I hope you enjoy these dumplings as much as I do.
Have a wonderful day and enjoy the beginning of Summer!
No kas, helmikuussa mennään jo. Päivissä alkaa olla viimein sen verran valoa, että usko kevääseen palaa synkkään mieleen ja kuva piirtyy kameran kennolle luonnonvalossa. Hanki tuntuu vielä vaan kasvavan, vaikka minun puolesta talvi saisi alkaa jo päättyä. Pakkanen on sentään jaksanut paukkua tänä talvena, eikä loskakeliä ole ollut viikkoihin. Juoksulenkit pakkasessa ovatkin olleet parasta viime aikoina.
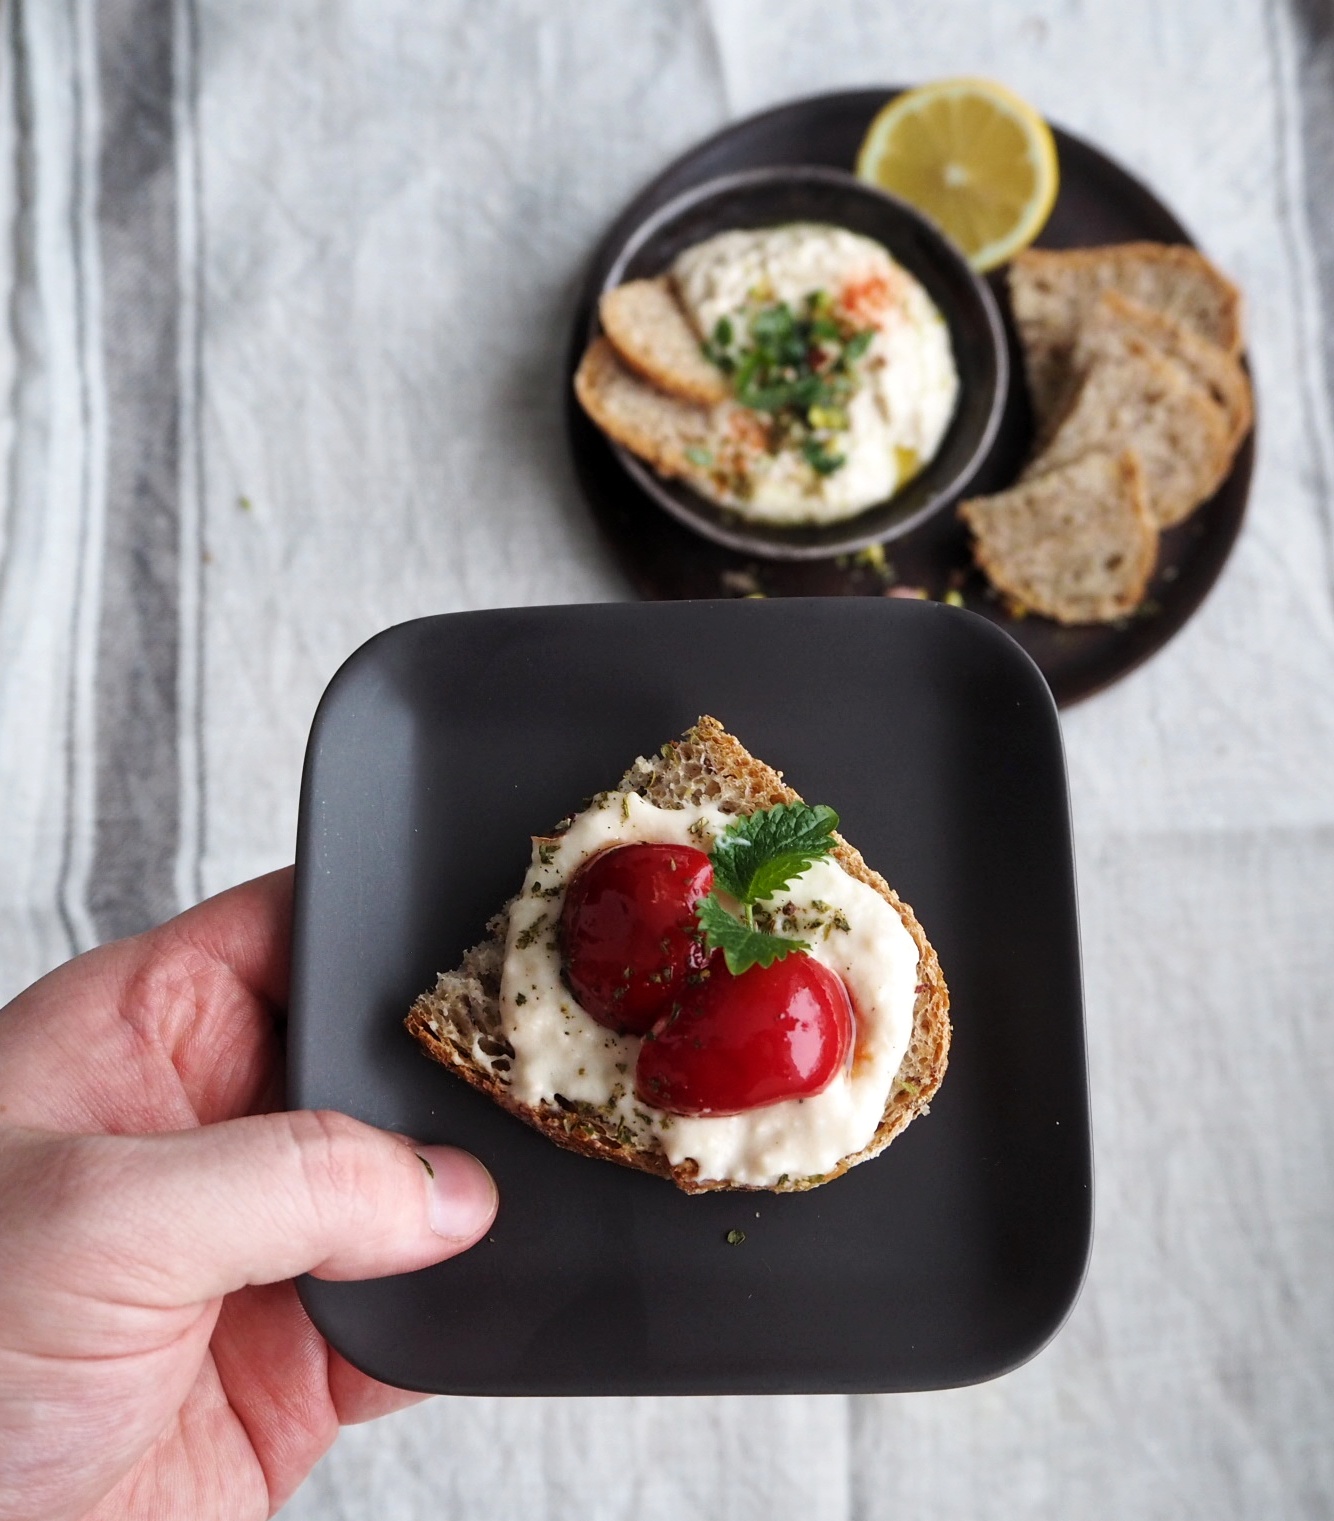
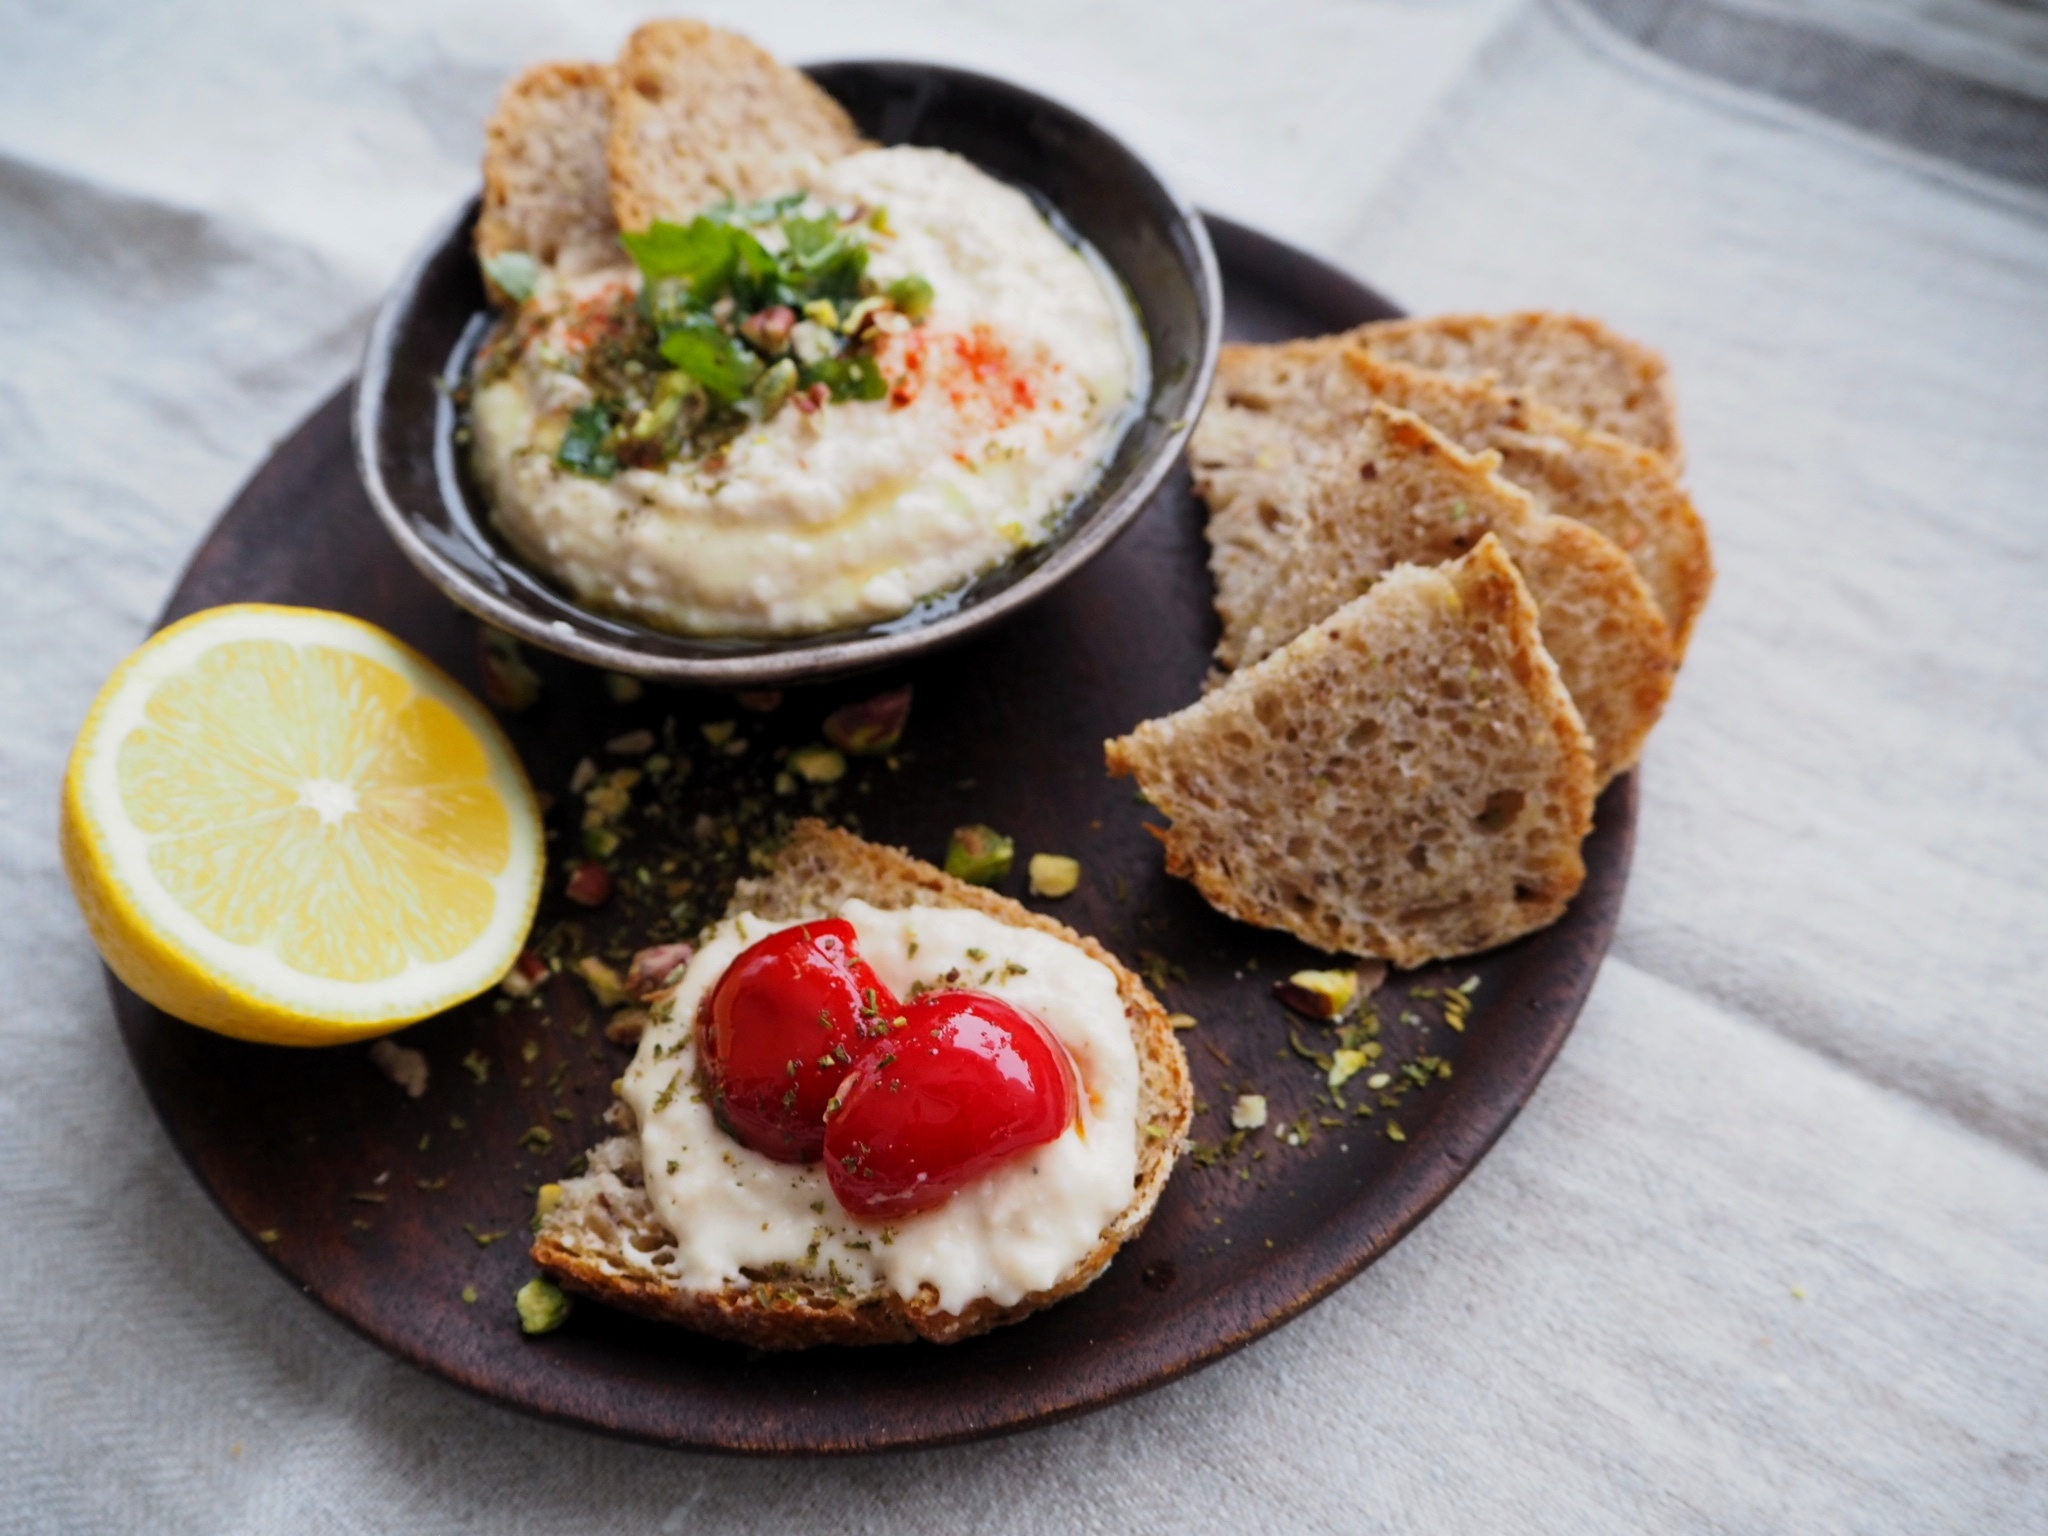
Talvihan on tietenkin lohturuoan kulta-aikaa, koska tuhdit maut ja yksinkertaiset ja hyvin säilyvät raaka-aineet valtaavat keittiön. Keittelin pitkästä aikaa tätä huikeaa papukeittoa, ja papuja jäi hieman yli. Rupesin muistelemaan mitä muuta olen niistä tehnyt, valkopapupaketti kun on kuivakaapin vakiovalikoimassa jo pitkään keikkunut. Ottolenghin valkopapuhummus palasi mieleeni ja sitähän piti ensi tilassa vääntää. Onneksi se on äärimmäisen helppoa ja nopeaa, eikä vaadi mitään kovin erikoisia raaka-aineita, tahiniakin kun alkaa olla jopa pikkumarketeissa tätä nykyä. Lisäksi luin juuri, että kikherneet uhkaavat loppua maailmasta, joten jo siksikin kannattaa kokeilla niille vaihtoehtoisia palkokasveja. Ja totta puhuakseni tämä hakkaa kikhernehummuksen aika helposti.
Kun hummus koostuu 90 % yhdestä raaka-aineesta, lienee selvää että kyseisen raaka-aineen laatu näyttelee varsin isoa roolia lopputuloksessa. Tarjolla on siis kaksi vaihtoehtoa: ostaa tölkillinen kypsiä papuja, jolloin pääsee ällistyttävän nopeasti nauttimaan perushummusta, tai sitten keitellä pavut itse, jolloin aikaa menee liotuksineen yli vuorokausi, mutta makukin on muista maailmoista. Hyvä että on kuitenkin vaihtoehtoja.
Jos päädyt käyttämään kuivattuja papuja, liota niitä yön yli vedessä ja keitä sitten kypsiksi maustavien kasvisten kanssa. Kypsyessään pavut imevät sienen lailla makua liemestä, joten niitä voisi popsia sellaisenaan lusikalla. Ja tosiaan niistä saa myös tuon papukeiton tehtyä vartissa, joten keitä saman tien isompi satsi.
Tahinin ja sitruunan määrää voi säätää oman maun mukaan, tahinin voi jopa jättää pois niin halutessaan. Mausta kuitenkin aika kevyesti, varsinkin jos keitit pavut itse: loistavaa makua ei kannata peittää liikaa.
Laita kuivat pavut kattilaan ja peitä runsaalla vedellä. Voit lisätä mukaan lusikallisen leivinjauhetta, joidenkin mukaan se edesauttaa papujen nesteytymistä. Anna liota yön yli ja kaada sitten vesi pois.
Peitä pavut uudestaan vedellä ja laita kattila hellalle. Lisää kattilaan kuorittu kokonainen sipuli, kuoritut valkosipulinkynnet, laakerinlehdet, suola ja sellerinvarsin muutamassa osassa. Kuumenna kiehuvaksi ja keitä miedosti poreillen reilu tunti tai kunnes pavut ovat mureita. Anna jäähtyä liemineen. Ongi kasvikset ja laakerinlehdet pois, sikäli kun se onnistuu.
Jos et käytä kaikkia papuja heti, säilö ne keitinliemessään jääkaapissa. Pitäisi säilyä viikonverran ainakin.
Valkopapuhummus
1 annos keitettyjä papuja (yllä) tai 2 tlk laadukkaita kypsiä papuja
2 rkl tahinia
½ sitruunan mehu
1 valkosipulinkynsi
½ dl oliiviöljyä
Suolaa ja pippuria
Valuta pavut ja laita ne tehosekoittimen tai monitoimikoneen kulhoon. Kuori ja pilko valkosipulinkynsi ja heitä se mukaan. Aja tasaiseksi.
Lisää mukaan tahini, oliiviöljy, sitruunamehu ja ripaus suolaa ja pippuria. Aja jälleen tasaiseksi. Tarkista maku ja lisää tarvittaessa suola tai sitruunamehua,
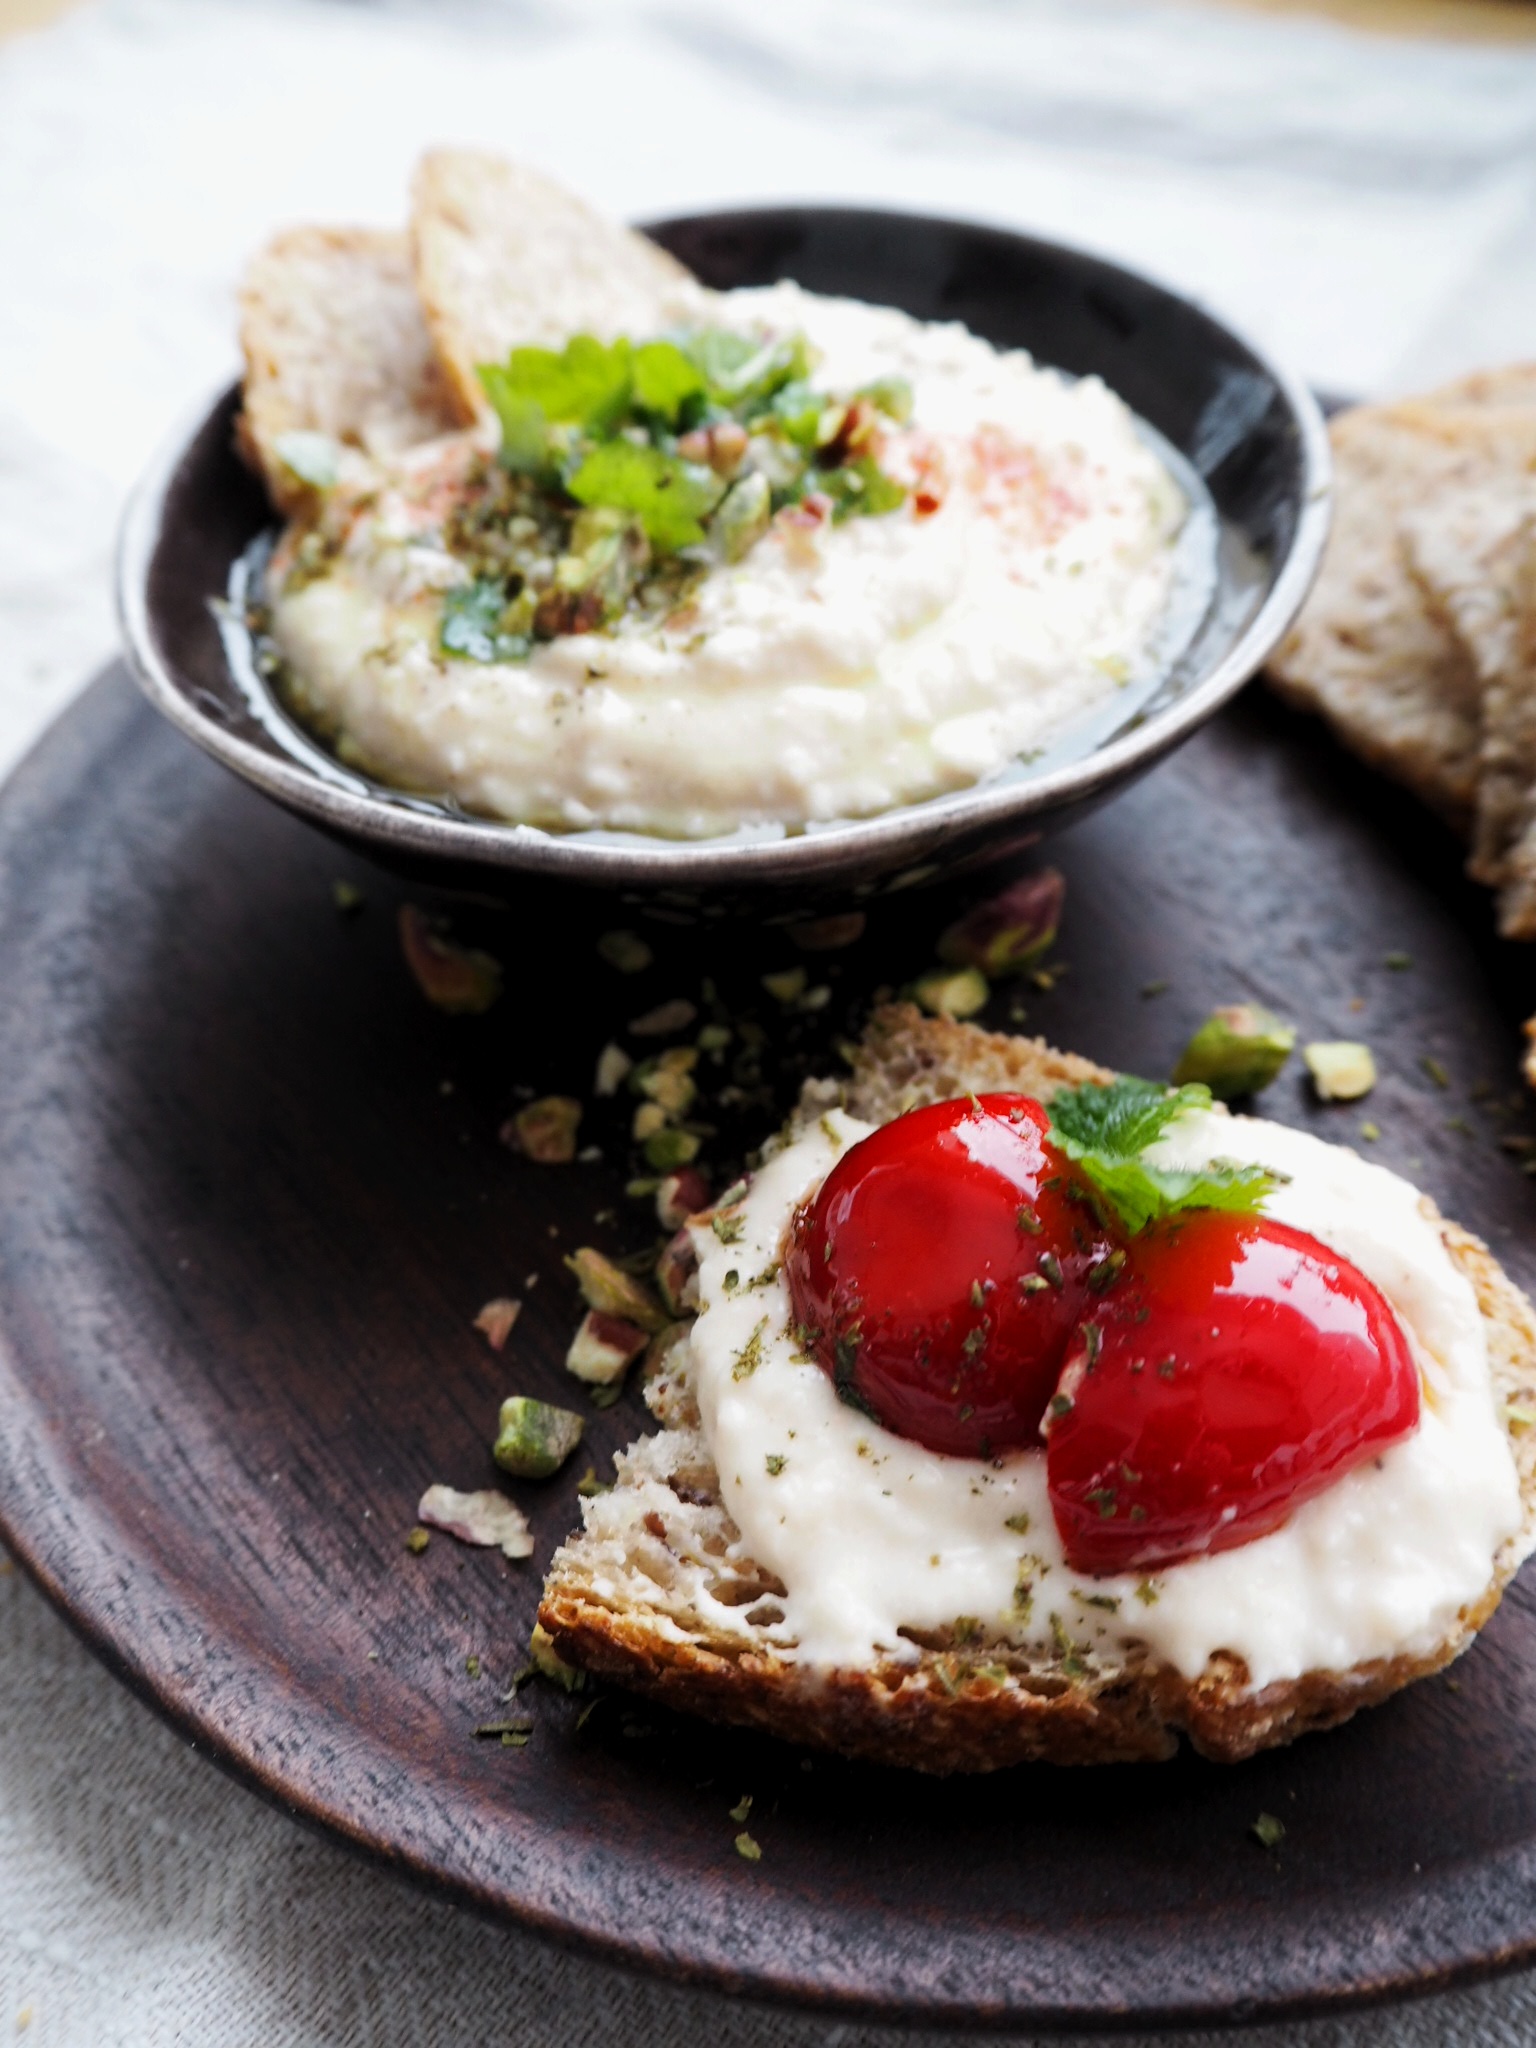
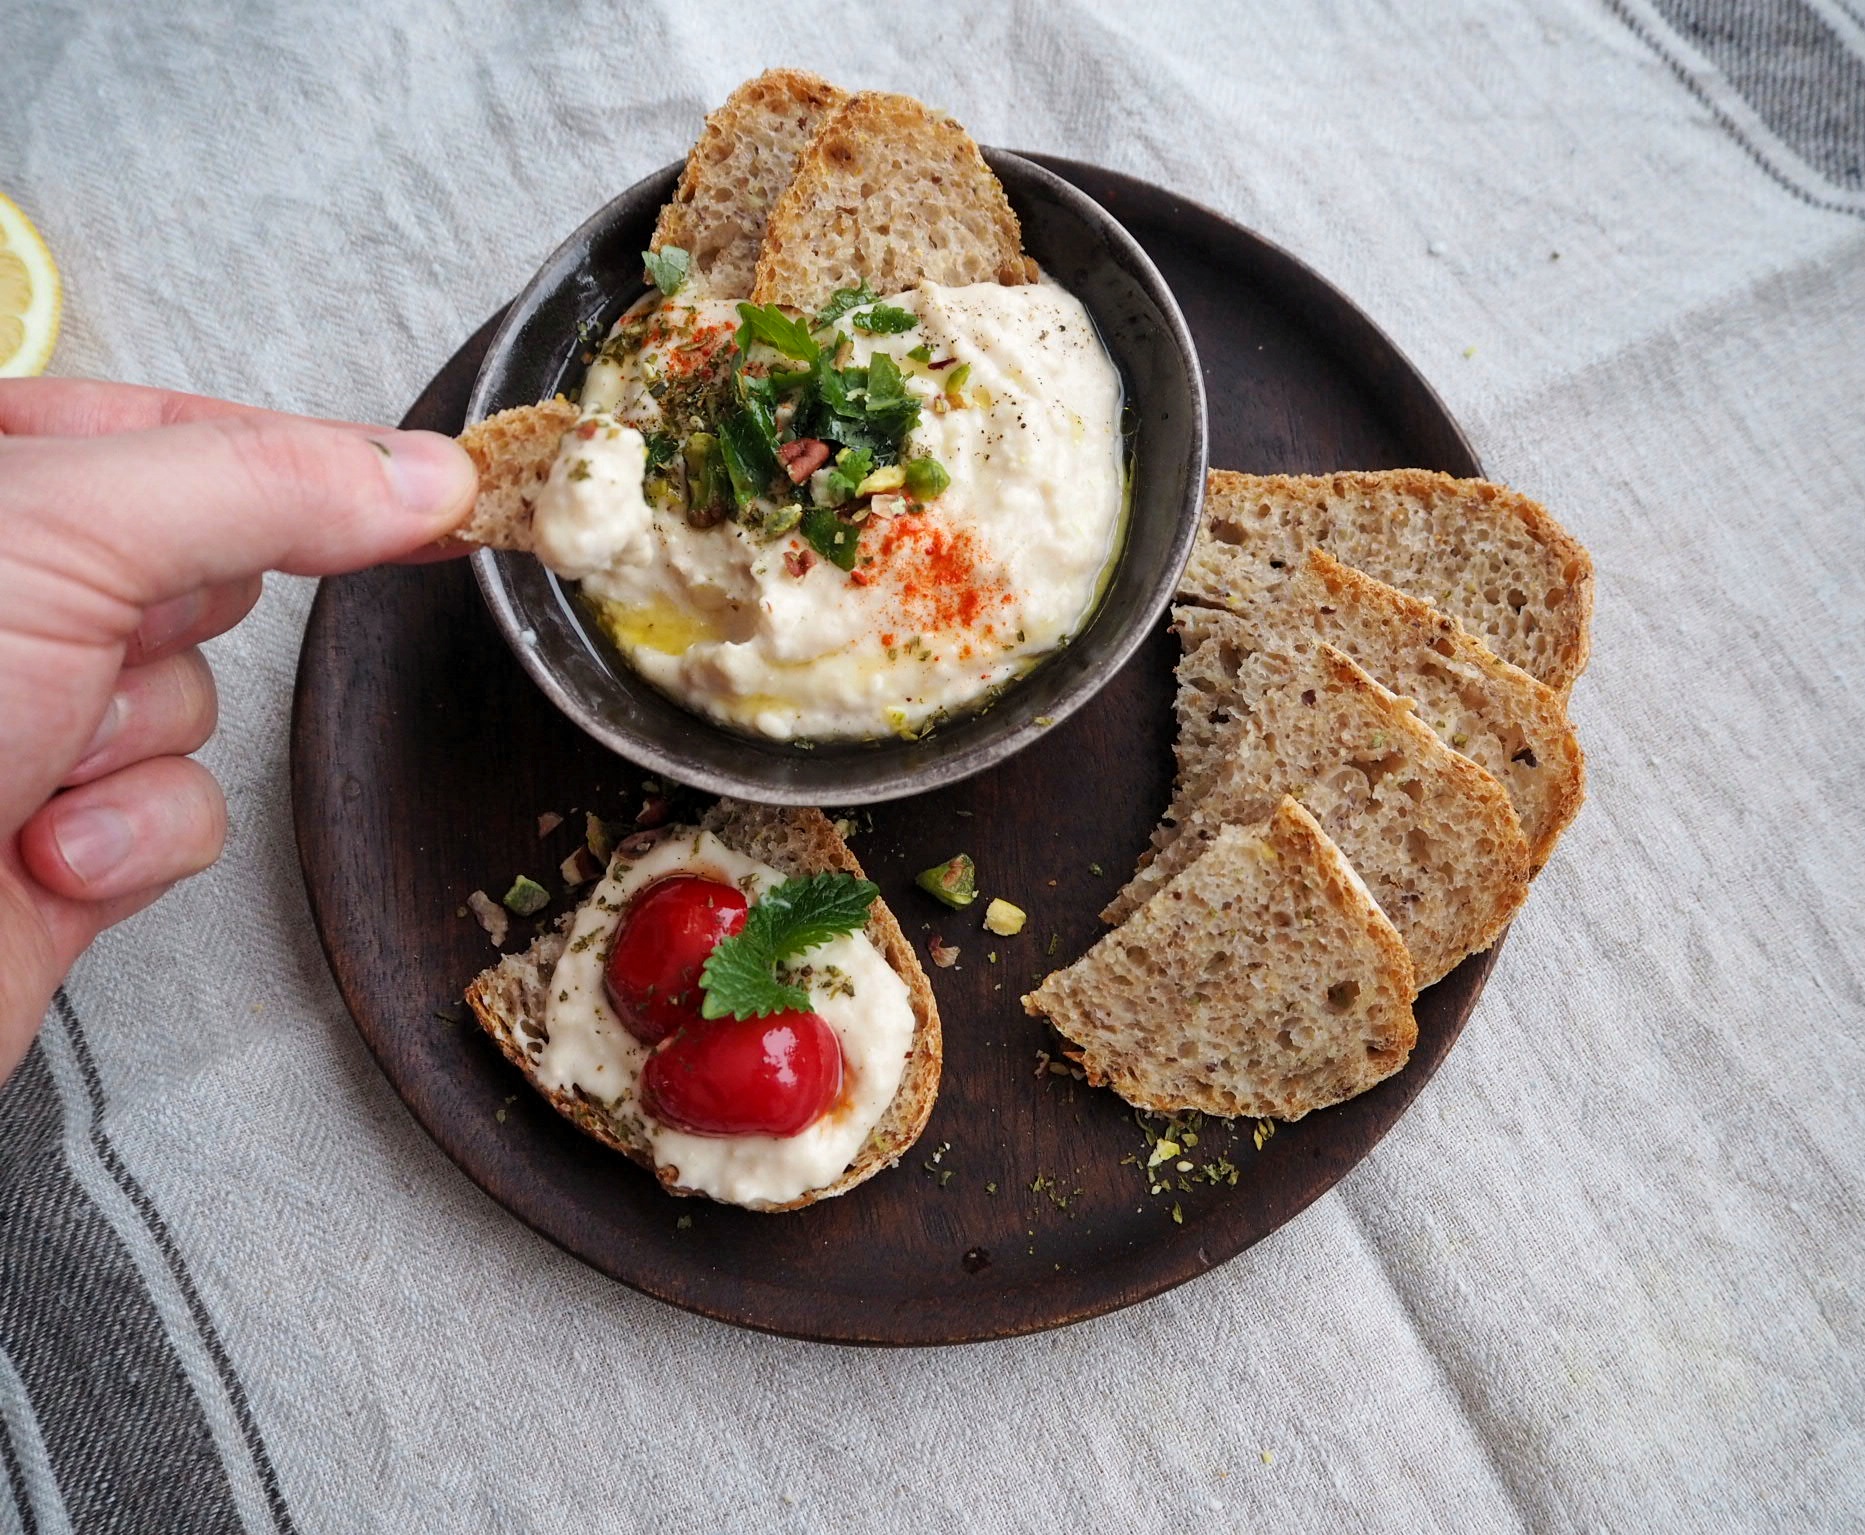
Kaavi hummus kulhoon, koristele oliiviöljyllä ja persiljalla (ja za’atarilla jos kaapista löytyy). Syö dippinä, levitä leivälle tai käytä pitaleipien täyttämiseen.
Toivottavasti maistuu! Kirkasta helmikuuta kaikille!
-Toni
—
Hi!
Suddenly it’s February! The days here in the North are getting a bit longer (praise Thor), and a darkened Northern mind realises that the Spring might yet again arrive after all. Also, there’s enough light to take a photo once every now and then. The snow seems to be piling on, nonetheless, and the spring isn’t exactly around the corner. At least the temperature has been sub-zero mostly, so there’s snow and not slush. Running in the frozen forests has been wonderful this year.
Winter is, of course, the season of the comport food as hearty flavours and simple ingredients have the centre stage. One of these days I was cooking this wonderful bean soup and I tried to remember what else have I cooked with those dried cannellini beans that have been sitting in my pantry since forever. Then I remembered: Ottolenghi’s cannellini bean hummus that is so simple, so elegant and oh-so-tasty. Especially when you take the extra step of cooking the beans yourself with some vegetables. It’s also a very timely recipe: I recently read that there’s a serious chickpea shortage and prices are soaring. It’s a good time to be looking at alternatives. Honestly, though, I prefer this recipe to the traditional chickpea version.
When the beans make up 90% of the hummus, it should be exceptionally clear that the quality of the beans is paramount. From here, two paths fork: you can buy (good quality) canned beans and be eating a nice hummus in 10 minutes, or you can cook the beans yourself in aromatic broth and make a hummus worth fighting for. That will take you more than a day but I promise you it’s worth it. Additionally, you can make the aforementioned soup with the same beans, so boil a big batch while you’re at it.
You can adjust the amount of tahini and lemon to your taste, or you can drop the tahini completely. Season the hummus quite lightly, especially if you cooked the beans yourself; you don’t want to overshadow the great flavour.
Cannelini Bean Hummus
Cooked beans 250 g dried cannellini beans
(1 tsp. baking powder)
1 onion
1 stalk of celery
2 garlic cloves
2 bay leaves
1 tsp. salt
Place the dried beans in a pot and cover with water. You can add a spoonful of baking powder; some say it helps to hydrate the beans. Leave to soak overnight and strain.
Cover the soaked beans with fresh water, add a peeled onion and the garlic cloves, bay leaves, celery stalk cut in two, and a teaspoon of salt. Place on heat, bring to a boil and let simmer for about an hour, or until the beans are tender. Let cool with the broth. Fish out the veggies and bay leaves, if they are still solid.
If you don’t use all the beans right away, store with the broth in the fridge for up to a week.
Cannellini Bean Hummus
1 portion of cooked beans (above) or 2 cans of cooked cannellini beans
2 tbsp. tahini
½ lemon, juiced
1 garlic clove
½ dl olive oil
Salt and pepper
Strain the beans and place in a blender. Peel and chop the garlic clove and add it to the beans. Blitz until smooth.
Add the tahini, olive oil, lemon juice, and pinch of salt and pepper. Blitz to mix evenly. Check the seasoning and add salt or lemon juice, if necessary.
Scoop the hummus into a bowl and garnish with olive oil and parsley (and za’atar, should you have some). Serve as a dip, spread on a nice slice of bread, or use to fill pita breads.
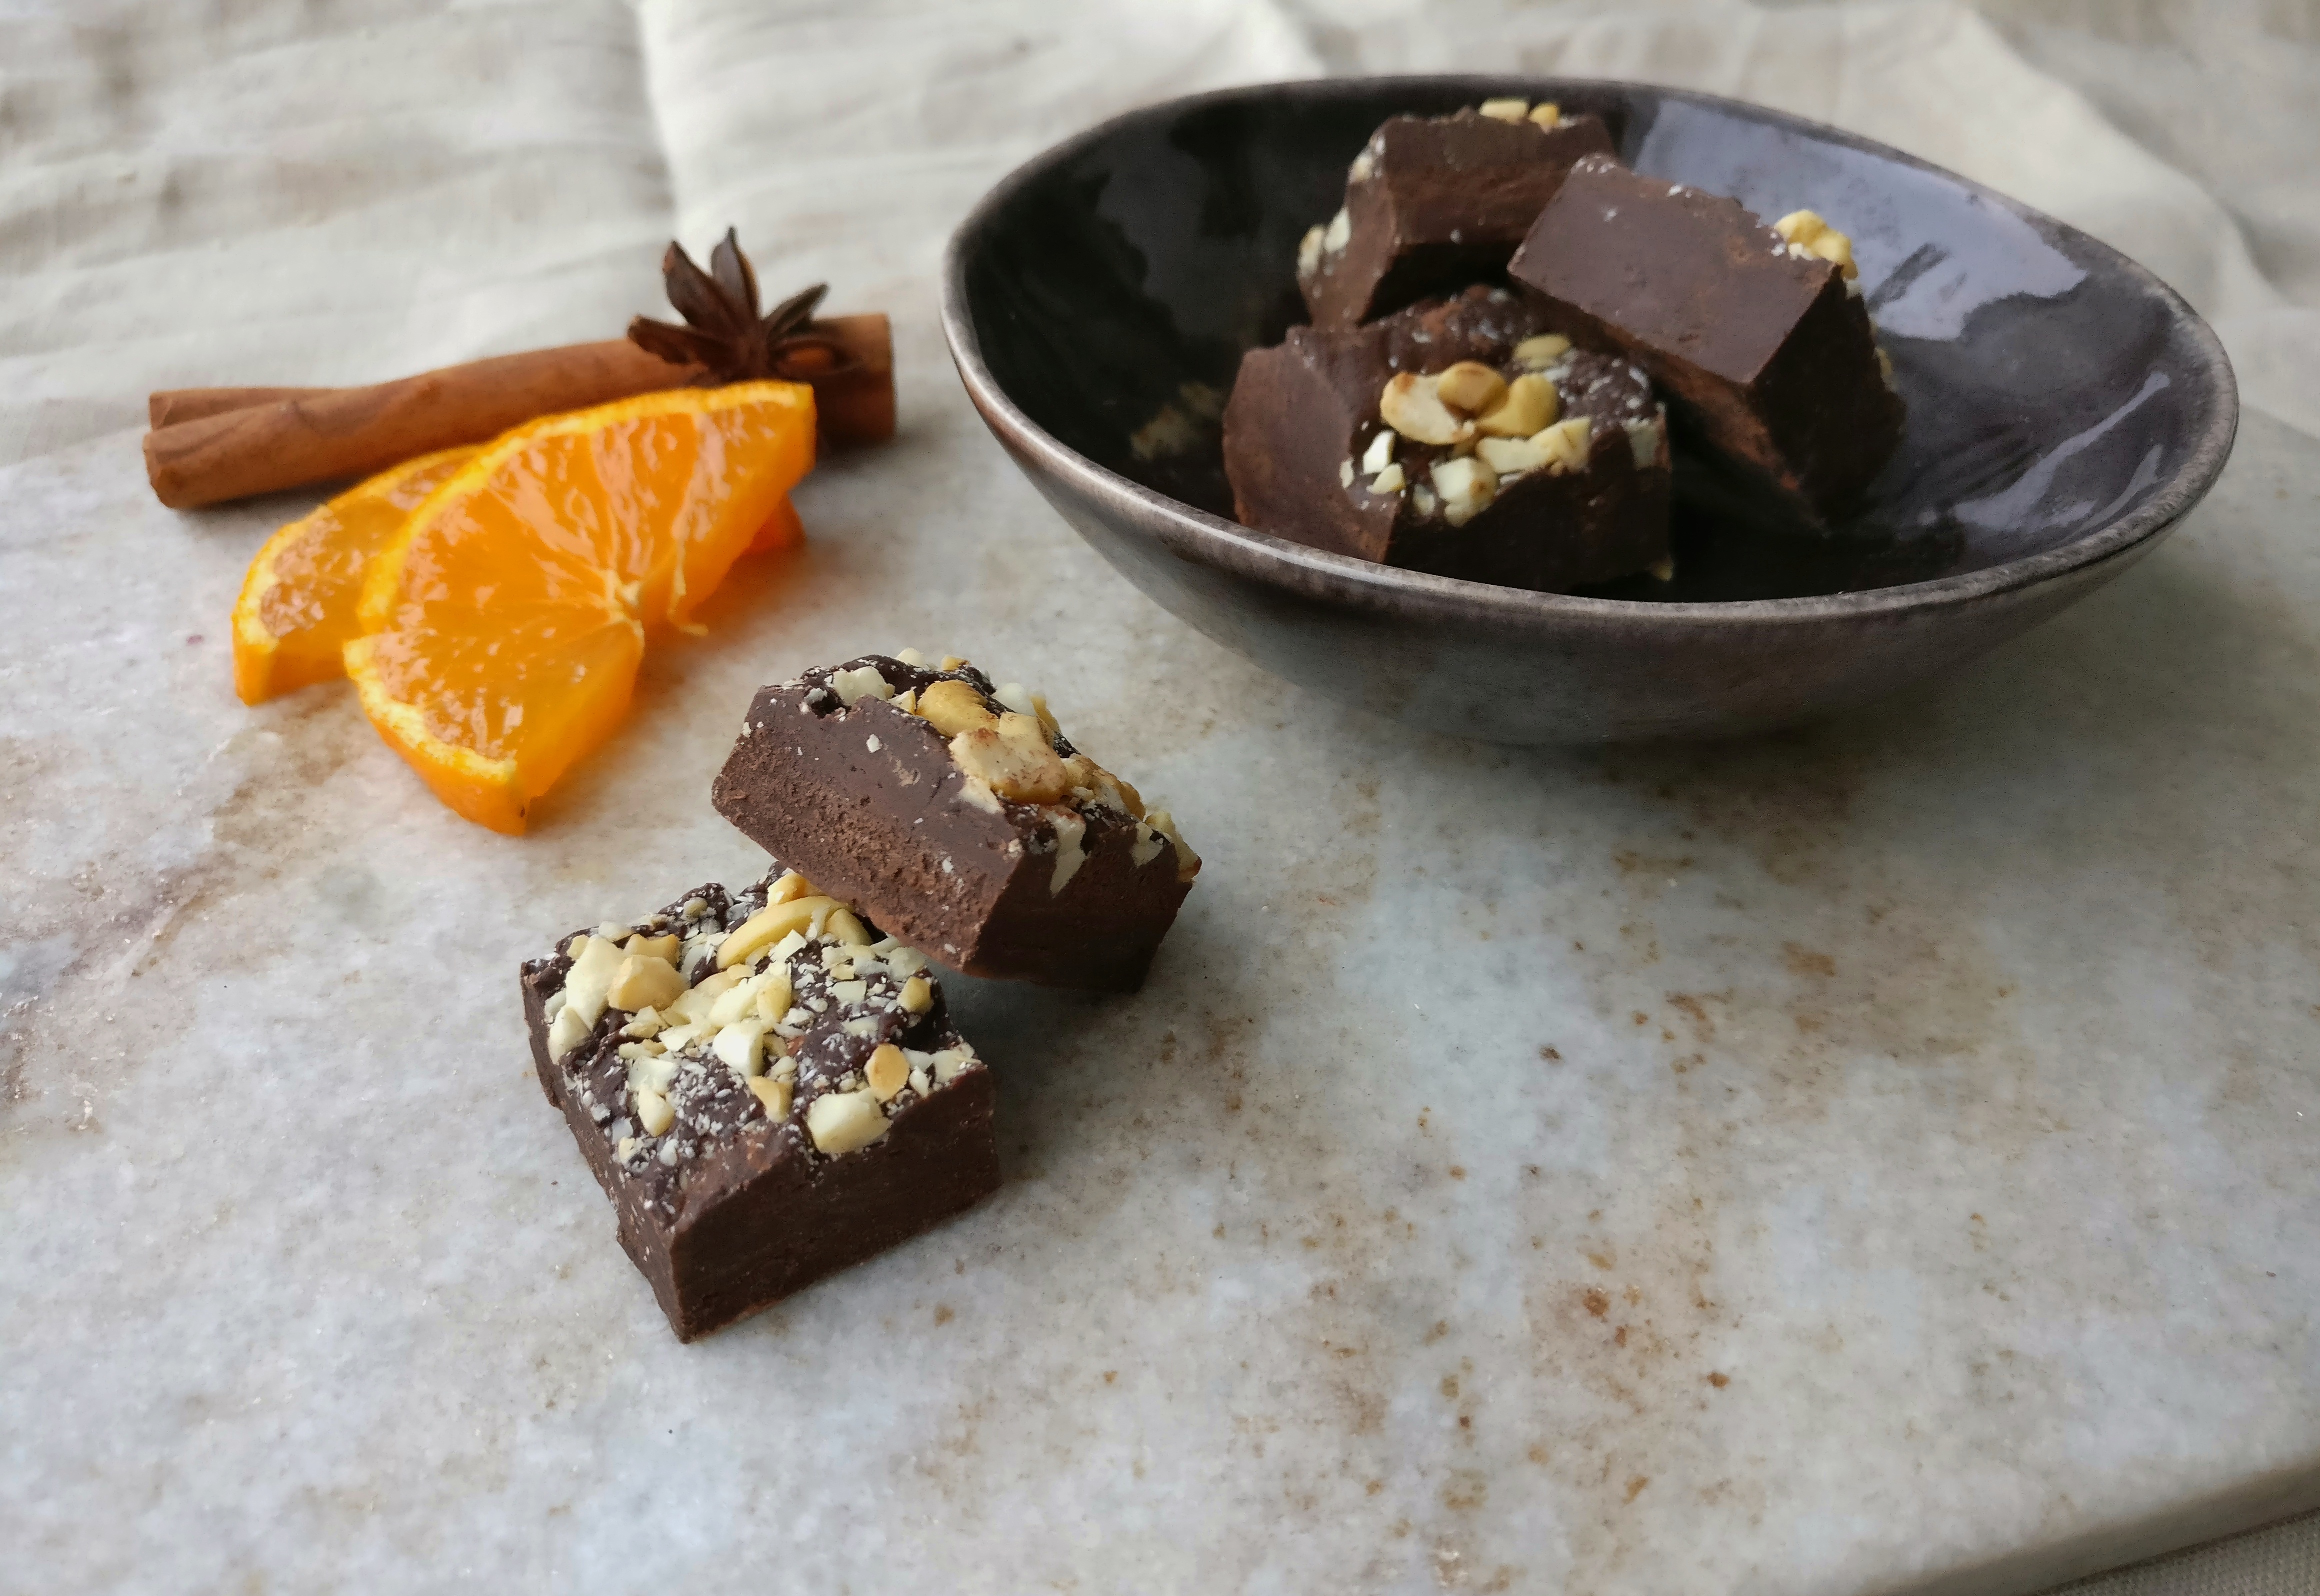
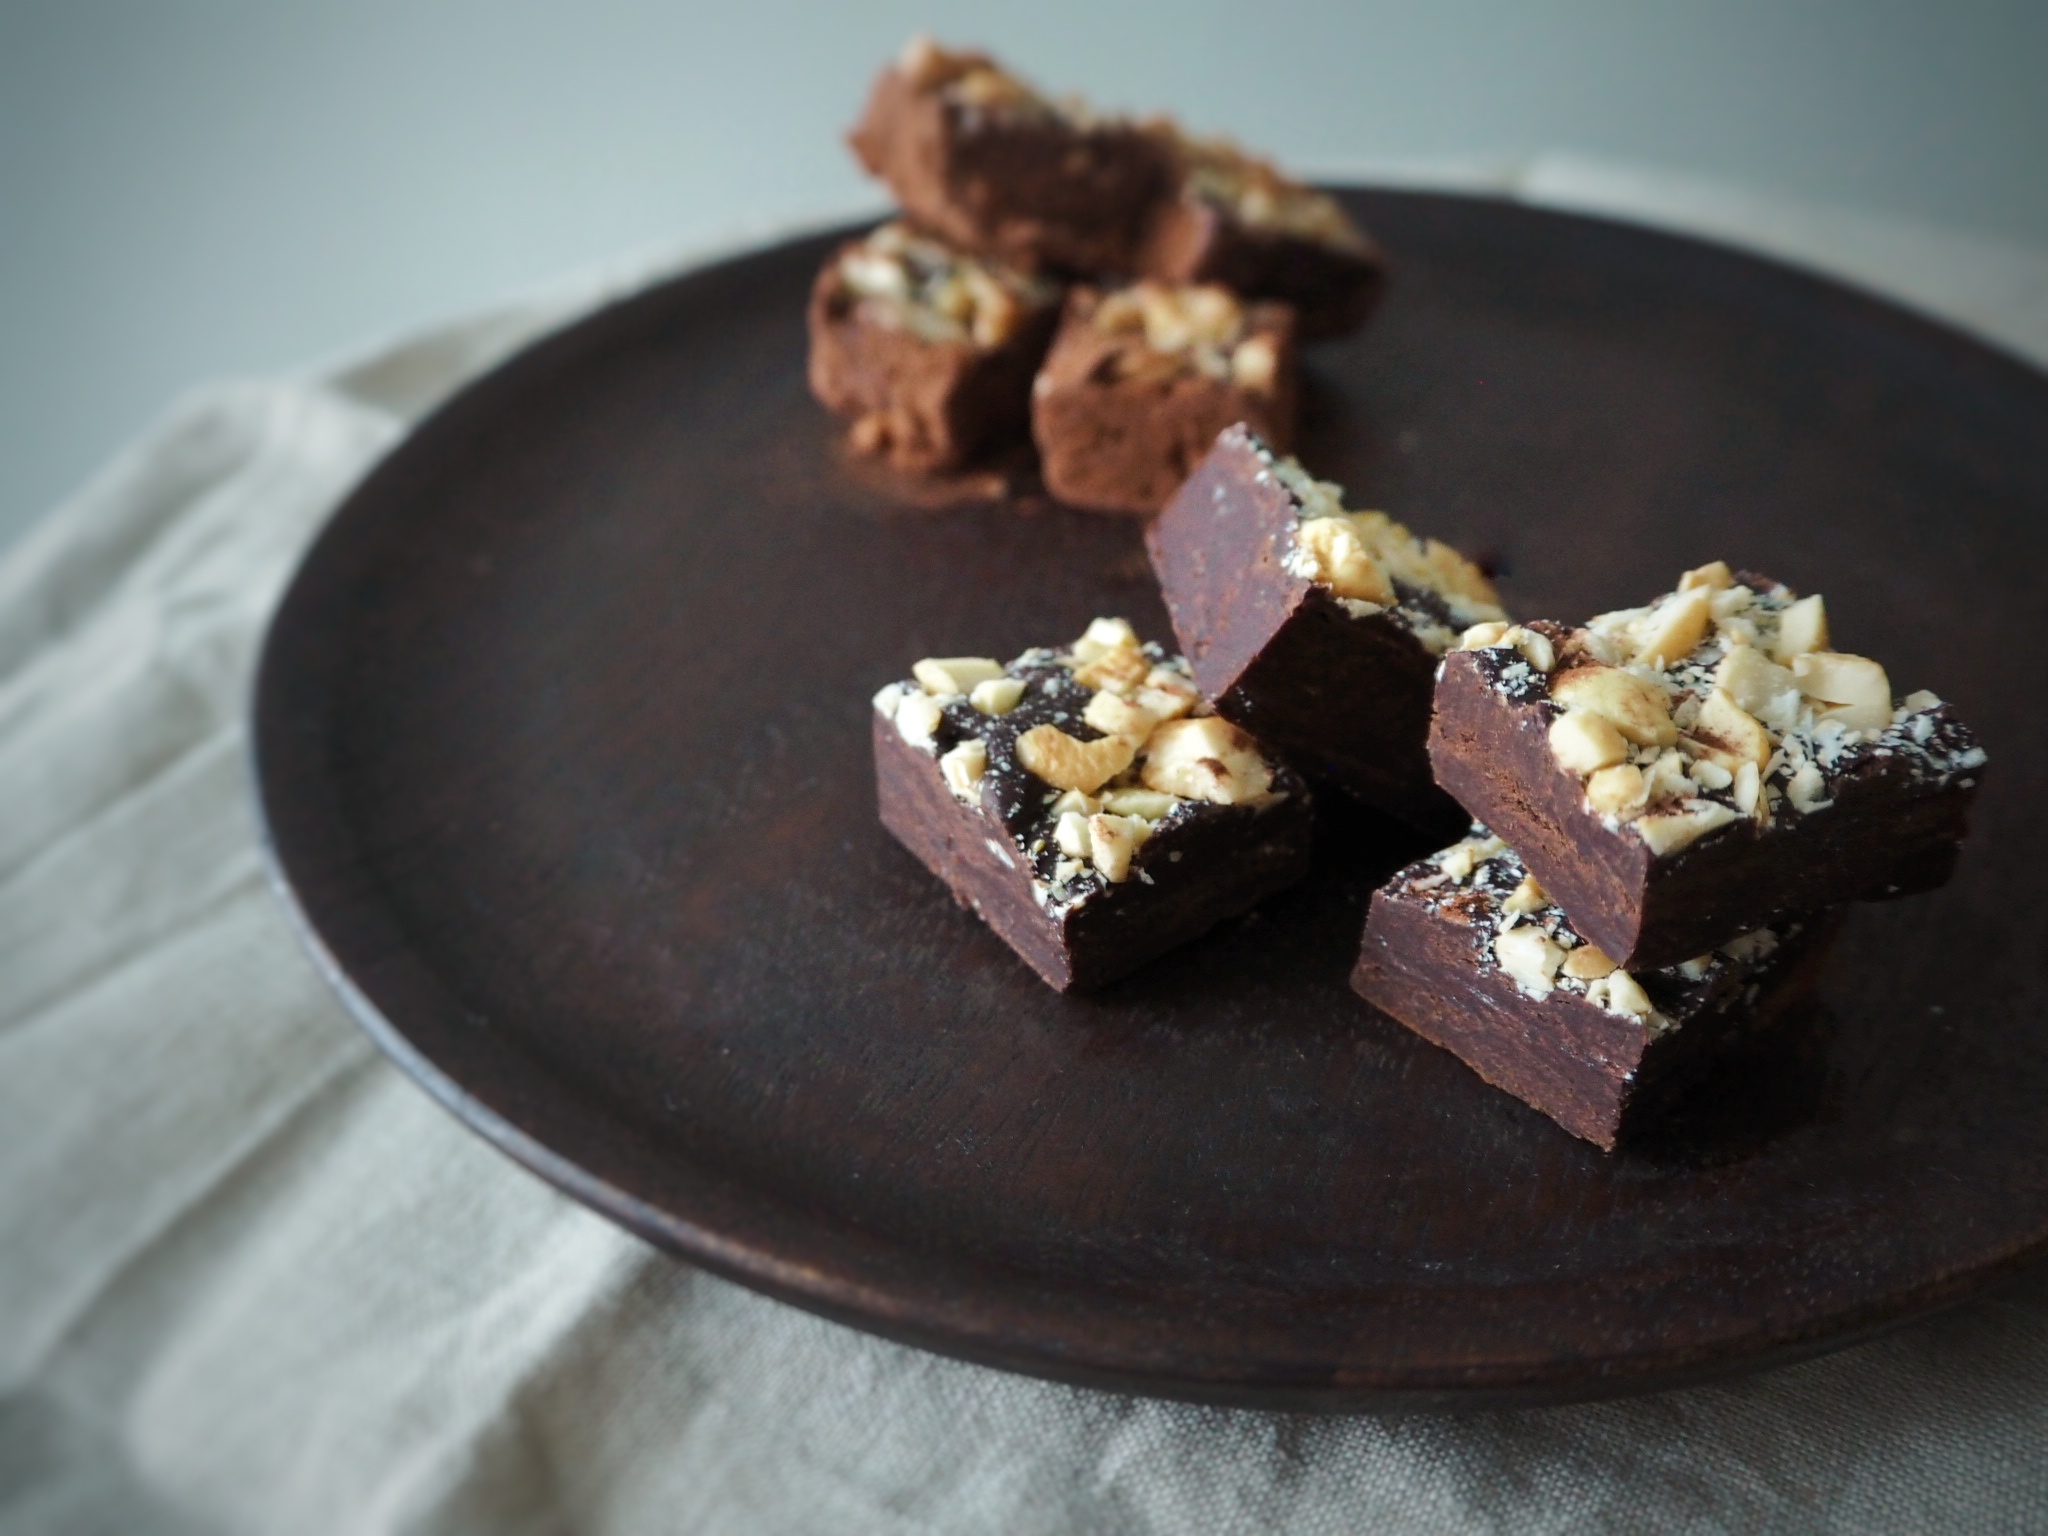
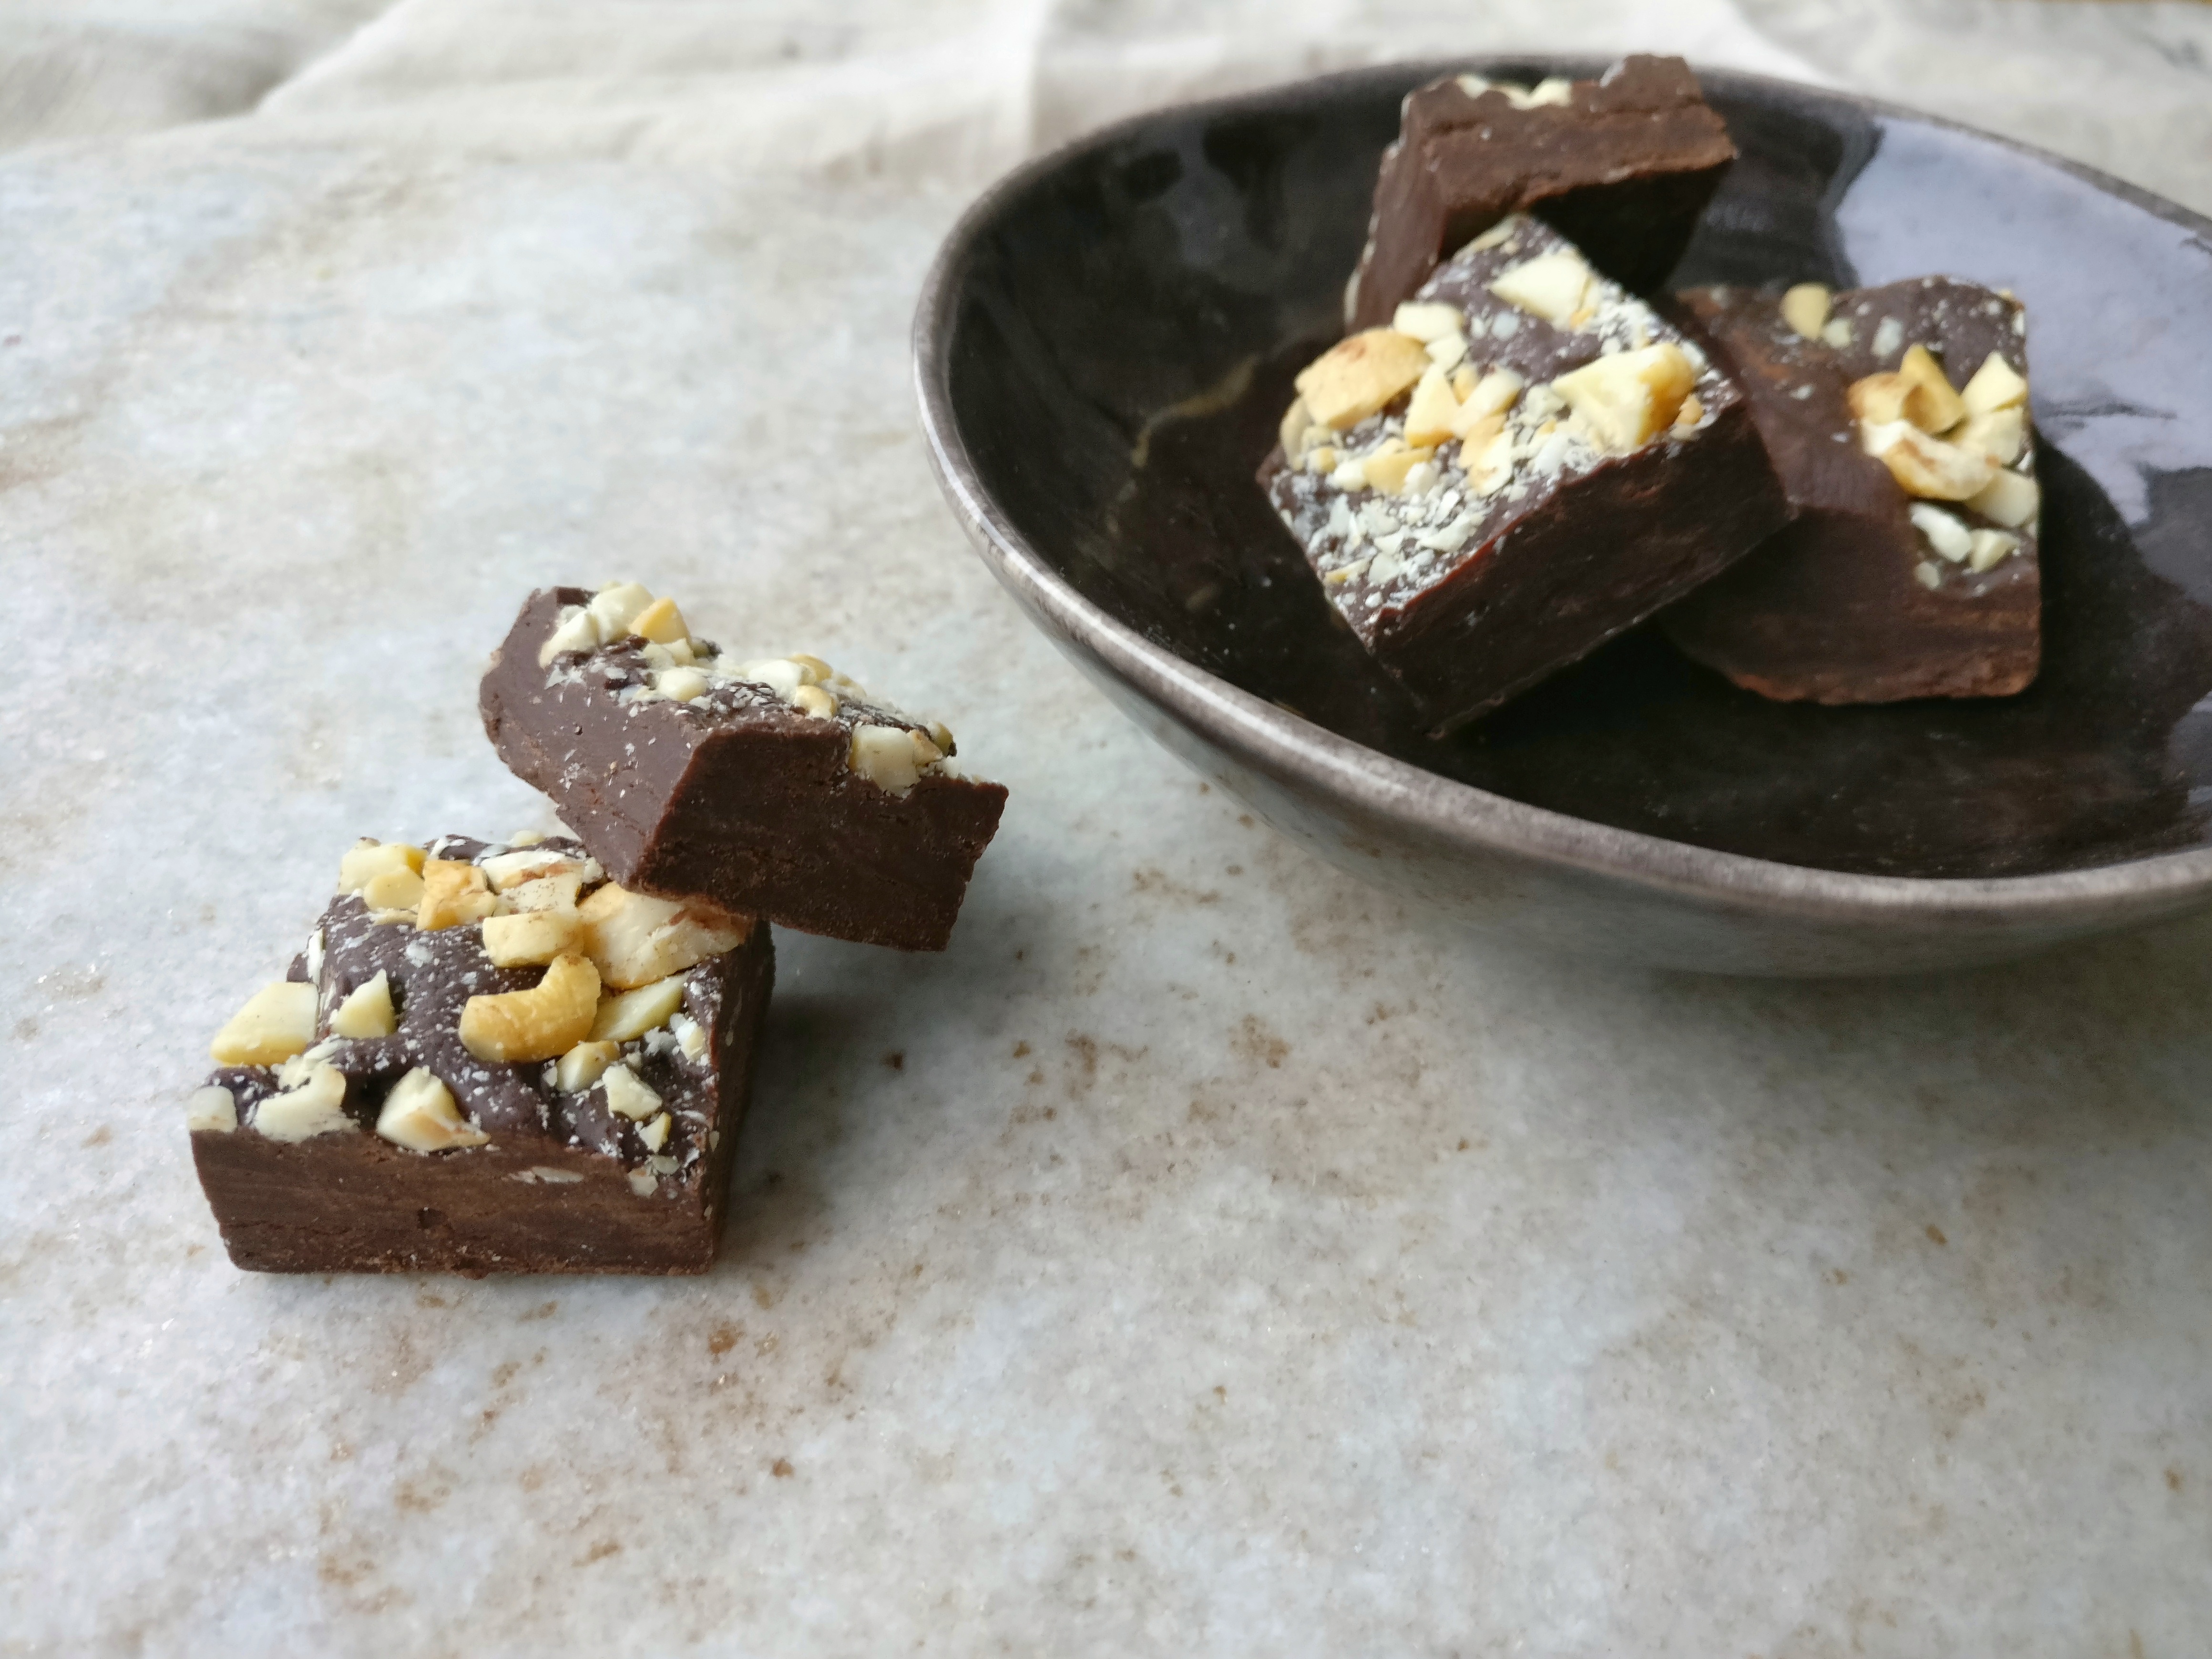
Pukkaako joulustressi päälle? Haluaisitko viedä syötäviä lahjoja tutuille, mutta aika ei tunnu riittävän mihinkään? Huomasitko toissajouluna kaverille antamasi konjakkisinapin lojuvan edelleen hänen jääkaappinsa perukoilla? Vastaus pulmiisi on suklaafudge!
”Ai fudge? Eikö sitä keitellä tuntikausia ja se juoksettuu megahelposti?” saatat kysyä. Vastaus on, että periaatteessa kyllä, mutta on olemassa oikotie onneen, joka tässä tapauksessa johtaa usein jopa parempaan lopputulokseen kuin pitkä ja hidas polku. Kerman sijaan fudgen voi nimittäin valmistaa kondensoidusta maidosta, joka notkistaa suklaan ja tekee muikean samettisen ja pehmeän rakenteen fudgepalohin. Resepti on kaiken lisäksi suorastaan niin yksinkertainen, että sen kutsuminen reseptiksi on melkeinpä liioittelua.
Perusresepti sisältää kaksi ainesosaa: sulatettua suklaata ja tölkin kondensoitua maitoa. Niillä pääsee jo pitkälle, mutta fudgen voi myös tuunata vastaamaan vastaanottajan mieltymyksiä tai omia namufantasioitaan. Tällä kertaa raastoin mukaan appelsiinia ja rouhin päälle suolattuja cashew-pähkinöitä. Jouluksi voisi kokeilla myös vaikka kanelia ja kuivattuja karpaloita, tai raikkaampaa kaipaavalle limeä ja pistaaseja.
Suosittelen käyttämään tummaa suklaata, joka ei ole kovin makeaa, sillä lähes kaikki Suomessa myytävät maitotiivisteet ovat tuhdisti sokeroituja. Jos et kaihda kunnolla makeaa tai löydät sokeroimatonta maitotiivistettä (englanniksi evaporated milk) niin voit kokeilla muitakin suklaalaatuja huoletta. Valkosuklaata käytettäessä kannattaa suklaan määrää kuitenkin lisätä ja tehdä mahdollisuuksien mukaan koe-erä, koska valkosuklaa saattaa laadusta riippuen olla kehnompaa jähmettämiskyvyiltään.
Valmiin fudgen voikin sitten vain leikata paloiksi, pyöritellä halutessaan kaakaojauheessa ja pakata sellofaani- tai paperipussikoihin. Aikaa menee lähinnä fudgen kovettamiseen pakkasessa tunnin verran, muuten projekti on ohi tuossa tuokiossa. Joskus hyvää saa helposti ja nopeasti.
Appelsiini-cashew-suklaafudge Noin 25 palaa
Ainekset 1 tlk kondensoitua maitoa (n. 400 g)
300 g tummaa suklaata
Luomuappelsiinin kuori
2 dl suolattuja cashew-pähkinöitä
Lisäksi halutessasi kaakaojauhetta
Vuoraa noin 20 x 30 cm vuoka leivinpaperilla. Tee sille tilaa pakkaseen tai jääkaappiin.
Rouhi cashew-pähkinöitä pienemmäksi ja raasta appelsiinin kuori hienolla raastimella.
Pilko suklaa paloiksi ja sulata vesihauteessa (eli keitä pieni määrä vettä kattilassa ja aseta kulho kattilan päälle niin, ettei sen pohja kosketa vettä) tai mikrossa (30 sekuntia kerrallaan).
Kaada kondensoitu maito suklaan mukaan ja sekoita rivakasti. Jos maitotiiviste on viileää, suklaa saattaa jämähtää nopeastikin. Lisää appelsiininkuori ja sekoita.
Kaavi massa leivinpaperilla vuorattuun vuokaan ja tasoita. Ripottele cashew-rouhe massan päälle ja painele rouhe kiinni massaan.
Laita vuoka pakkaseen tai jääkaappiin ja anna fudgen jähmettyä tunnin verran.
Leikkaa jähmettynyt fudge paloiksi lämpimällä veitsellä. Voit halutessasi pyöritellä fudgepalat kaakaojauheessa. Pakkaa fudget pussiin ja anna lahjaksi tai ahmi itse.
Hyvää joulua, muistakaa ottaa iisisti ja nauttia herkuista ja ruoasta hyvällä omallatunnolla!
-Toni
—
Hi there!
Feeling swamped by everything you have to get done by Christmas? You want to give delicious treats to your loved ones, but it feels like about eight hours of each day are just missing? Did you notice the home-made mustard you gave to your friend in 2014 still hanging in the back of their fridge? Read on, because I may have a solution for your problems.
“Fudge? The soft toffee type thing that takes hours to cook?” you might be asking, and you might be right on that. Though I’m usually an advocate for slow food and original recipes, a shortcut here and there is more than acceptable. Especially since the shortcut I’m about to point out leads to a better result than the winding path. The shortcut I’m talking about is using condensed milk instead of cream. The condensed milk makes the fudge velvety soft and delicious. Moreover, it makes the recipe so easy that calling it a recipe is an exaggeration.
The basic recipe requires two ingredients: melted chocolate and a can of condensed milk. Other things can be added to introduce flavour or texture, like the orange zest and cashew nuts in this recipe. You could add some Christmassy spices and dried cranberries to make a holiday fudge, or lime zest and pistachios for someone looking for some refreshment after a heavy feast.
I would use dark and bitter chocolate for this, as the condensed milk is plenty sweet. If you are not afraid of some serious sweetness, or you can get your hands on a can of unsweetened condensed milk (often called evaporated milk), you can use whatever chocolate you fancy. If using white chocolate, though, I would add some more chocolate and possibly make a test batch, as white chocolate might not be able to set the fudge entirely.
When the fudge is done, you can cut the fudge into pieces and roll them in cocoa powder and pack into festive bags and shell out to people and ta-dah, you got some new fans! The whole thing is done in a little over hour, so I would call this efficient time management in the time of the year when the hours in a day seem to vanish inexplicably. Sometimes good things just might be that quick and easy.
Orange and Cashew Chocolate Fudge Approx. 25 pieces
Ingredients 1 can of condensed or evaporated milk (about 400g)
300g dark chocolate
Zest of an organic orange
2 dl salted cashews
Additionally Cocoa powder (optional)
Line a rectangular pan (about 20 x 30 cm) with parchment paper. Make room for the pan in your freezer or fridge.
Chop the cashews coarsely, grate the zest off the orange.
Melt the chocolate either in bain-marie (in a bowl placed on a kettle of steaming water) or microwave (30 seconds at a time)
Pour the condensed milk into the melted chocolate and mix briskly. If the condensed milk is cool, the chocolate might stiffen up quickly. Add the orange zest and mix thoroughly.
Transfer the fudge into the pan lined with parchment paper and even the surface. Sprinkle the cashews on top and press gently to make them stick to the fudge.
Place the pan into a freezer or fridge and let set for an hour.
Cut the fudge into chunks using a warm knife. If you want, you can roll the chunks in cocoa powder for a dusty finish. Pack into pretty bags and gift to those who have been nice. Including yourself.
Merry Christmas people, remember to take it easy and enjoy your treats and feasts!
Jaahas, long time no write. Tällä kertaa pitkän paussin syynä ei ole ainoastaan vähäinen keittiössä vietetty aika, eikä edes päivänvalon vähäisyys ja sen aiheuttama valoisien kuvausaikojen harvinaisuus. Viime kuun lopussa kävi nimittäin niin, että sain vakituisen päivätyön, joten aika on ollut niin sanotusti hieman kortilla. Tarkoitus olisi kuitenkin silloin tällöin kirjoitella tännekin, joten ällös huolehdi. Käännöstoimeksiantoja ja muita töitä otan myös vastaan kuten ennenkin.
Se siitä tilannepäivityksestä, tuli nimittäin kokkailtua ja kuvailtua pitkästi aikaa jotain uutta ja maukasta. Sunnuntailounaalle piti keksiä jotain, ja koska en ole käynyt kunnolla kaupassa ainakaan viikkoon, montaakaan tuoretta ainesta ei ollut käytettävissä. Sen sijaan kuivakaapit pullistelevat kaikennäköisiä säilykkeitä ja pussukoita, joita olen tilaillut erinäisistä alennusnettikaupoista. Katselin pitkää riviä erilaisia paputölkkejä täysin ilman inspiraatiota ja päätin hakea jälleen kerran konsultaatiotukea kasvisruoan mestarilta, herra Ottolenghiltä. Ottolenghin reseptit kuitenkin vaativat yleensä pitkän listan tuoreita kasviksia ja yrttejä, mutta pienen tonkimisen jälkeen vastaan tuli resepti, joka mukaili brittiklassikko Beans on toastia. Ottolenghi tosin käytti kikherneitä, Lähi-Idän mausteita ja haudutti papuja tomaattikastikkeessa 5 tuntia (!). Vaikka olenkin slow foodin vankkumaton kannattaja, kuulostaa moinen hieman liioittelulta. Oikaisin ”hieman” lisäämällä reseptiin miso-tahnaa tuomaan samaa umamia, jota syntyisi tomaatista pitkän haudutuksen aikana. Aivan samanlainen lopputulos ei varmasti ole, mutta pirun herkullista kuitenkin.
Sipulien ja muiden makupohjan ainesten ajaminen tahnaksi saattaa sekin tuntua turhalta työvaiheelta, mutta toisaalta silloin säästyy kasvisten pilkkomiselta lähes täysin. Tahnaksi soseutettu makupohja myös kypsyy nopeammin, joten suosittelen kokeilemaan sitä. Jos käytössä ei ole monitoimikonetta tai sauvasekoitinta, voi sipulit ja muut kyllä hienontaa ihan veitsellä.
Lisäsin kastikkeeseen tosiaan muutaman lusikallisen miso-tahnaa tuomaan täyteläistä makua nopeasti. Käytän misoa paljon, joten sitä on aina jääkaapissani purkillinen. Tuo fermentoitu soijapaputahna säilyy ällistyttävän hyvin, joten kovin usein sitä ei tarvitse uusia. Puhdasta miso-tahnaa voi ostaa ainakin aasialaisista ruokakaupoista ja joidenkin isojen markettien Aasia-hyllystä. Saman asian voi kuitenkin hoitaa jokaisesta marketista löytyvillä misokeittoaineksilla, joissa pääraaka-aineen ainakin pitäisi olla miso-tahna. Tarkkaile kuitenkin suolan määrää, jos käytät misokeittoaineksia, koska ne ovat usein hyvin suolaisia.
Tähän pataan lenteli vähän kaikennäköisiä tahnoja ja mausteita, joita kaapeissa lojui, joten voit skippailla niitä varsin vapaasti. Makua voit muutenkin helposti säätää oman mieltymyksien mukaiseksi lisäämällä tai vähentämällä mausteiden määriä.
Beans on toast eli papumuhennos leivälle 2-4 annosta
Ainekset
Maustetahna 1 sipuli
1 valkosipulin kynsi
3 rkl tomaattipyreetä
3 rkl oliiviöljyä
1 rkl misotahnaa
½ tl suolaa
½ tl mustapippuria
½ tl korianteria
½ tl jeeraa
1 tl savupaprikaa
1 tl chilijauhetta
1 rkl sokeria
(1 rkl tahinia)
½-1 tlk valkoisia papuja
½-1 tlk kikherneitä
1 tlk hyvää tomaattimurskaa
oliiviöljyä
Lisäksi leipäviipaleita
oliiviöljyä
pehmeäksi keitettyjä kananmunia
suolaa ja pippuria
(za’atar-mausteseosta)
Tee ensin maustetahna: kuori ja pilko sipulit muutaman osaan ja laita monitoimikoneeseen tai tehosekoittimeen. Mittaa tahnan loput ainekset mukaan ja surauta tasaiseksi. Saman pitäisi onnistua myös sauvasekoittimella.
Laita kannellinen kastikekasari tai kattila lämpiämään keskilämmölle. Lorauta kasariin vähän oliiviöljyä ja kaavi maustetahna pannulle. Paista tahnaa muutama minuutti.
Valuta ja huuhtele pavut ja kikherneet. Lisää ne pannulle ja sekoita tahnan kanssa. Lisää sitten tölkillinen tomaattimurskaa. Täytä tyhjä tölkki puoliksi vedellä ja lisää vesi pannulle. Sekoita, anna kastikkeen kiehahtaa ja laske sitten lämpötilaa alimmalle tasolle. Anna muhennokset hautua kannen alla välillä sekoitellen mahdollisimman pitkän, mielellään ainakin tunnin verran.
Maista muhennosta ja lisää tarvittaessa suolaa ja muita mausteita. Misotahnalla saat lisättyä täyteläisyyttä, jos maku tuntuu ohuelta.
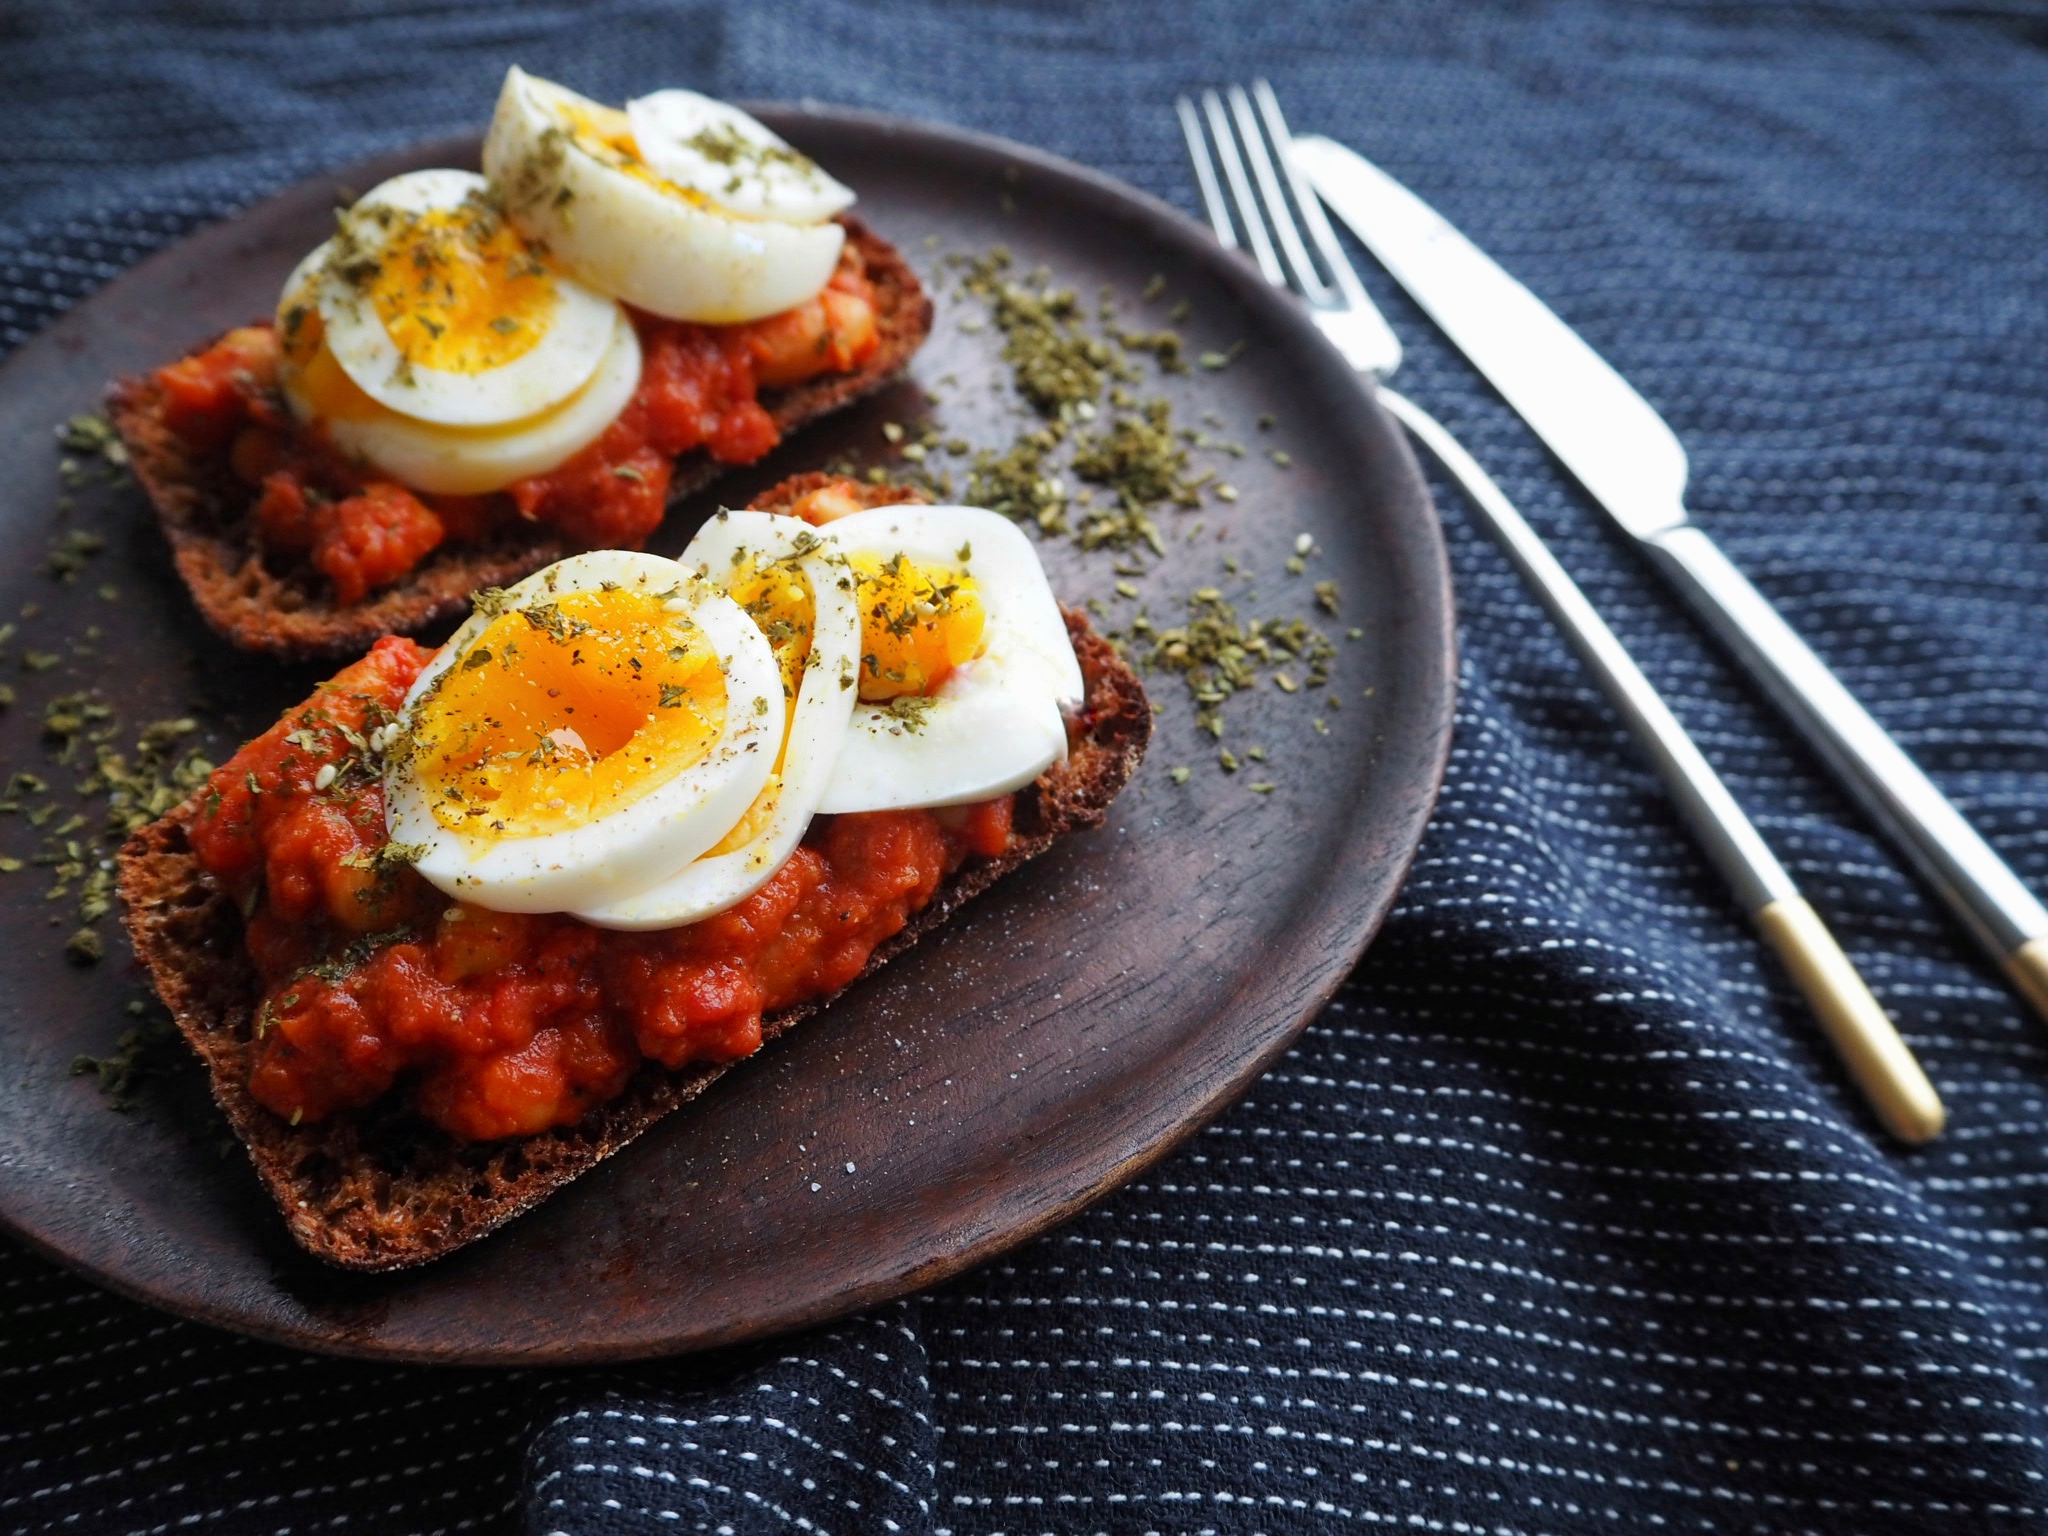
Jos käytät kananmunia, keitä ja jäähdytä ne muhennoksen kypsyessä. 7-8 minuutin munien keltuaiset ovat täydellisen valuvia.
Laita uunin grillivastus lämpenemään täydellä lämmöllä. Voitele leipäviipaleita oliiviöljyllä ja laita ne uunipellille suoraan grillivastuksen alle. Käytin itse ruisleipää, mutta vaaleakin leipä käy erinomaisesti. Paahda leipiä muutama minuutti, mutta älä polta.
Kokoa leivät: kauho paahdetuille leiville muhkea kasa kuumaa muhennosta, pilko päälle kananmunaa ja koristele koko komeus za’atar-maustesekoituksella sekä suolalla ja pippurilla. Za’atarin sijaan voit käyttää seesaminsiemeniä ja persiljaa.
Vinkki! Tämä muhennos sopii erinomaisesti myös riisin, kuskuksen tai bulgurin kanssa tarjoiltavasti.
No, kuulostaako syötävältä? Täyteläisen tomaattikastikkeen, mureiden papujen ja lämmittävien mausteiden yhdistelmä on erinomainen lounasruoka kylmille marraskuisille päiville, joten tätä tulee varmasti keiteltyä useamman kerran lähiaikoina. Seuraavaksi täytyykin varmaan siirtyä jouluisten mausteiden syleilyyn, kun appelsiini, kaneli ja neilikka täyttävät tuoksullaan loppuvuoden.
-Toni
—
Hi there!
Long time, no write. This time my excuse isn’t just the lack of time spent in the kitchen or even the diminishing number of daylight hours here in the north that make photography quite hard. What really happened, is that I got a fulltime job in the end of last month. Since then, my schedules have been all over the place. But fear not, I’m not considering dropping this blog, but there might not be weekly posts. (As if there had been in the last six months.) I’m also still available for translation commissions and other jobs as usual.
So now that the situation update has been given, let’s dive in with today’s recipe. I finally had the time and energy to cook something new and delicious. I hadn’t been properly grocery shopping for over a week so there weren’t that many fresh ingredients available, but my pantry was (and is) bursting with all kinds conned goods and other goodies from various online discount shops. I was looking at the long line-up of canned beans but nothing felt inspiring, so I decided to look for inspiration from the Grand Master of vegetarian cuisine, Mr. Ottolenghi. His recipes, however, are often full of different and exotic fresh ingredients, so it took a while but I did find a nice recipe for Middle-Eastern Beans on toast. It is based on chickpeas and ample spices stewed in a lovely tomato sauce for five hours(!). Even though I consider myself as slow food acolyte, I think that’s long for a bean stew. I fast-tracked the recipe by adding a spoonful of miso paste to bring in the umami flavour that would eventually appear from the tomatoes after long and slow cooking. I’m sure the result isn’t quite the same, but it’s damn delicious anyway!
Grinding the onion and such into a paste before cooking might seems like an extra step, but it actually saves you from chopping and mincing everything. Finely pureed flavour paste also cooks faster and therefore creates the flavour base in a timely manner. If you don’t have the equipment to make a paste, a sharp knife gets you there just as surely.
So, my main addition to the recipe is the miso paste which expands the deepness of flavour quickly and easily. I use miso a lot so there’s always a jar in my fridge. The fermented soy bean paste keeps remarkably well so there’s no need to replace it often. You can buy pure miso paste at Asian grocery stores and some large supermarkets. You can also use miso soup base, that is sold at basically every supermarket that has any Asian foods. The main ingredient of miso soup is (or at least should be) miso paste, so it should be a good substitution. However, the miso soup bases often are quite salty, so skimp on the salt in other stages on the recipe.
I used all kinds of pastes and spices I found in the pantry, so feel free to streamline the recipe as you wish. You can also use bigger or smaller amounts of spices to suit your taste.
Beans on toast 2-4 servings
Ingredients
Flavour paste 1 onion
1 garlic clove
3 tbsp. tomato paste
3 tbsp. olive oil
1 tbsp. miso paste
½ tsp. salt
½ tsp. black pepper
½ tsp. ground coriander
½ tsp. ground cumin
1 tsp. smoked paprika
1 tsp. chili powder
1 tbsp. sugar
(1 tbsp. tahini)
½-1 can white beans
½-1 can chickpeas
1 can canned tomatoes
olive oil
Additionally bread
olive oil
soft boiled eggs
salt and pepper
(za’atar spice mix)
Start by making the flavour paste: peel and quarter the onion and garlic clove. Add them to the bowl of a food processor with the rest of the ingredients and blitz until smooth.
Place a medium size sauce pan with a lid on the hob on medium heat. Add some olive oil and the paste. Cook for a couple minutes until fragrant.
Drain and rinse the beans and chickpeas. Add them to the pan with the paste. Add the canned tomatoes and rinse the can with water and add the water, too, to the pan. Mix, bring to a boil, reduce heat and let simmer under the lid as long as possible, preferably at least an hour, mixing every once in a while.
Taste the stew and add salt and spices, if necessary. Adding more miso paste deepens the flavour, if the stew’s flavour seems thin.
If using eggs for the toast, boil them soft (7-8 minutes) and cool in cold water before peeling.
Turn on the grill in your oven and place bread slices on an oven sheet and drizzle with generous olive oil. Toast the bread for a couple of minutes under the grill but don’t let them burn. I used rye bread but any kind will do. Sourdough would be glorious.
Assemble the toast: ladle a big pile of the bean stew onto the toasted bread, slice the egg on top, and garnish with za’atar (should you have some) and salt and pepper. You can use sesame seeds and parsley instead of za’atar.
Tip! This stew is excellent when served with rice, couscous, or bulgur, too!
So, how about that? I know Finns probably won’t have strong feelings about changing up the classic Beans on toast, but some Brits may feel violated by this blasphemy. Personally, I find the comforting combination of the hearty tomato sauce, the tender beans, and the warming spices just what the doctor ordered for the cold November days. Middle-Eastern spices also work as gateway to the Christmas spices, orange, cinnamon, and clove, that will dominate the olfactory sensory field of the remaining year.
Pohdin edellisessä kirjoituksessa, että niitä kuuluisia arjen pelastaja -ruokia pitäisi ehkä dokumentoida tänne myös enemmän. Edelleenkään en ole mitään uutta ja eksoottista keittiössä kokeillut toviin (tosin syksyn ensimmäinen hapanjuurileipä paistui pitkän tauon jälkeen), joten nämä reseptit ovat toistaiseksi hyvinkin ajankohtaisia keittiössäni.
Helpoimmasta ja nopeimmasta päästä arkiruokia ovat tietenkin munakkaat. Hieno ruokalaji, johon voi ajaa oikeastaan mitä vain kasviksista edellisen päivän tähteisiin ja puoliunohtuneisiin säilykkeisiin. Kananmunien proteiinipitoisuus pitää vatsan täytevaihtoehdoista riippumatta kylläisenä ainakin illalliseen saakka.
Munakkaissa on kuitenkin se yksi ikävä vaihe: kääntäminen. Kun munakasta yrittää kääntää päällispuolen hyydyttämiseksi, tapahtuu usein kamalia ja munakas löytyy usein jostain ihan muualta kuin pannulta. Klassinen mummokikka on käyttää kääntämiseen lautasta, mutta se ei poista mokaamisen vaaraa täysin (been there, done that, screwed up, twice). Uunissakin munakkaan voi kypsentää alusta asti, mutta se on verrattain hidasta hommaa kiireiseille lounastajalle.
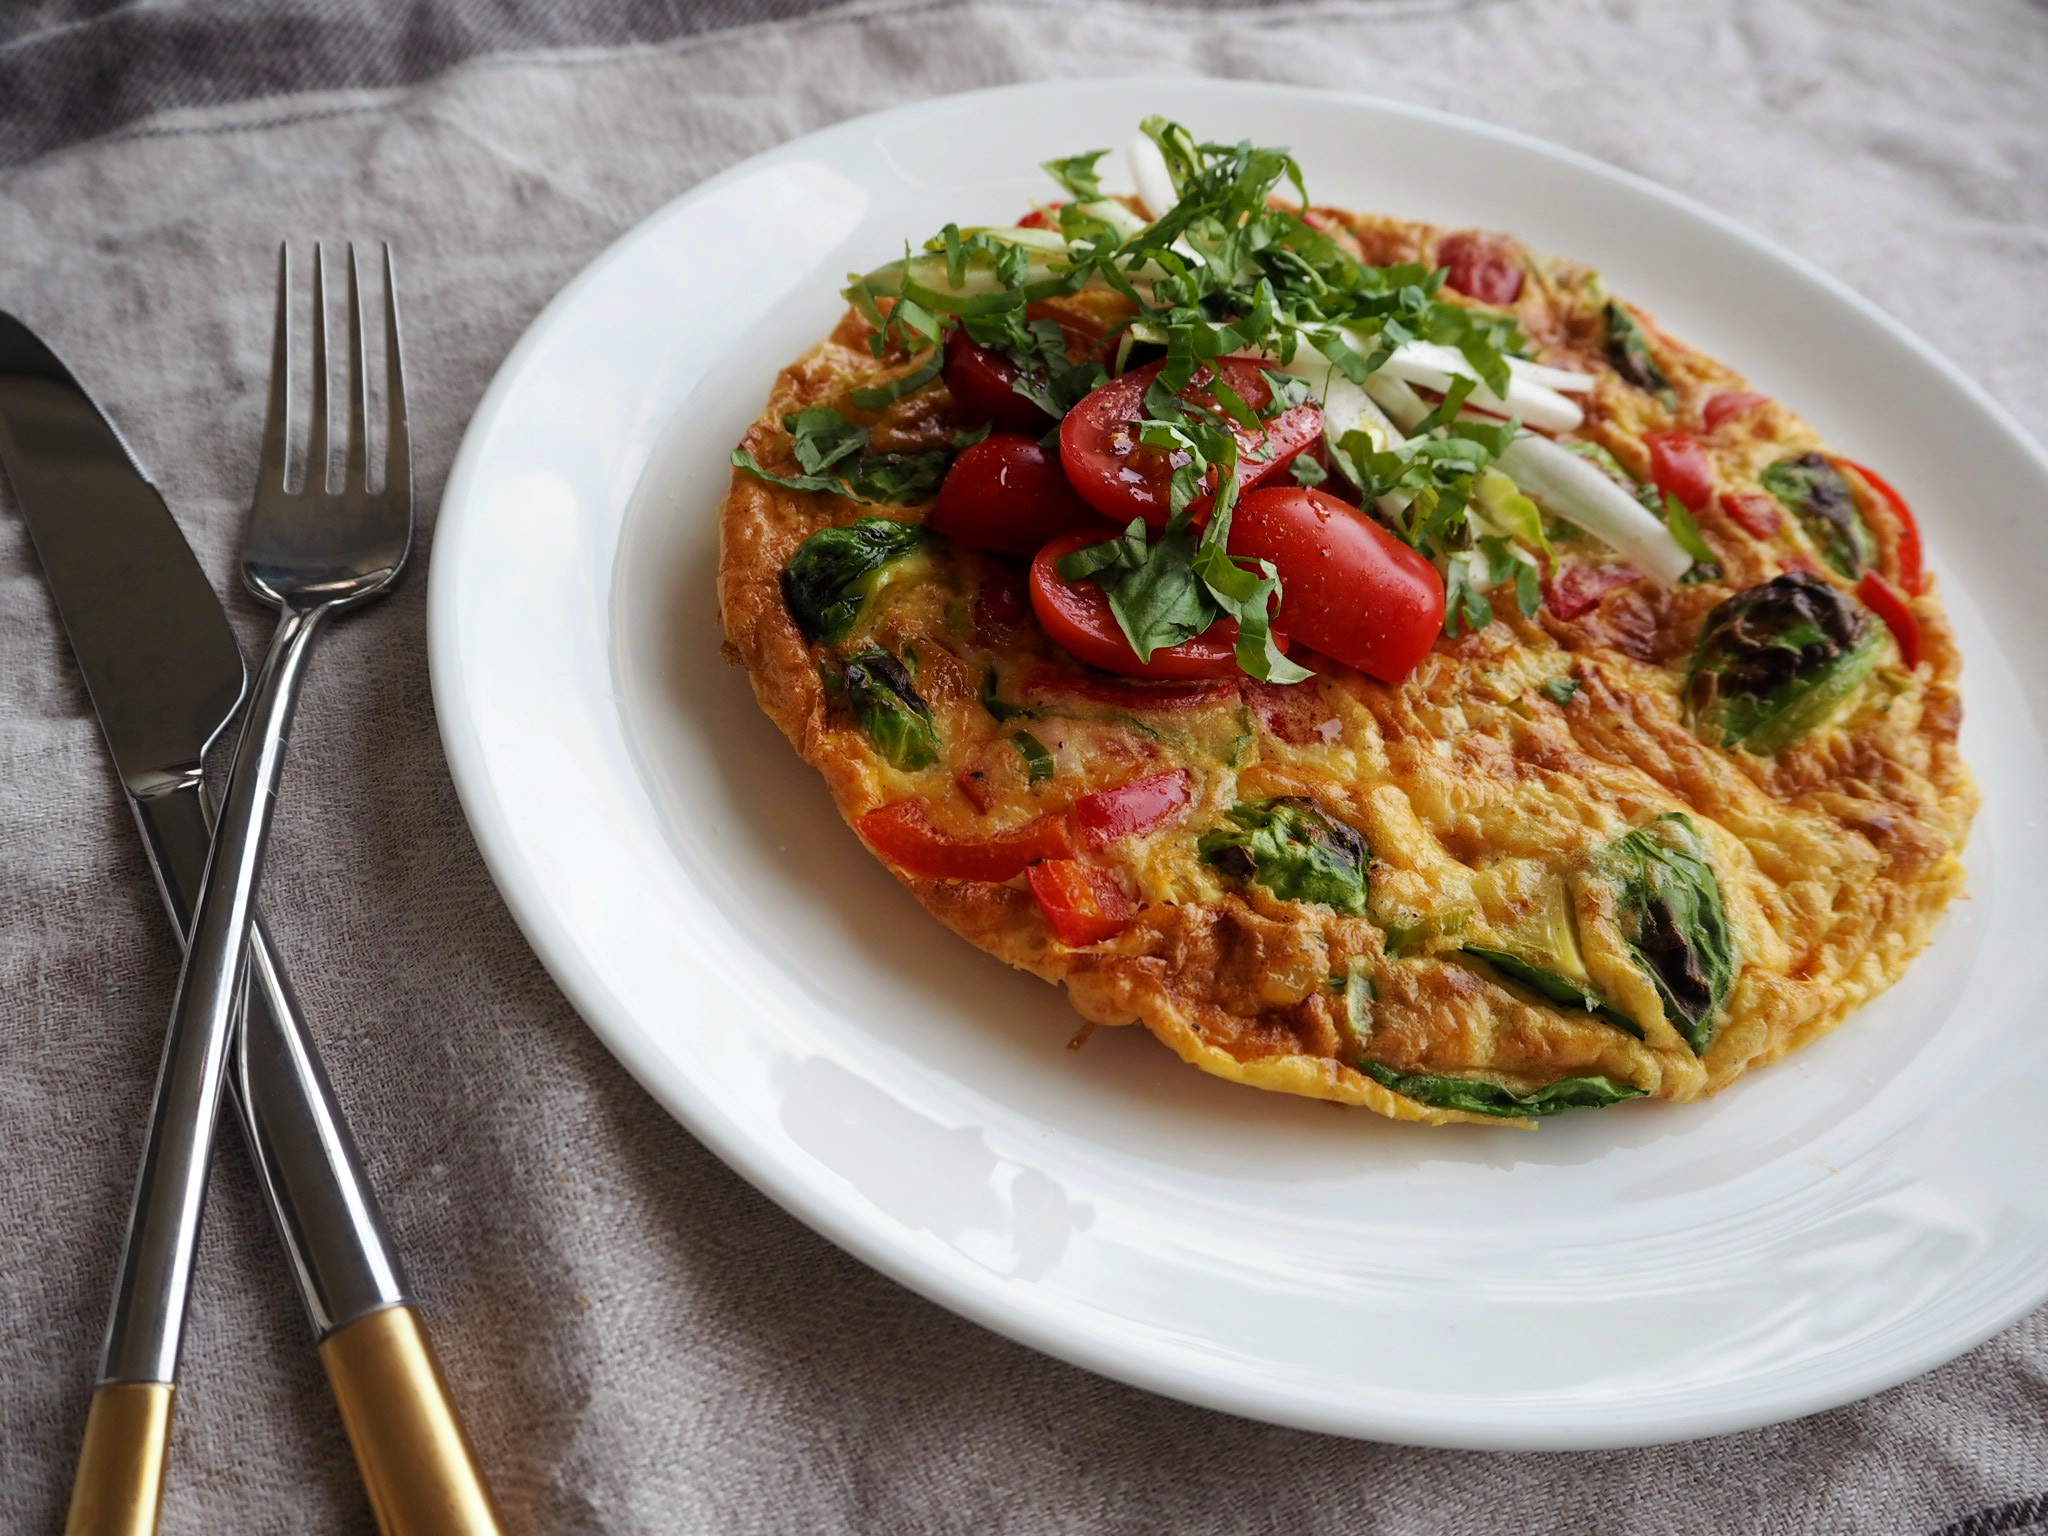
Italialainen frittata on ratkaisu tähän. Se paistetaan alkuun pannulla, joka sitten lyödään uuniin grillivastuksen alle muutamaksi minuutiksi, joten kääntämistä ei tarvita, eikä munakasta tarvitse odotella puolta tuntia. Idea on lähes idioottivarma: itse olen toivoton munakkaan ja ylipäänsä munanpaistaja, mutta yhtäkään frittataa en ole pilannut. Tätä kannattaa siis ehdottomasti kokeilla, jos munakkaat ovat tuntuneet turhan vaikeilta.
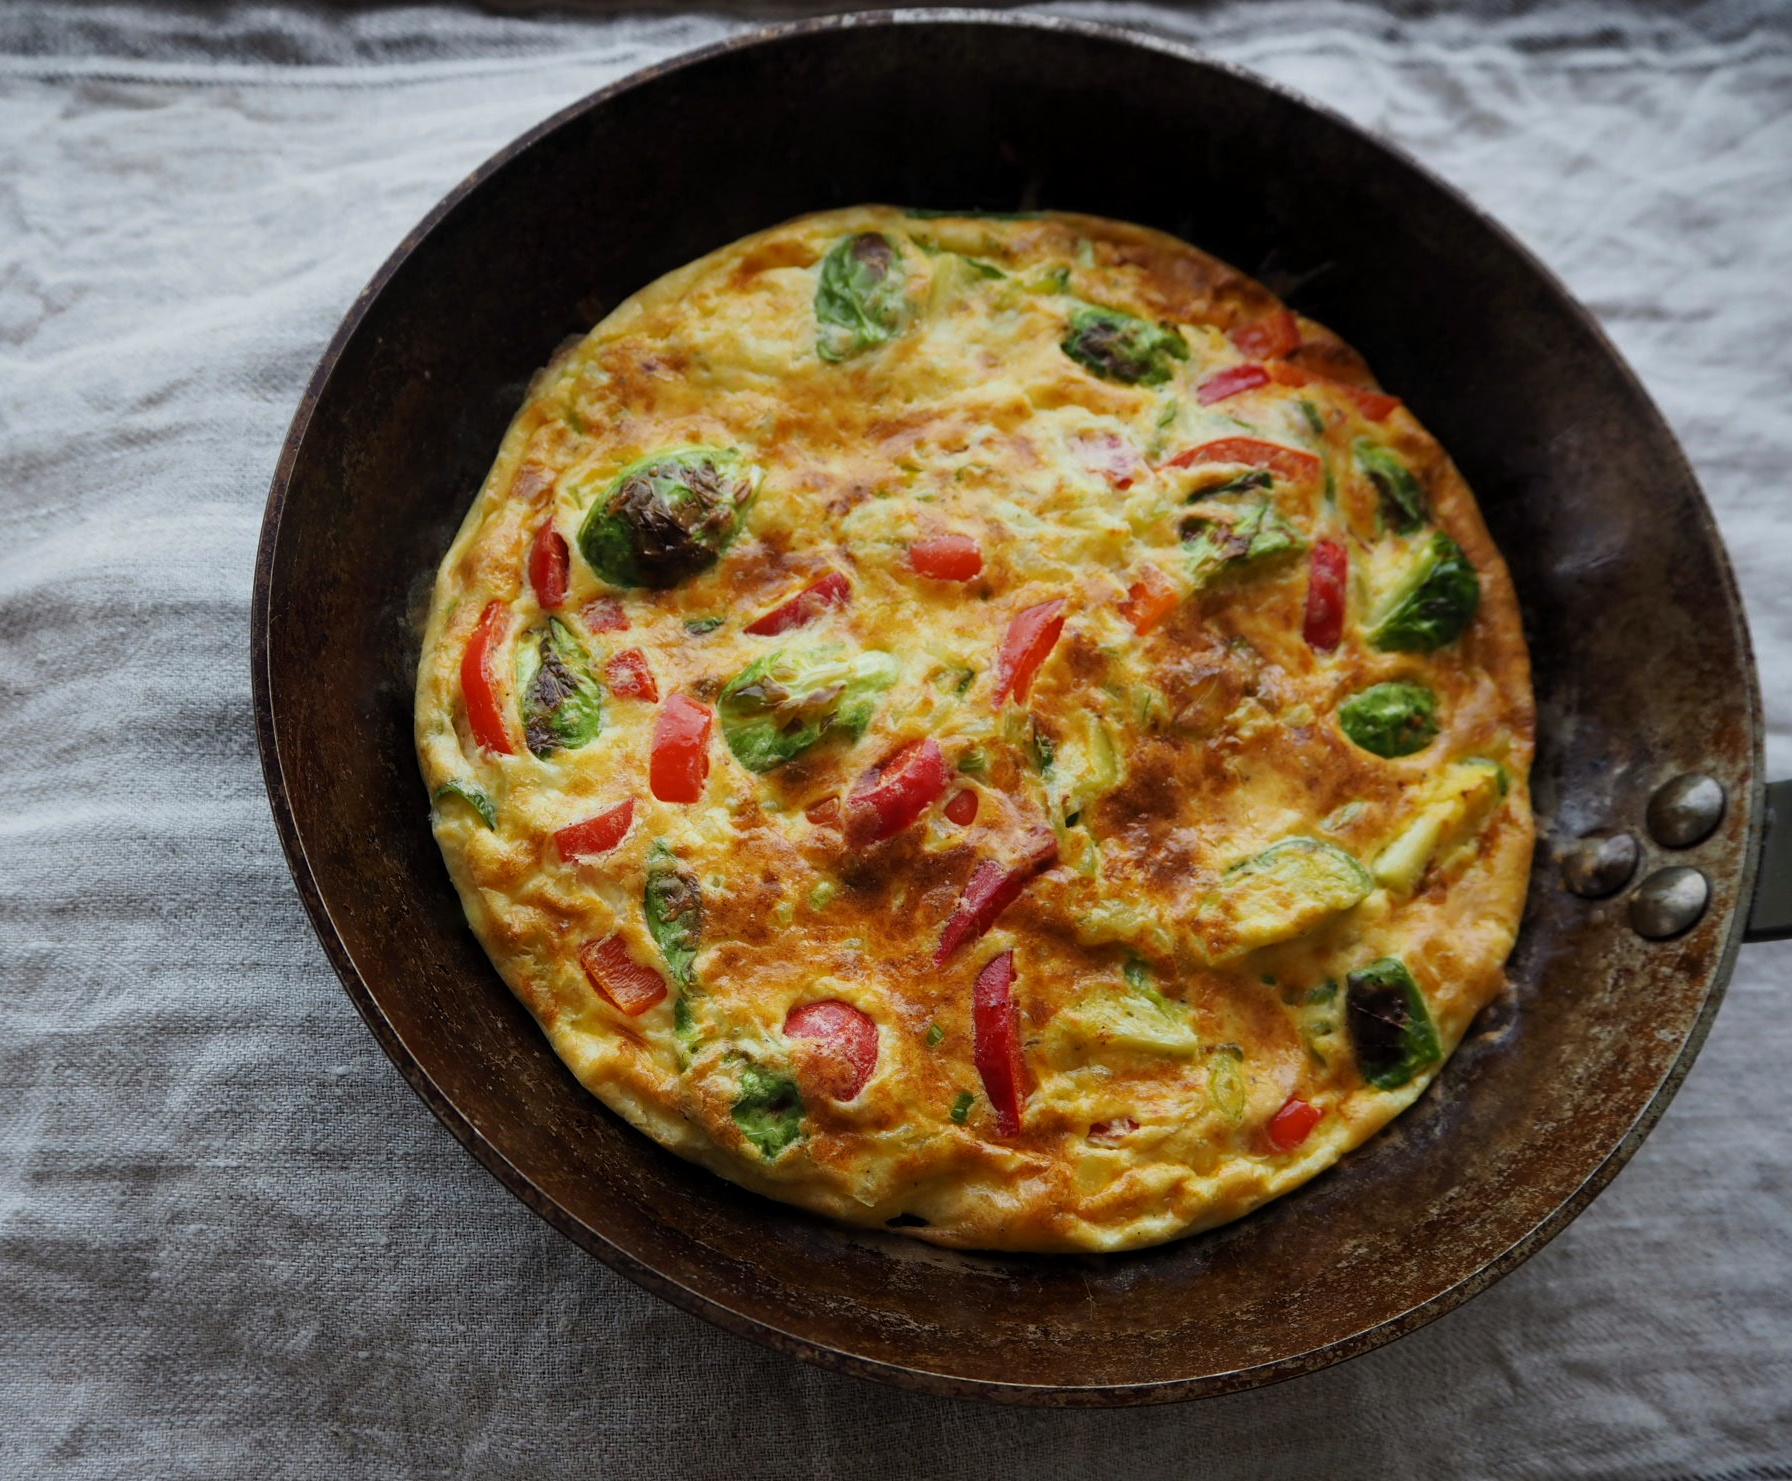
Tässä versiossa on paprikaa, purjoa ja ruusukaalia | This version is made with sweet peppers, leek and Brussels sprouts.
Yksi vaatimus frittatan paistamiseen tosin on: paistinpannun täytyy kestää uunia. Paras vaihtoehto on siis hiiliteräs, teräspannu tai valurauta. Muitakin voi omalla vastuulla kokeilla, mutta muovikahvan kanssa kannattaa olla varuillaan.
(Ja kyllä, reseptissä on taas maissia, mutta jätä se pois jos saturaatiopiste on saavutettu.)
Valmiina uuniin | Ready for the oven
Neljän minuuutin grillauksen jälkeen | After 4 minutes under the grill
Frittata Yhdelle
Ainekset 3 kananmunaa
½ dl vettä
kovaa juustoa raastettuna (pecorino, parmesaani tms.)
oliiviöljyä
suolaa
mustapippuria
1 pieni sipuli
½ paprika
½ dl maissia
1 lehti lehtikaalia
Riko kananmunat kulhoon, mittaa mukaan vesi ja vatkaa kevyesti. Raasta mukaan kovaa juustoa, jos sattuu löytymään ja rouhi suolaa ja mustapippuria.
Kuori ja silppua sipuli, pilko paprika ja lehtikaali, valuta säilykemaissi.
Lämmitä uuninkestävä n. 20 cm paistinpannu keksilämmöllä. Valuta pannulle oliiviöljyä, lisää pilkotut kasvikset ja paistele muutama minuutti.
Kaada pannulle vatkatut munat. Sekoittele levyesti, jotta kasvikset leviävät tasaisesti munakkaaseen. Paista munakasta pannulla, kunnes se on pintaa lukuun ottamatta hyytynyt. Siirrä sitten munakas pannuineen uuniin ylätasolle grillivastuksen alle. Sulje luukku, mikäli se mahtuu kiinni. Anna munakkaan paistua uunissa muutama minuutti, tai kunnes pinta on täysin hyytynyt.
Ota pannu pois uunista (varo kuumaa kahvaa) ja irrota munakas varovasti lastalla. Siirrä lautaselle ja halutessasi koristele vielä esimerkiksi lohkotulla tomaatilla, silmusalaatilla ja oliiviöljyllä.
Ovatko munakkaat jo arkiruokarotaatiossa, vai ovatko ne mielestäsi aamiaisruokaa?
Hyvää loppuviikkoa höpönassut!
-Toni
—
Last time I figured that I should post more quick everyday lunch recipes here. The situation in my kitchen remains the same: nothing new and exotic, though I did wake up my sourdough after a six month break, so these recipes are still very much my go-to stuff at the moment.
One of the culmination points of quick and tasty lunches are omelettes. Such a fine concept, for which you can use basically anything and everything you have lying around from veggies to leftovers and those canned foods you had forgotten in your cupboards. Whatever you choose to throw on the pan, the high protein content of the eggs should keep you full until supper.
However, there is that one annoying thing about omelettes everybody dreads: the flip. When you try to flip the omelette to set the upper side, you are very likely to find the omelette somewhere totally else than the pan (at least I am). The Classic Granny Tip is to use a plate for the flip but even that’s not fool-proof (been there, done that, screwed up, twice). You can, of course, cook the omelette in the oven, but ain’t nobody got time for dat. At least for lunch.
The Italian Frittata is the answer to all our troubles (at least those related to flipping omelettes). You cook your frittata first in the pan on the hob and then finish it by throwing the whole pan under the grill in the oven for a few minutes. No need to flip your omelettes and no need to wait for the oven to heat. The method is basically idiot-proof: I’m usually hopeless in cooking omelettes and eggs in general but I have not screwed up a single frittata. This is the one to try if you are wary of cooking eggs.
There is one requirement for frittata: a pan that can be put in the oven. The best option is a carbon steel, stainless steel or cast iron pan. Other materials might work too, but be aware that the heat might do something unexpected. Plastics handles should be paid special attention to.
(And yes, there is sweetcorn in the recipe, again, but you can leave it out if your saturation point has been reached.)
Frittata For one
Ingredients 3 eggs
½ dl water
grated hard cheese (pecorino, parmigiano tms.)
olive oil
salt
black pepper
1 small onion
½ sweet pepper
½ dl sweetcorn
1 leaf kale
Additionally tomato
sprouts
Turn on the grill element in your oven on full heat.
Break the eggs in a bowl, add the water and whisk lightly. If using cheese, grate some and add to the eggs with black pepper and a generous pinch of salt.
Peel and mince the onion, dice the sweet pepper and shred the kale. Drain the sweetcorn if using canned corn.
Heat an oven-proof pan on medium heat on the hob. Add some olive oil and the vegetables and cook for a minute or two.
Pour in the whisked eggs. Stir lightly to spread the vegetables evenly. Cook the omelette on the pan until it is mostly solidified, except on the surface. Transfer then the whole pan, omelettes and all, into the oven under the grill element. Close the hatch, if possible. Roast for a couple of minutes until the surface of the omelette is set.
Take the pan out (careful with the hot handle) and loosen the omelette with a spatula. Transfer onto a plate and add some fresh tomatoes and sprouts.
There! Are omelettes part of your daily meal rotation, or do you feel it’s more of a breakfast dish?
Heh, syksyhän ehti pitkälle edellisen kirjoituksen jälkeen. Ainakin täällä etelässä tuntuu olevan komein ruska vuosiin, kun puut vaihtavat vuorotellen väriään keltaiseen, oranssin ja punaisen eri sävyihin ja lopulta ruskeaan. Siihen tule kiinnitettyä huomiota erityisesti siksi, että asuntomme joka ikkunasta näkyy suoraan suuria lehtipuita, joista iso osa on vielä vaahteroita. Väriloiston puutteesta ei voi siis ainakaan valittaa. Lisäksi sää on hellinyt poutaisena ja varsin lämpimänä viime viikot, joskin nyt Karibian hurrikaanien rippeet saivat asiaintolan kääntymään epävakaampaan suuntaan.
Keittiössä on monista syistä ollut hiljaista, ja olenkin kokkaillut lähinnä nopeita aterioita, niitä kuuluisia arjen pelastajia. Instagramin puolella ovatkin vilahtaneet frittatat, maissit ja muut helpot ja nopeat safkat. Niistä voisi tietenkin kirjoitella tännekin enemmän, koska moni tuntuu etsivän inspiraatiota nopeisiin ja helppoiin arkiruokiin netistä .
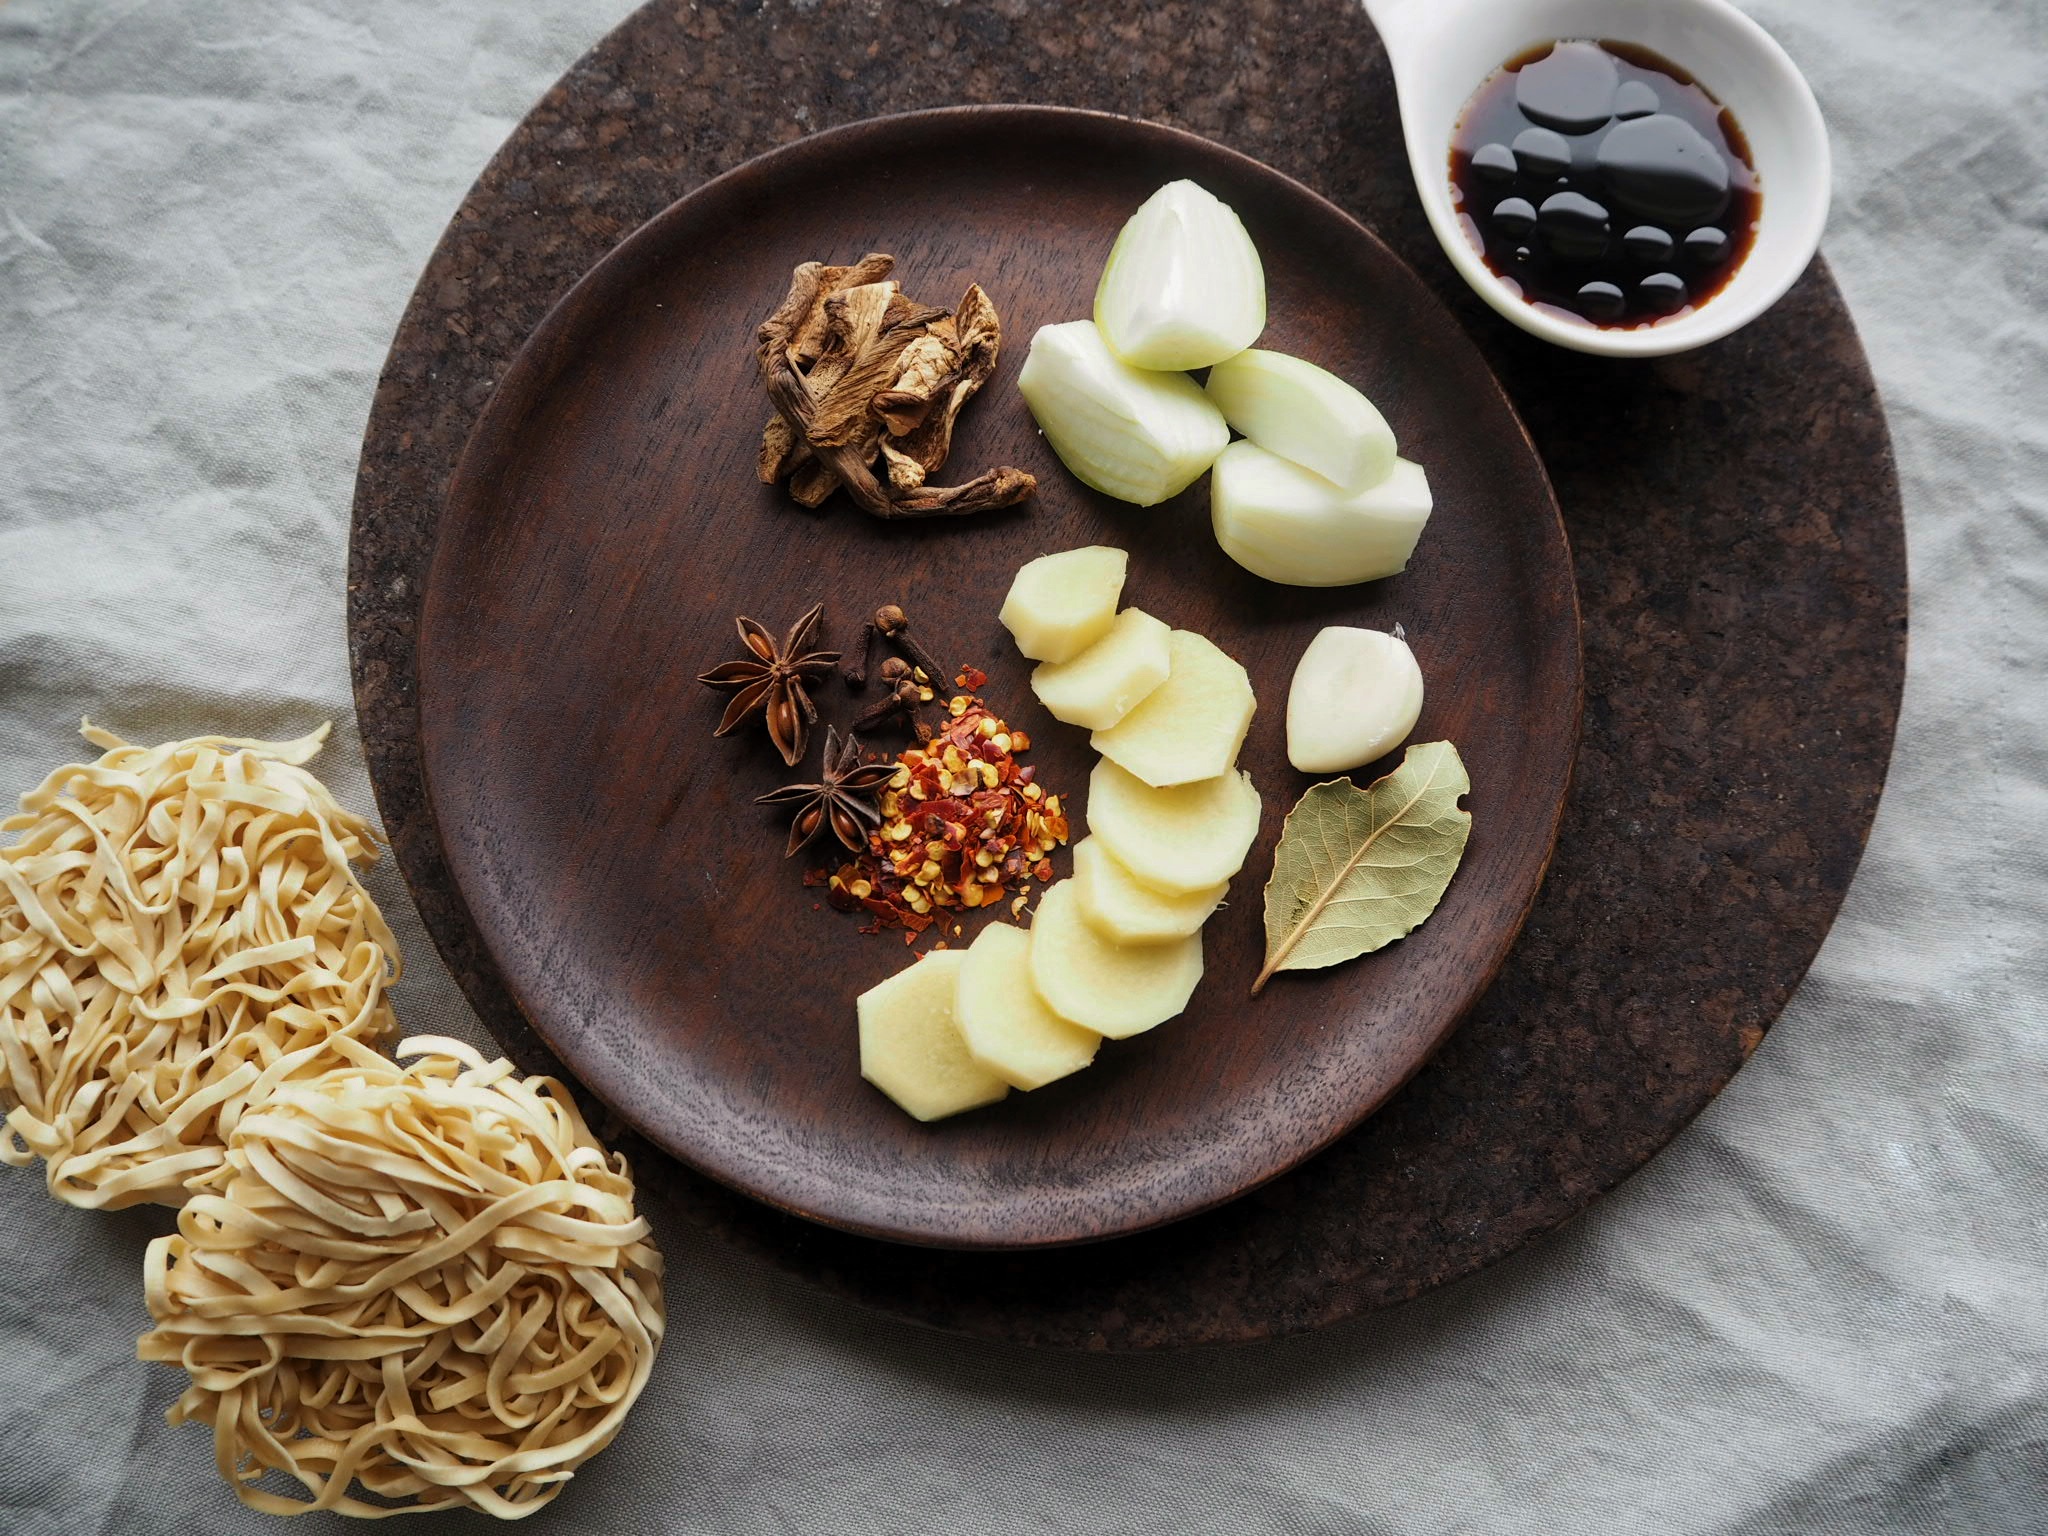
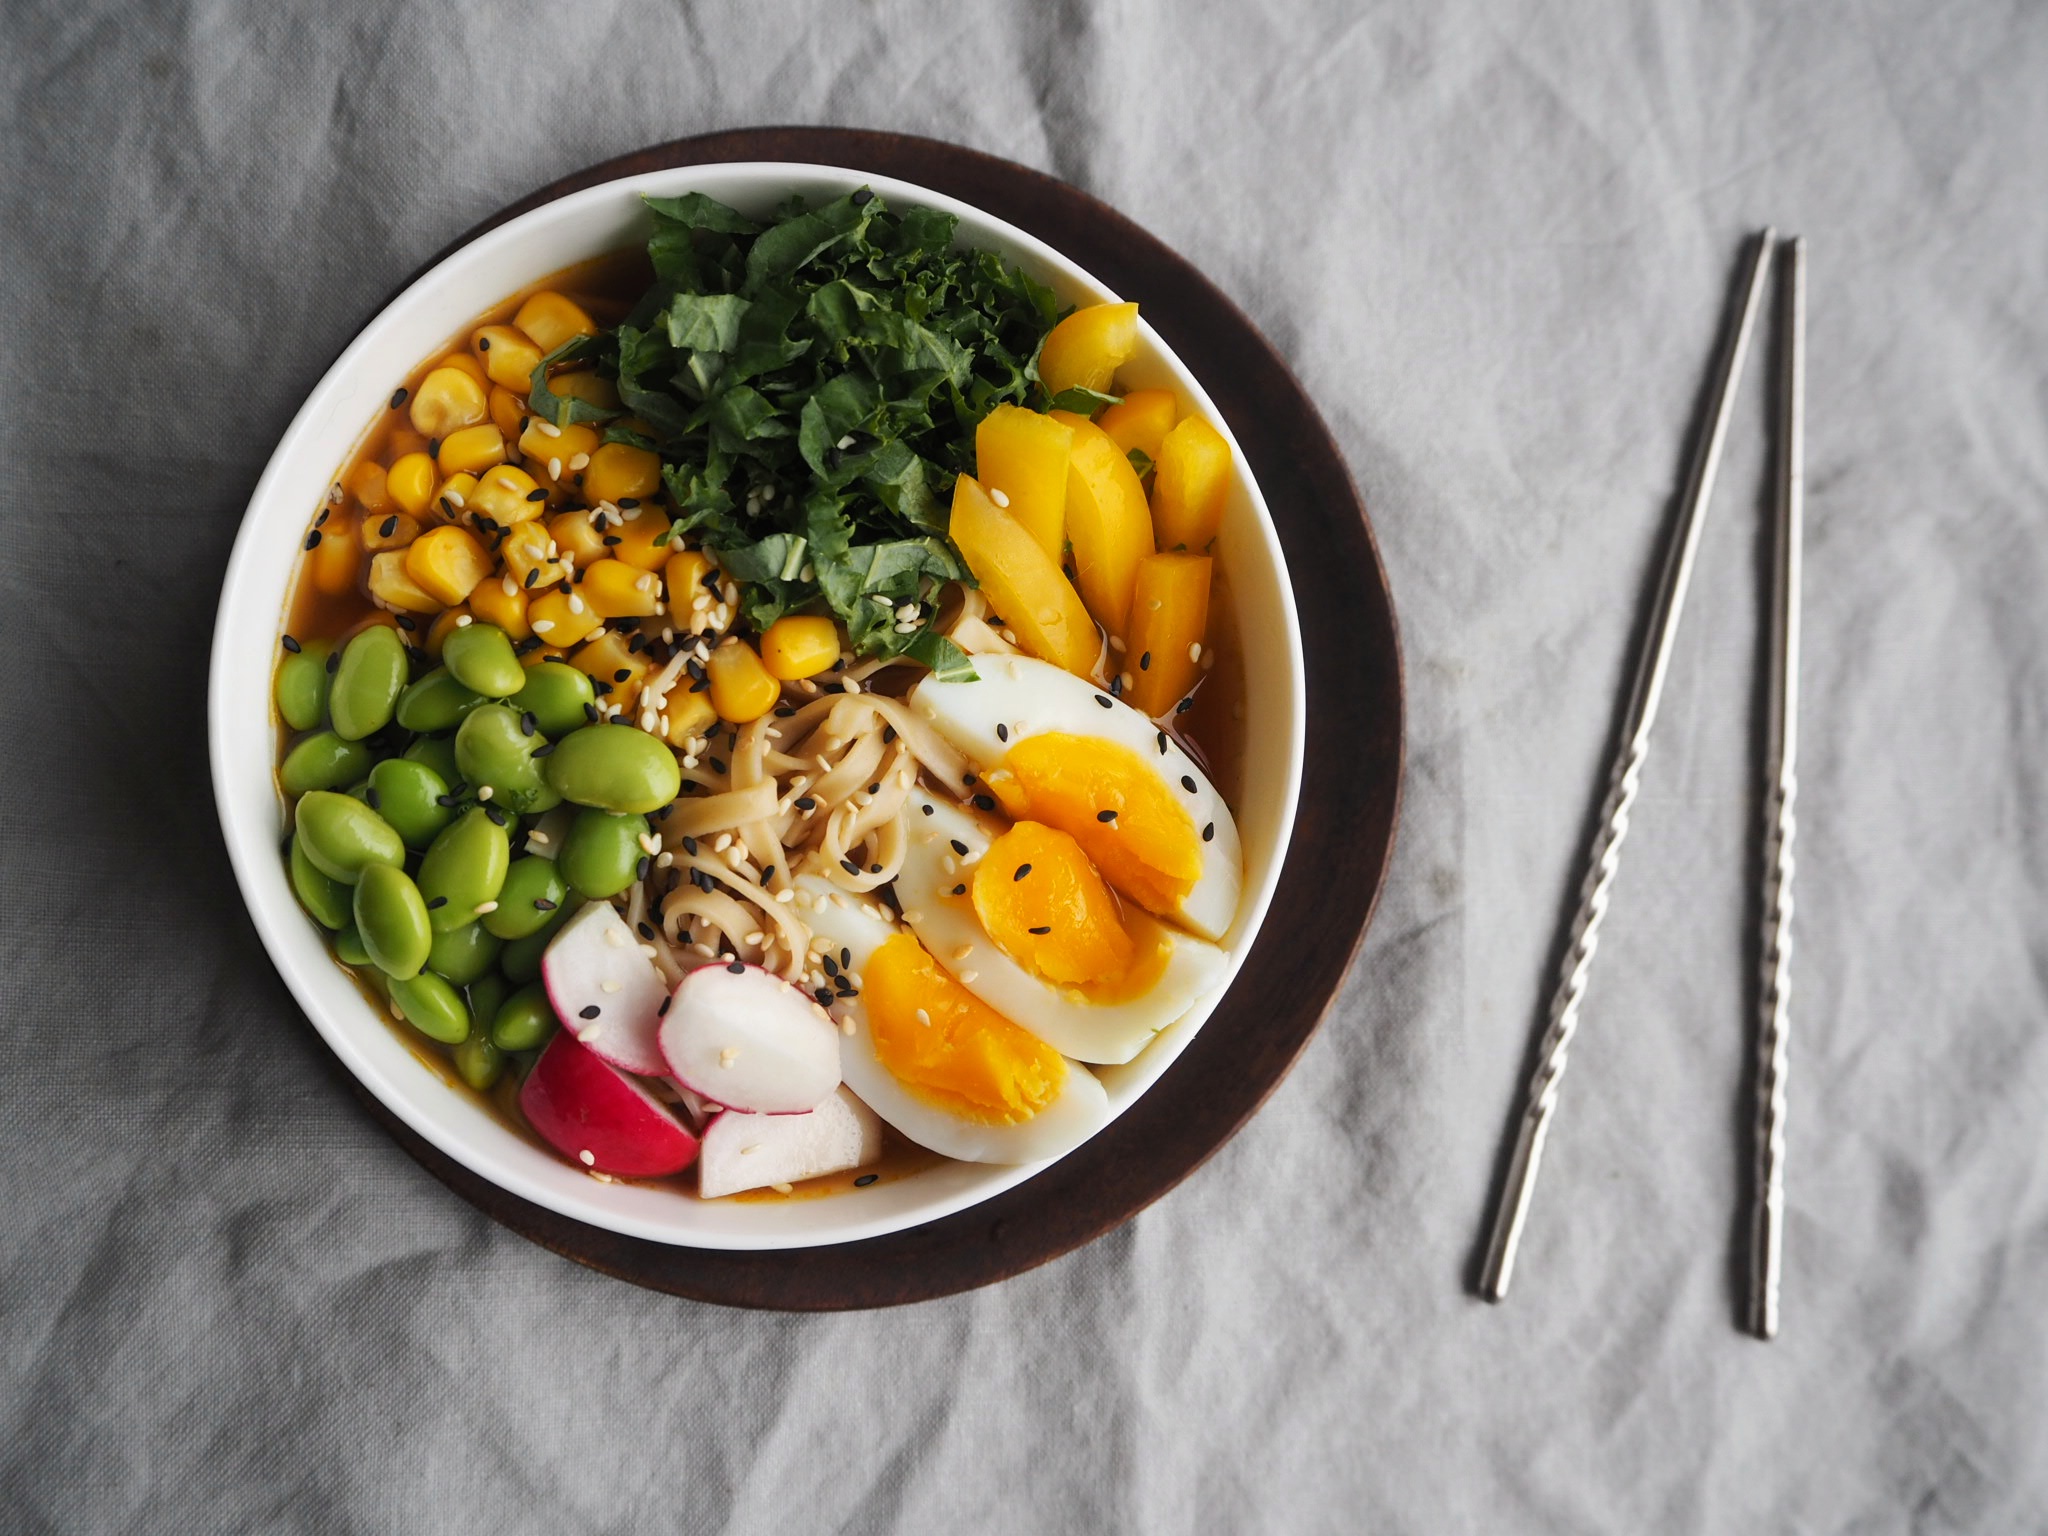
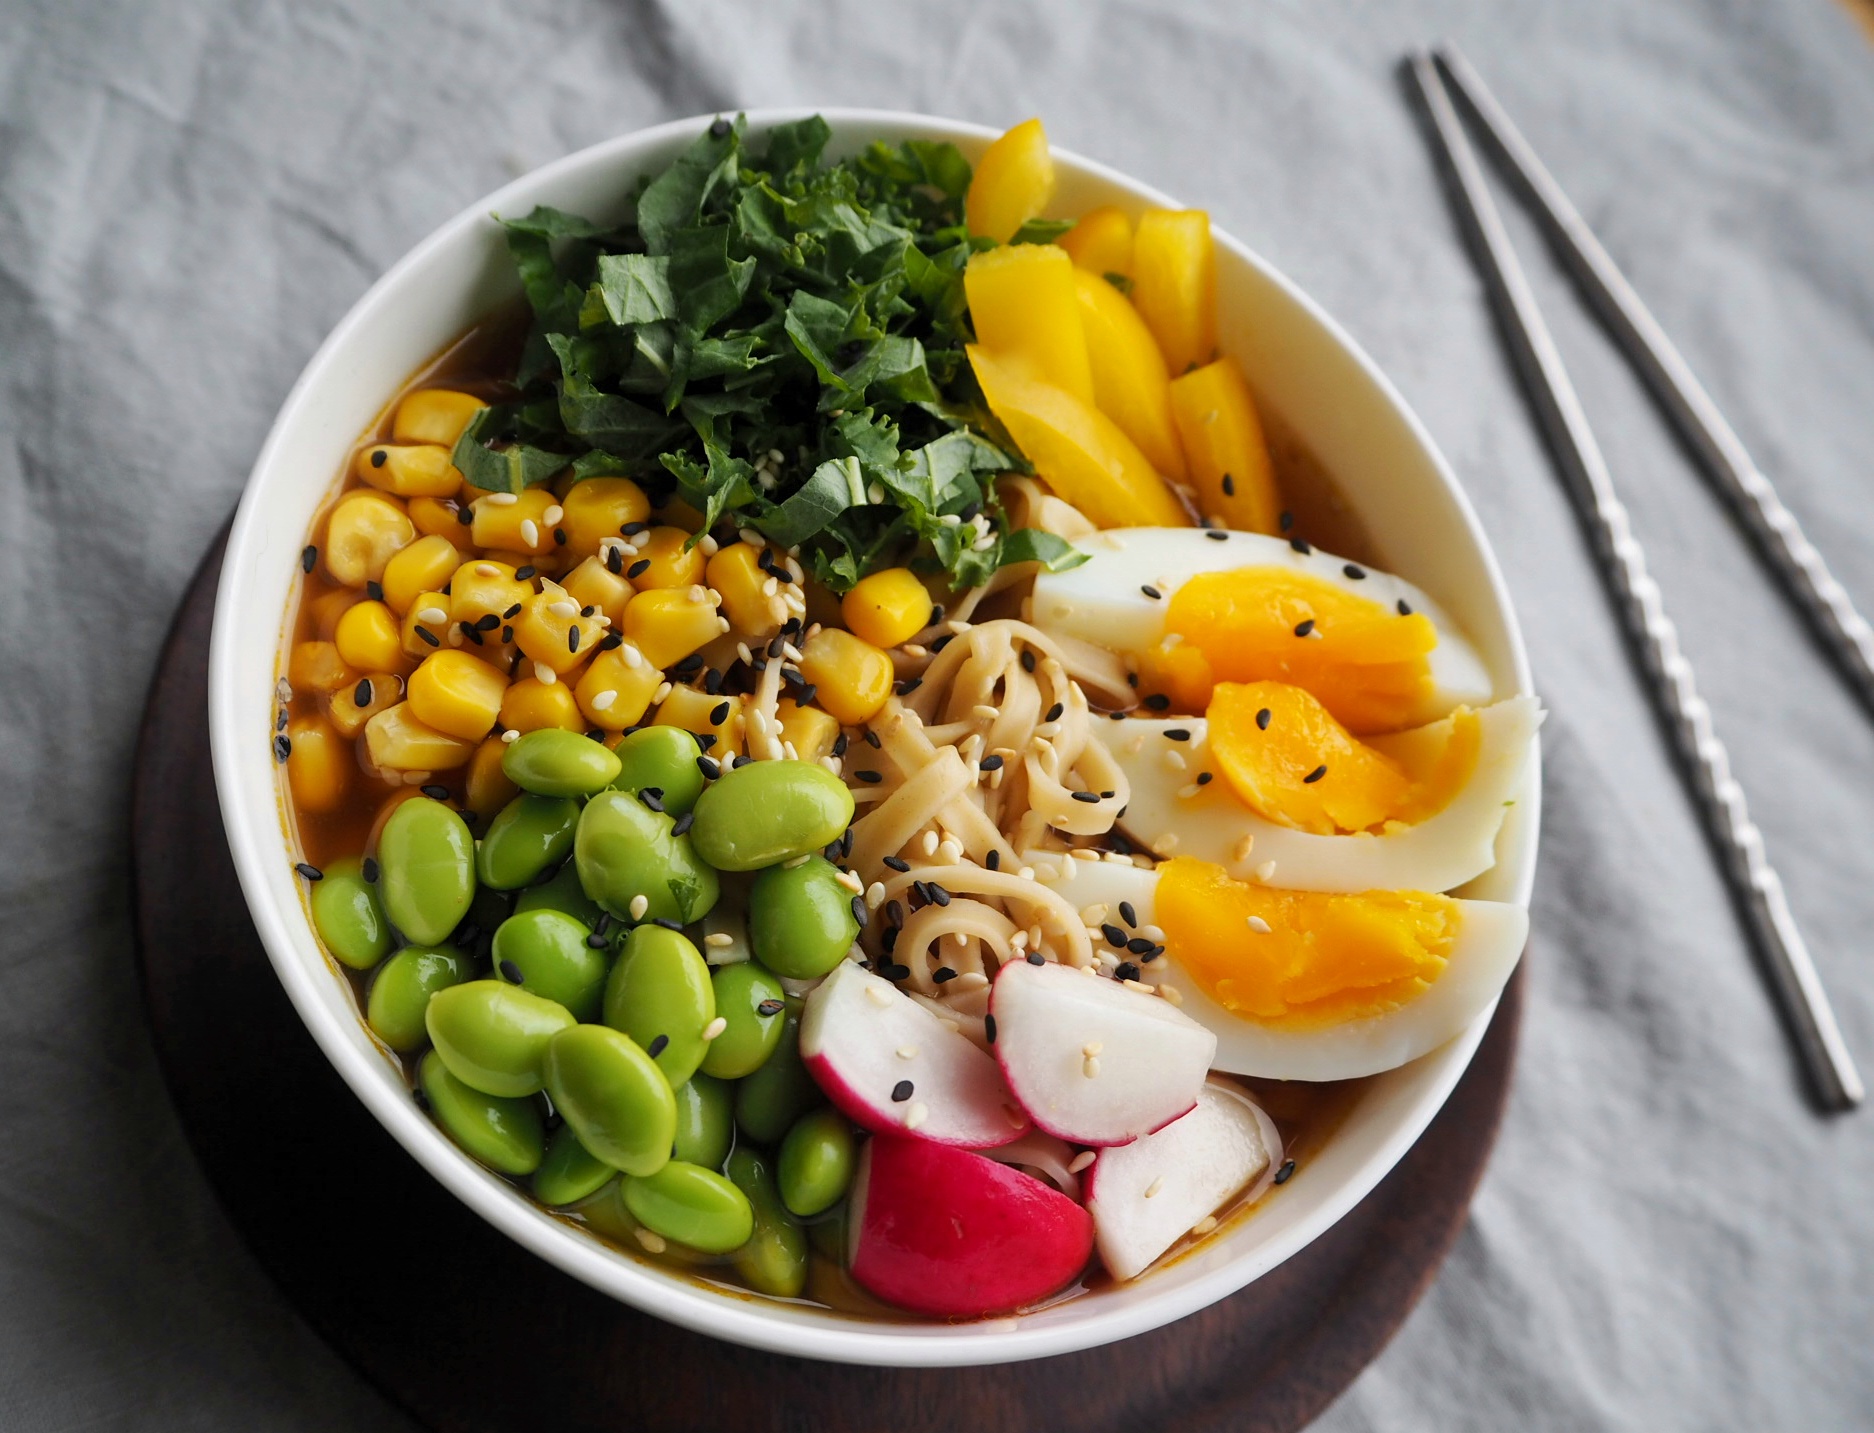
Tämä resepti ei varsinaisesti mikään pikaruoka ole, joskin monia esikuviaan selväsi nopeampi ja helpompi. Syksyn tullen katseet ja nenät kääntyvät luontaisesti mausteisia tuoksuja kohti, kun keitot ja padat alkavat kiinnostaa taas vaihteeksi. Tällä kertaa kokkailin mausteista ramen-keittoa. Japanilainen ramen-nuudelikeitto on valloittanut maailman jo kauan sitten pikanuudeleiden muodossa, mutta viime vuosina myös vähän aidompana variaationa. Japanilainen ruokafilosofia pyörii hyvin pitkälle erilaisten liemien ja keittojen ympärillä: moni on varmasti kuullut kombu-merilevästä ja bonito-tonnikalahiutaleista keitetystä dashiliemestä, joka on esimerkiksi misokeiton pohjana, mutta Japanista löytyy monia muitakin perusliemiä. Ramennuudelikeitossa liemi on usein perusdashia maustetumpi ja paksumpi.
Tässä reseptissä käyttämäni liemi on paljon velkaa Eeva Kolun ramenreseptille, jota olen muutellut entistä tuhdimman makuiseksi. Japanilaisissa resepteissä tuskin käytetään tällä tavalla mausteita, mutta ne sopivat syksyyn erinomaisesti: neilikka lämmittää, inkivääri tuo potkua, chili tulisuutta ja tähtianis raikkautta. Kuivattu herkkutatti tuo hirmuannoksen täyteläistä umami-makua, joten tämä liemi kelpaa varmasti lihansyöjällekin. Mausteiden käyttäminen nopeuttaa liemen maun kehittymistä, joten keittelyyn ei tarvitse käyttää tuntikausia. Kannattaa kuitenkin olla varovainen, koska erityisesti liika tähtianis pilaa keiton helposti.
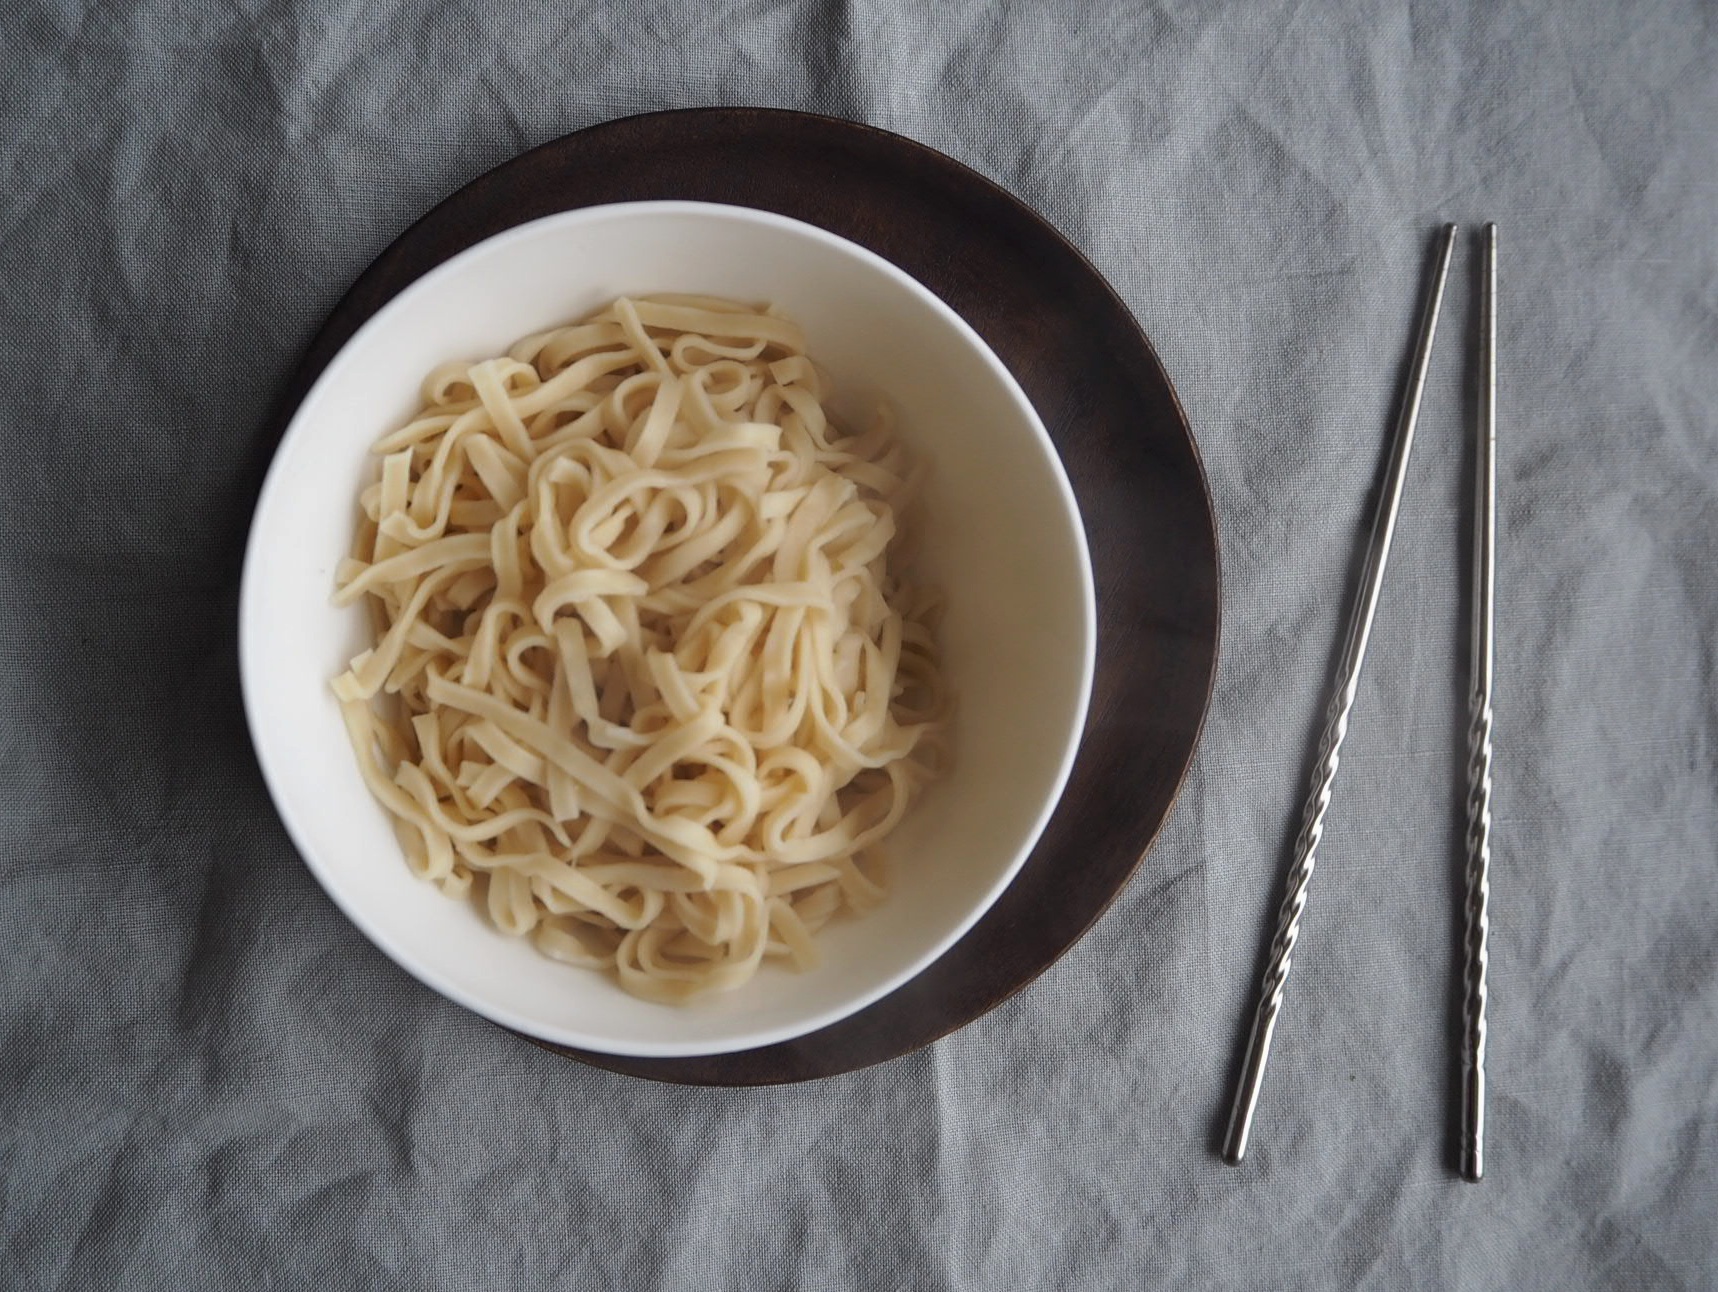
Nuudeleissa on myös suuria eroja: Japanissa suosittuja ramen-nuudeleiden lisäksi ovat myös esimerkiksi udon- ja soba-nuudelit, joita voidaan tarjota keiton lisäksi vaikka riisin tapaan lisäkkeinä. Japanissa nuudeleita saa myös tuoreena, mutta Suomessa sellaisesta on turha haaveilla. Suosittelen kuitenkin vilkaisemaan nuudelihyllyllä eri paketteja ja valitsemaan sellaisen nuudelin, jossa ei ole turhia lisäaineita ja jonka keittoaika on viiden minuutin tienoilla. Pikanuudelit ovat valmiiksi kypsytettyjä, joten ne menevät mössöksi tällä tavalla tehtynä turhan helposti.
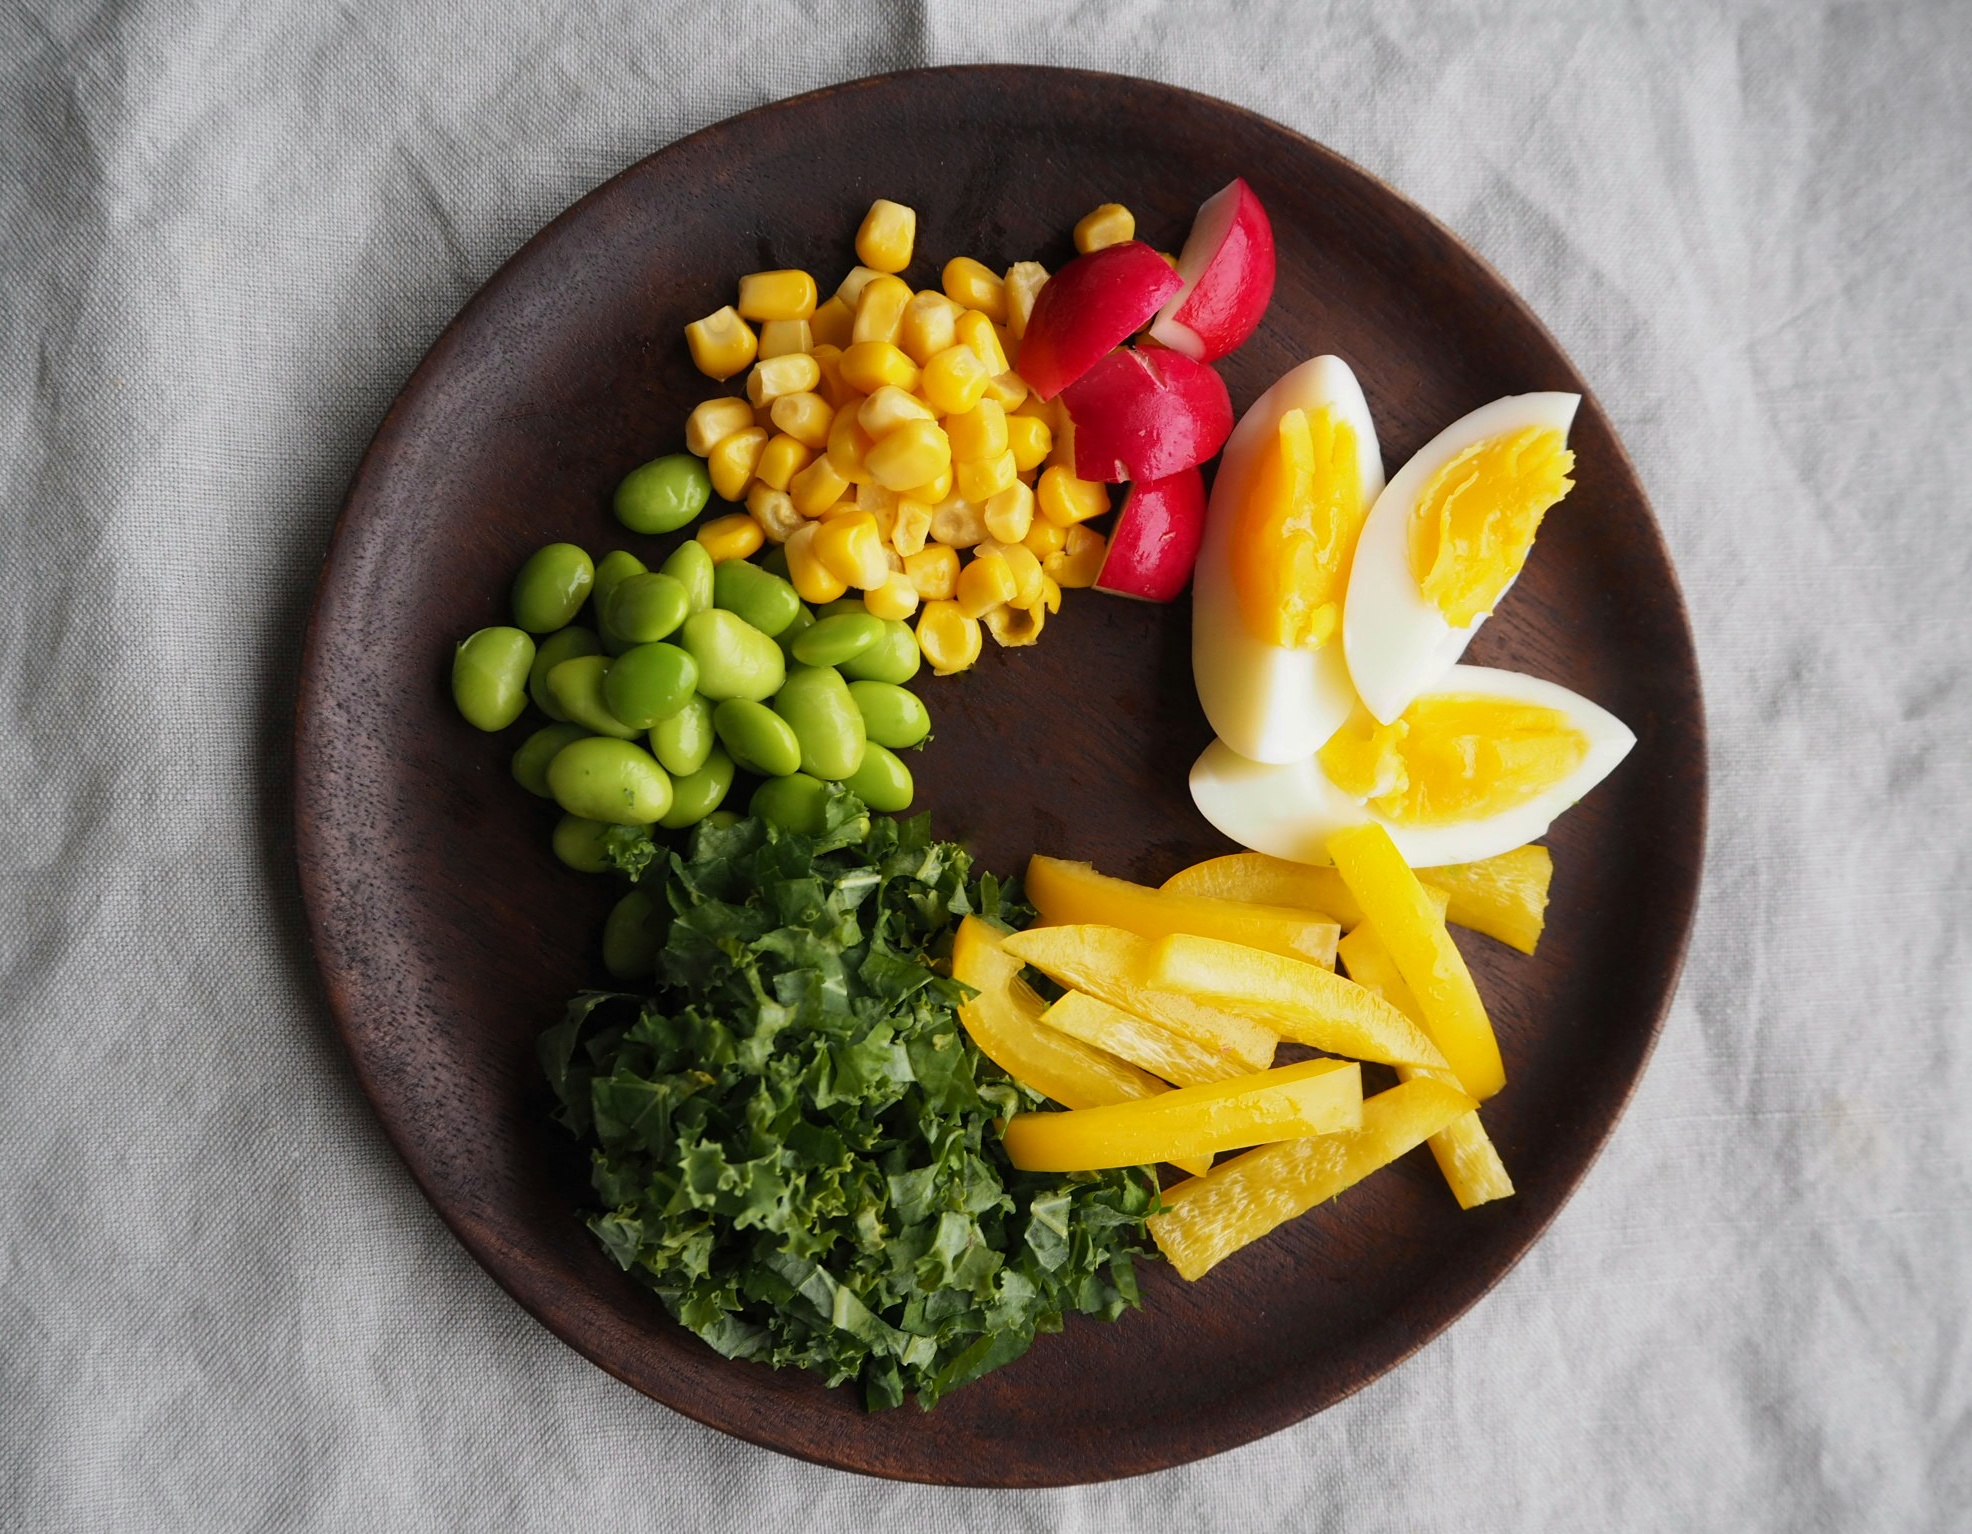
Nuudelit liemessä eivät kuitenkaan ole kovin ravitsevaa ruokaa, joten päälle kannattaa kasata erilaisia päällysteitä, kuten soijapapuja, maissia, keitettyä kananmunaa, kaalia, tofua, viipaloitua kanaa tai oikeastaan mitä tahansa mitä mieli tekee. Näillä päällysteillä keitosta saa ruokaisamman, kauniimman ja ehkä myös vähän terveellisemmän, jos pysyttelee kasvikunnan tuotteissa lihattoman lokakuun kunniaksi.
Lisäksi
Munanuudeleita
Keitettyjä kananmunia (8 min on hyvä keittoaika)
Soijapapuja (pakasteesta tai säilykkeenä)
Maissia (tuoreena tai säilykkeenä)
Lehtikaalia
Paprikaa
Retiisiä
Seesaminsiemeniä
Jos käytät kananmunia, keitä niitä ensin 8 minuuttia ja laita viilentymään kylmään veteen ennen kuorimista.
Kuori ja viipaloi inkivääri, kuori ja murskaa valkosipuli sekä kuori ja lohko sipuli.
Mittaa kasvisliemi kattilaan ja nakkele mukaan kaikki liemen ainesosat paitsi sitruunamehu. Kuumenna kiehuvaksi ja laske sitten lämpö pienelle ja anna porista noin 20 minuuttia. Lisää lopuksi valmiiseen liemeen loraus sitruunamehua.
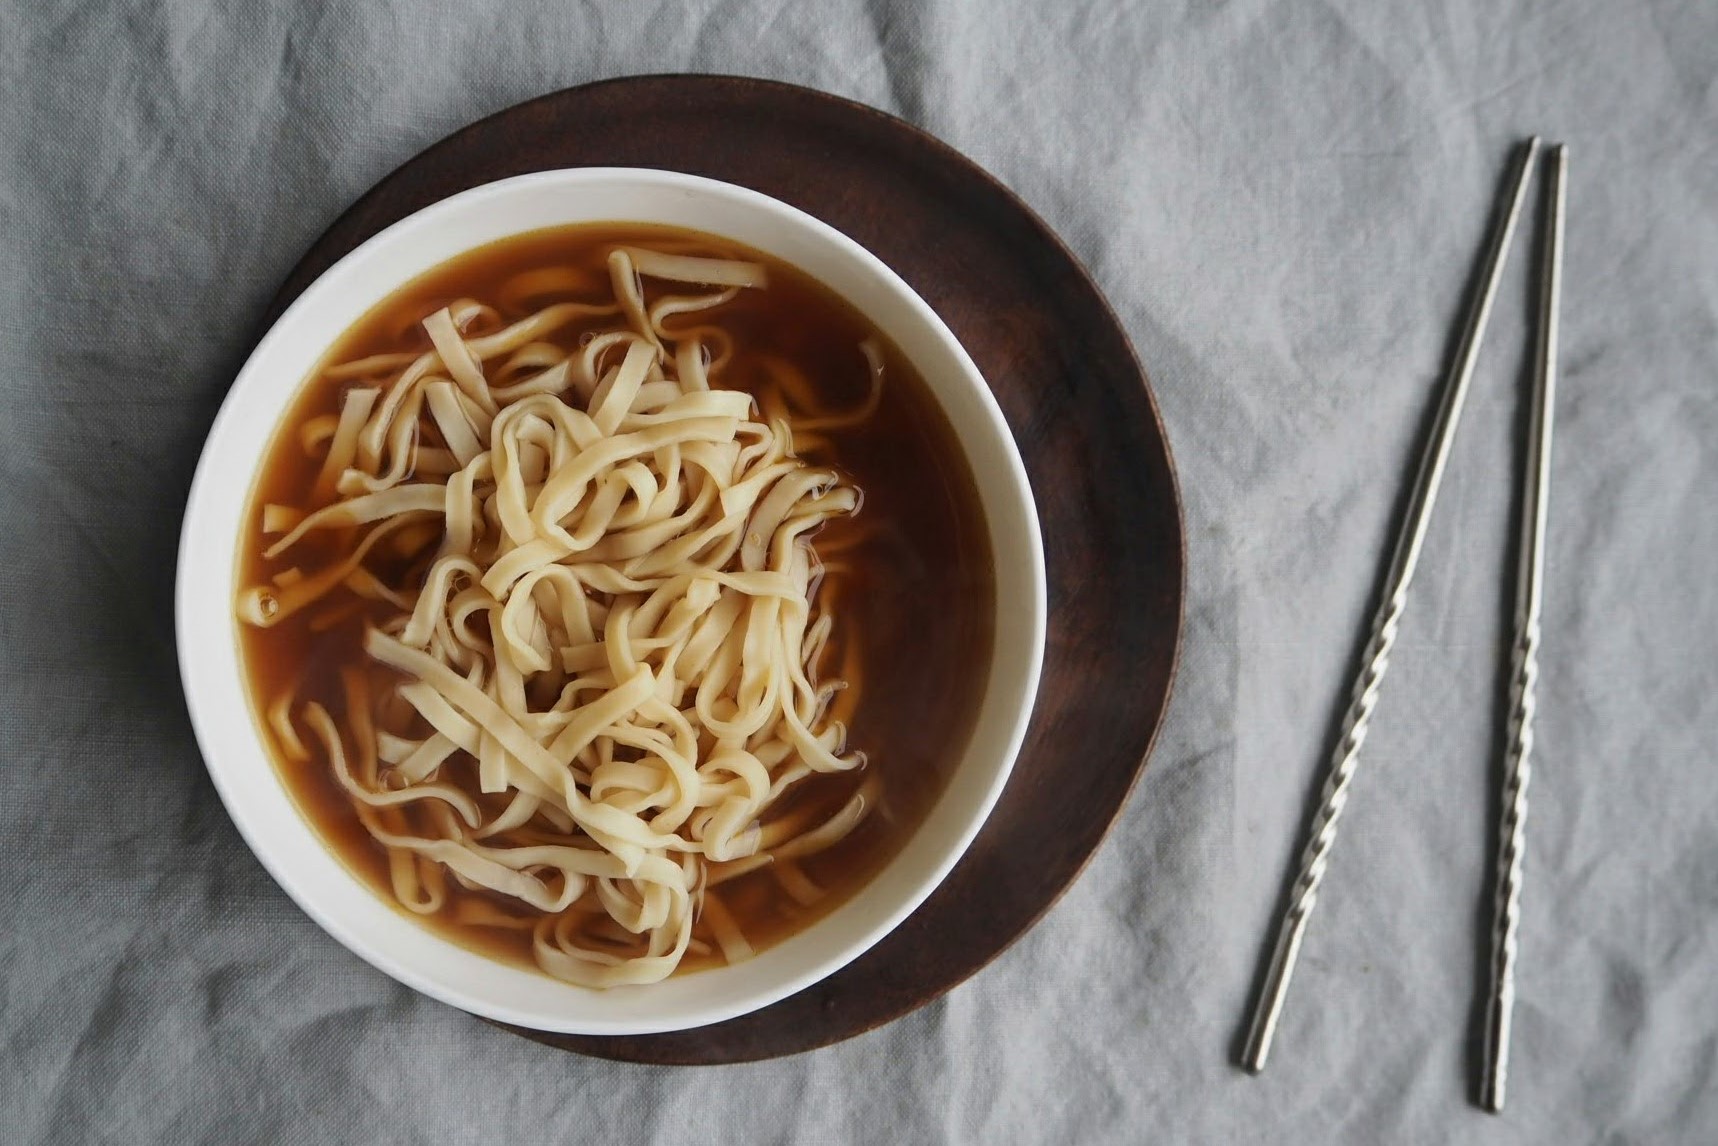
Keitä nuudelit paketin ohjeen mukaan. Valuta kypsät nuudelit, jaa tarjoilukulhoihin ja siivilöi lientä päälle kunnes nuudelit lähestulkoon peittyvät.
Leikkaa kanamunat neljään osaa, leikkaa lehtikaalia ohuiksi suikaleiksi, pilko retiisit ja paprika. Asettele täytteet keiton päälle joko näteiksi pinoiksi tai oman tyylin mukaan. Ripottele päälle vielä seesaminsiemeniä.
Tarjoile soppa syömäpuikkojen ja lusikan kanssa: puikoilla syödään nuudelit ja isommat täytteet, maissit ja muut pienet kannattaa suosiolla lusikoida. Japanilaisittain liemi ryystetään kovaäänisesti suoraan kulhosta.
Noniin, siinä olisi syksyn ensimmäinen keittoresepti. Ramenkeitto on yhtä aikaa ravintoa vatsalle ja silmille ja se pitää alkusyksyn kylmän etäällä.
Värikästä viikkoa!
-Toni
—
Well, the fall has gotten pretty far since my last post. Here in southern Finland, the fall foliage of the trees has been spectacular this year as the leafs have been fading from green to yellow and multitude of shades of orange and red, before turning brown. I’ve been observing the change quite closely as our building is basically encircled with maples, birches, and rowans and they are visible from every window. Also, the weather has been gentle with a dry fortnight period and relatively warm temperatures. However, that changed quickly as the remnants of the Caribbean hurricanes are reaching the Scandinavia carried by the Gulf Stream, so it’s about to get wet and cold.
My kitchen has been awfully quiet these last few weeks, and I have been cooking exclusively quick and easy dishes, like the frittatas and sweetcorn that you might have seen on my Instagram. I should perhaps write more about the quick and easy foods, since that’s what many people seem to be looking up on blogs.
This recipe, however, isn’t super quick, but it is much easier and quicker than many of the original recipes for this dish. The fall winds guide the nose and the gaze towards spices, and soups and stews feel appropriate after the hotter seasons. This spiced up version of the Japanese ramen soup fits the bill perfectly. The ramen soup conquered the Occident already a long time ago in the form of instant noodles, but fortunately some more authentic versions have recently surfaced even here in the North. The base and heart of the dish is the broth. Different broths form the backbone of Japanese cooking in general: many have heard of the ubiquitous dashi, which is boiled from kombu seaweed and bonito tuna flakes, that is used as the base for the miso soup, but that’s just the tip of the iceberg. The broth used for ramen is usually richer and spicier than your average dashi.
This recipe for the broth is based on Eeva Kolu’s recipe that I tweaked to be even richer in umami flavour. I doubt the Japanese use spices like this in their broths, but they do add a whole lot of punch to the broth: the cloves add warmth, ginger adds a zing, the, the chili brings the heat, and the star anise freshens everything up. The dried porcini mushrooms add a huge amount of savoury flavour that will fool any meat lovers. Using spices also makes it easier to achieve the richer flavour without a long simmering time. Be careful with the spices, though: especially the star anise becomes very cloying if used to much.
Do pay attention to the noodles as well. The Japanese have several different noodles, like the ramen, soba and udon, which can also be served as a side dish instead of rice. Some places make their own fresh noodles for their ramen soups, but I can’t even dream about such things here in Finland. I recommend browsing through the noodle selection at the supermarket or Asian food store and choose the noodles that have as little extra ingredients as possible and a cooking time around 5 minutes. The instant noodles are pre-cooked and become mushy when used like this, so steer clear of them.
Noodles in broth doesn’t really tick many boxes of your nutritional needs, so adding toppings on the ramen soup is advisable. Edamame (green soy beans), sweetcorn, boiled eggs, kale, cabbage, tofu, or sliced chicken or meat work all perfectly well, or you can use whatever you have handy. These toppings can also be used to make the dish a bit healthier if you choose vegetables and other healthy products. Colourful vegetables make the soup also very photogenic.
Ramen Soup Two servings
Broth
1 litre vegetable stock
a piece of ginger
couple pieces of dried porcini mushrooms
1 small onion
1 garlic clove
2 star anise
4 whole cloves
1 bay leaf
1 tsp. chili flakes
2 tbsp. soy sauce or tamari
1 tsp. rice wine vinegar
½ tsp. toasted sesame oil
a splash of lemon juice
Noodles and Add-ons
Egg noodles
Boiled eggs (I prefer 8-minute eggs)
Soy beans (frozen or canned)
Sweetcorn (fresh or canned)
Kale
Peppers
Radish
Sesame seeds
If you are using eggs, boil them first for 8 minutes and cool in cold water before peeling.
Peel and slice the ginger, peel and crush the garlic, and peel and quarter the onion.
Measure the vegetable stock into a saucepan, bring to a boil and add all other ingredients for the broth into the saucepan, except for the lemon juice. Bring again to a boil, reduce heat to simmer and cook for a good 20 minutes. Add a splash of lemon juice and set aside.
Cook the noodles per instruction on the package. Drain and divide into serving bowls. Pour the hot broth over the noodles until they are covered.
Quarter the eggs, slice the kale into thin strips, slice the radish and peppers. Place the toppings on the soup in neat little piles, or according to your artistic vision. Sprinkle with sesame seeds for garnish.
Serve the soup with chopsticks and a spoon: the chopsticks are used to eat the noodles and bigger toppings, the spoon to eat the broth and smaller pieces like the corn. The Japanese slurp the broth loudly from the bowl, so you can try that too.
There you go, the first soup of the season. I love how the ramen soup is a feast not only for your mouth and stomach, but your eyes as well. It also keeps the gentle chill of the early fall away.
Syksyllä tuoreista kasviksista ja hedelmistä ei tunnetusti ole puutetta, korkeintaan runsaudenpulasta voi puhua. Kun kaikki on tuoretta, kannattaa parhaat palat myös tarjota tuoreena, joten väänsin viikonlopulle kausisalaatin – tai siis kaksi koska en osannut päättää mitä valitsisin.
Salaattien rakentaminen on editointia: kaikkea on tarjolla, mutta kaikkea ei voi laittaa samaan kasaan ja odottaa lopputuloksen olevan vastustamaton. Hyvä salaatti rakentuu muutamasta selkeästä mausta ja pääraaka-aineesta, joita tukee neutraalimpi pohja.
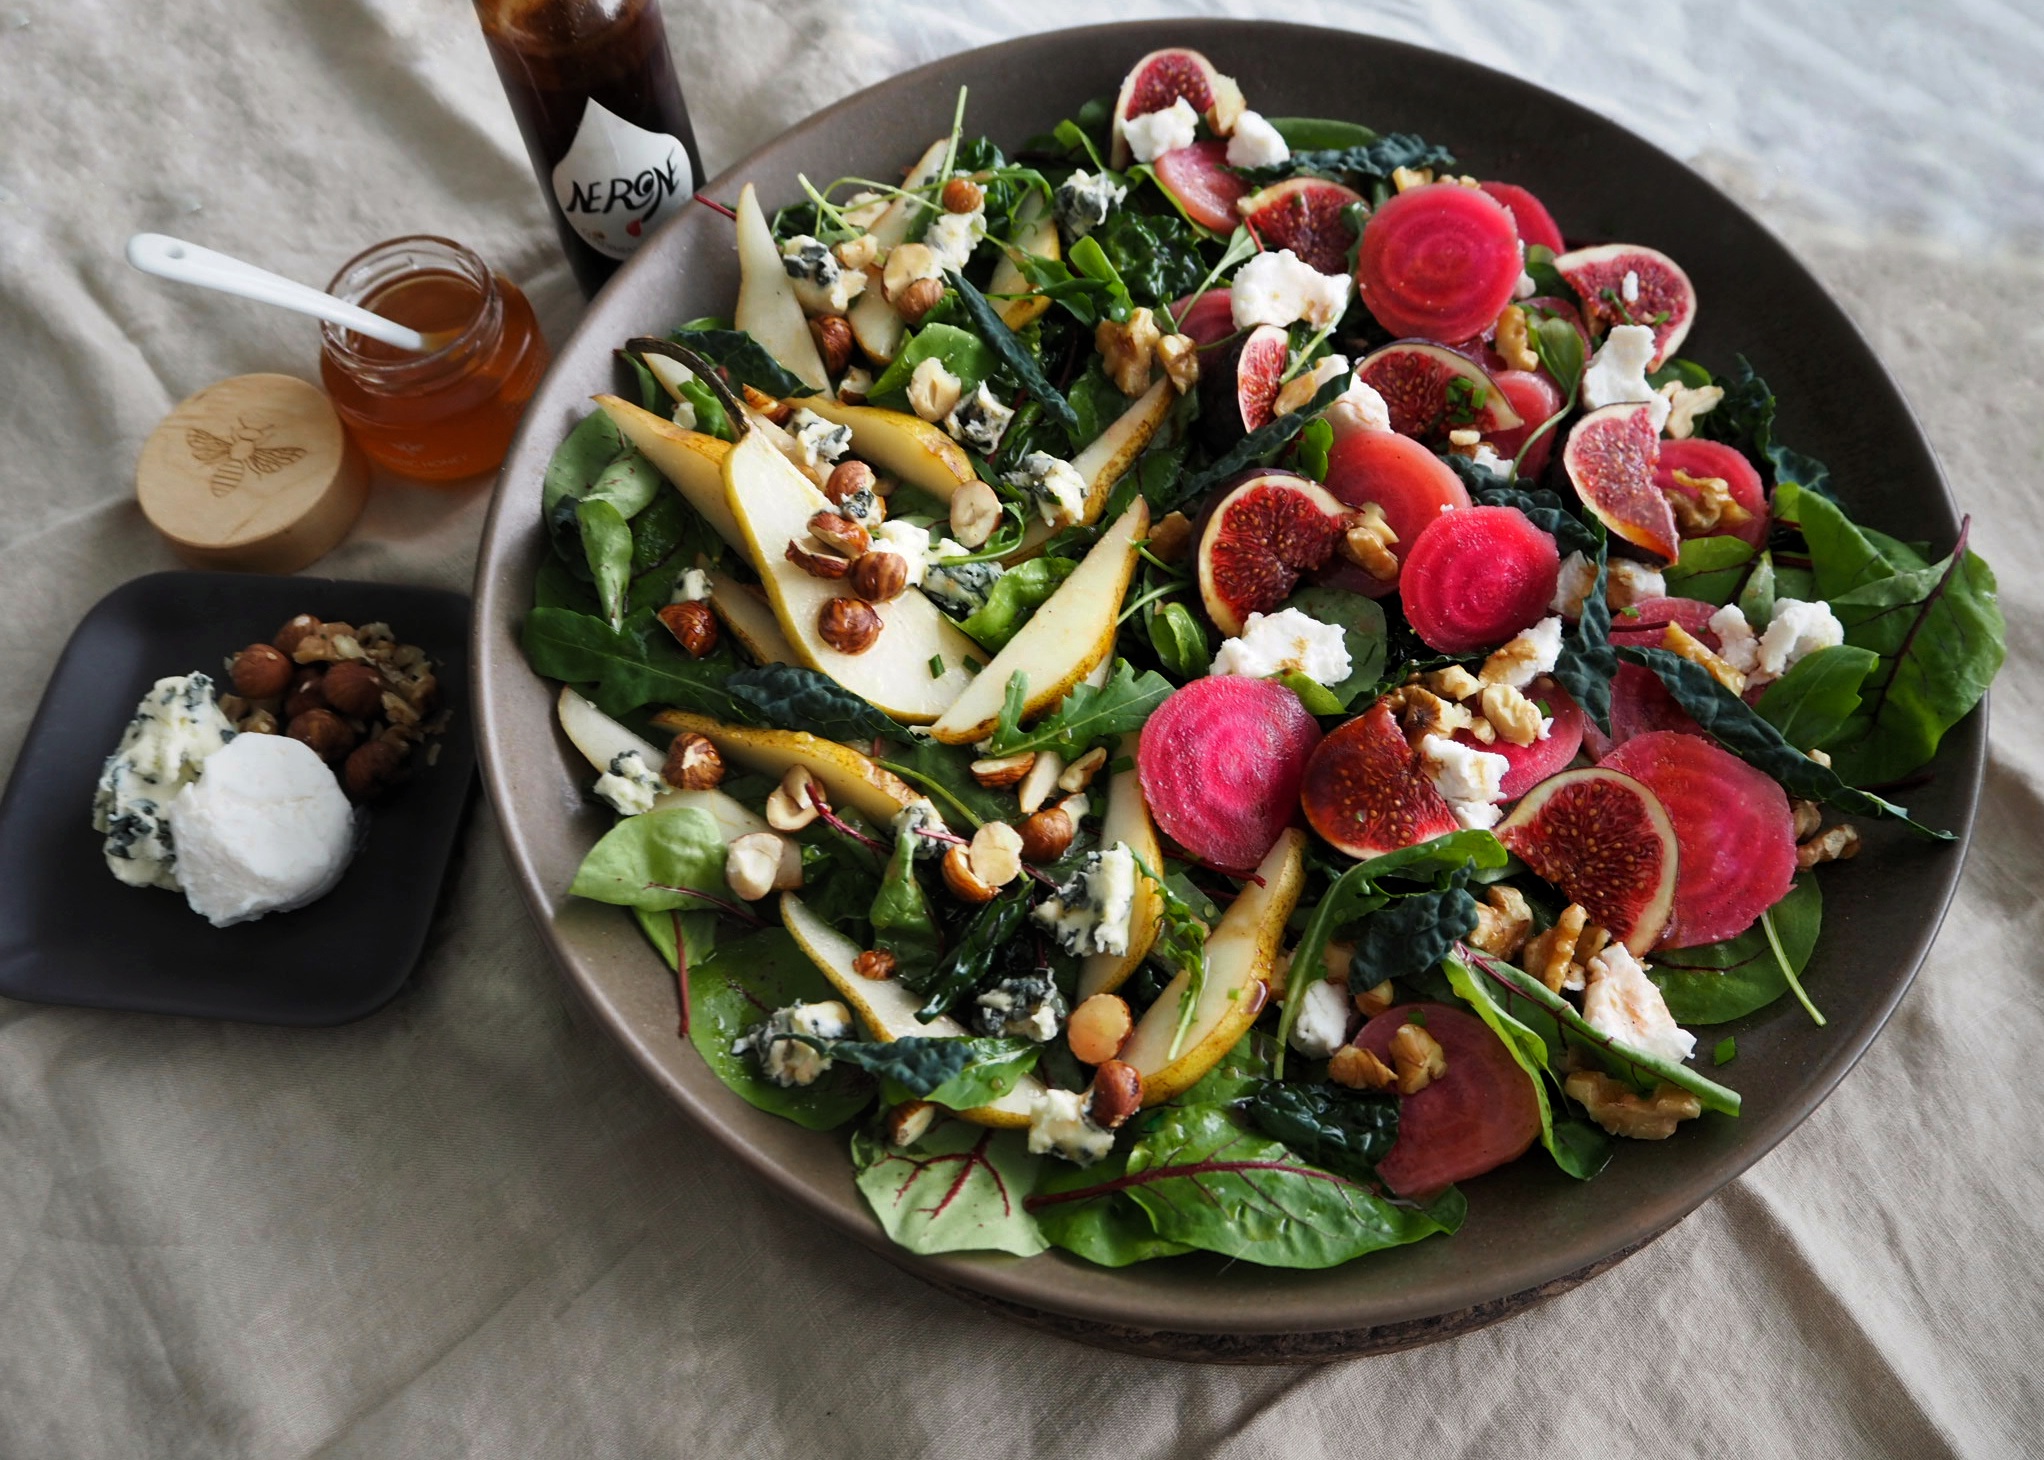
Vihannesosastolle ovat ilmestyneet tuoreet viikunat, joita en voinut vastustaa, mutta myös italialaiset luomupäärynät olivat herkullisen näköisiä. Juureslaarilla psykedeeliset raitajuuret suorastaan huusivat huomiota. Juustohyllyllä taas veri veti kermaista sinihomejuustoa kohti, mutta toisaalta takaraivossa kolkutti tarve antaa vuohenjuustolle mahdollisuus. Jos nuo kaikki olisi kipannut samaan kulhoon, olisi lopputulos ollut epäilemättä syksyinen mutta myös sekava. Ratkaisu oli tietenkin tehdä kaksi salaattia, jossa kummassakin ainekset saavat ansaitsemansa huomion. Koska salaattipohja ja kastike ovat molemmissa salaateissa samat, kaksinkertaista vaivaa ei kuitenkaan tarvitse nähdä.
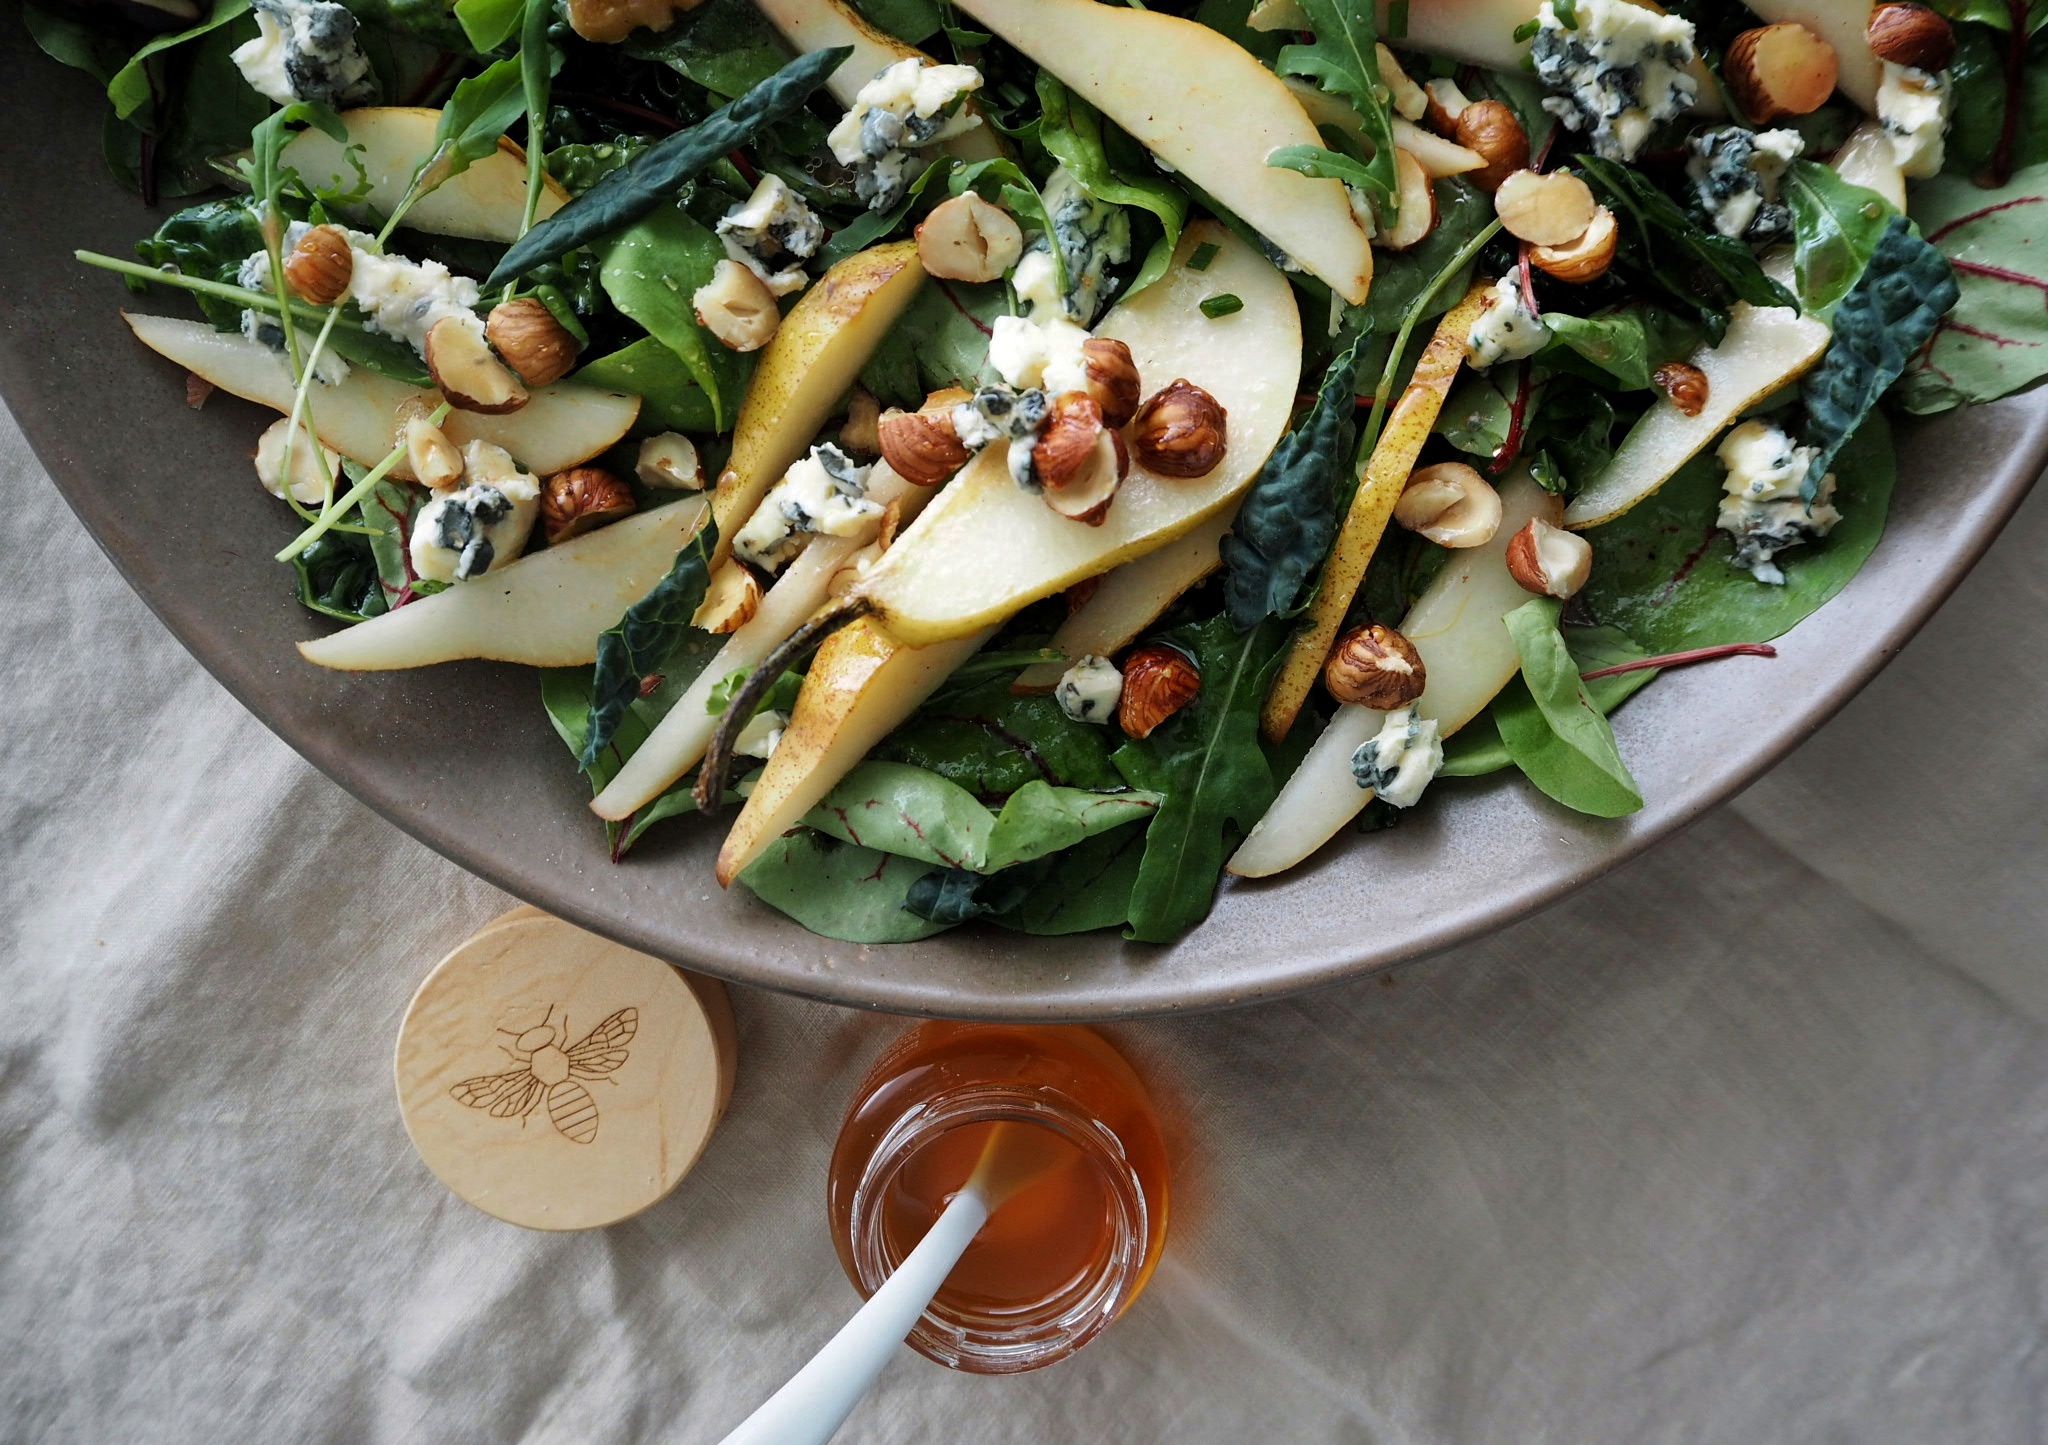
Päärynä, sinihomejuusto, hasselpähkinä | Pear, blue cheese, hazelnut
Kastikkeeksi kelpaa raitajuurten marinadi, joten siinäkin kohtaa pääsee helpolla. Paseerasin syksyn kunniaksi vinegrettiin pihlajanmarjoja, joita lähipuistojen puut pursuavat. Ne voi kuitenkin jättää pois tai korvata jollain muulla happamalla marjalla, esimerkiksi punaherukalla.
Kokoa salaatti tai salaatit laakealle tarjoilulautaselle, etteivät ainekset suotta sotkeennu. Lautasella salaatti myös näyttää kauniimmalta ja kukin ruokailija voi valita sopivia makupaloja annokseensa.
Päärynä-sinihomejuusto-hasselpähkinä päärynöitä
pehmeää sinihomejuustoa (esim. Saint Augur, gorgonzola, Peltola Blue)
hasselpähkinöitä
hunajaa
Pihlajanmarjavinegretti/marinadi ½ dl oliiviöljyä
¼ dl omenaviinietikkaa tai valkoviinietikkaa
1 rkl hunajaa
½ dl pihlajanmarjoja
suolaa ja pippuria
Lisäksi tummanvihreää salaattia (pinaatti, viinisuolaheinä)
mustakaalia tai lehtikaalia
rucolaa
Keitä raitajuuria kuorineen ja kokonaisina noin 20 minuuttia, tai kunnes puutikku uppoaa juurekseen kohtuullisen helposti. Viilennä kylmässä vedessä. Leikkaa päädyt pois ja rapsuta kuori irti sormin tai lusikalla.
Tee kastike. Laita etikka, hunaja sekä suola ja pippuria kulhoon. Paseeraa mukaan pihlajanmarjat, eli survo ne siivilän läpi lusikkaa apuna käyttäen. Valuta oliiviöljy joukkoon ohuena nauhana samalla vatkaten vispilällä.
Viipaloi raitajuuret poikittain, jotta niiden kuvio pääsee esiin. Laita juurikasviipaleet purkkiin ja kaada kastike päälle ja sekoita kevyesti. Anna maustua tovi huoneenlämmössä, tai säilytä jääkaapissa yön yli.
Poista päärynöistä siemenkodat ja viipaloi hedelmät pitkittäin.
Paahda hassel- ja saksanpähkinät kevyesti kuivalla pannulla koko ajan sekoittaen. Rouhi pähkinöitä hieman pienemmäksi.
Leikkaa mustakaalista kovat keskiruodot pois ja leikkaa suikaleiksi. Pyörittele oliiviöljyssä ja puristele käsin pehmentääksesi kaalia hieman.
Kokoa salaatit: asettele salaattipohja (eli mustakaali sekä muut salaatit) tarjoilulautaselle. Asettele toiselle puolelle lautasta marinoidut raitajuuriviipaleet, neljään osaan leikatut viikunat, murennettu tai leikattu vuohenjuusto sekä rouhitut saksanpähkinät. Ripottele päälle hieman balsamicoa.
Toiselle puolelle lautasta tulevat viipaloidut päärynät, murennettu sinihomejuusto sekä rouhitut hasselpähkinät. Valuta niiden päälle kevyesti hunajaa.
Lusikoi koko komeuden päälle kevyesti pihlajanmarjavinegrettiä. Tarjoile hyvän leivän kanssa.
Joskus kompromissi on mahdollisuus tehdäkin enemmän ilman myönnytyksiä, kuten tässä kahden salaatin edut yhden vaivalla. Salaatit voi tietenkin tehdä erikseen, jos sille päälle sattuu. Muista nauttia syksystä ja sen tarjoamista herkuista!
Syysterveisin
-Toni
—
The Autumn is the season of opulence in the produce section of the food markets with local and exotic fruits and vegetables tempting by-passers alike. When everything is fresh, the season’s best should be served fresh before the rest is made into conserves and pickles and such. And what’s a better way of serving something fresh than a salad, so I made a seasonal salad – or two because I couldn’t decide which fruits and veggies to choose.
The secret of making great salads is editing down: there are lots of ingredients to choose from, but you can’t just throw all delicious things in a bowl and expect it to be irresistible. A great salad usually consists of a couple of key ingredients on a complimentary neutral base.
As I was adventuring through the produce section, first I was tempted with fresh figs, but the organic Italian pears seemed just right, too. Candy cane beets, the psychedelic sister of the red beetroot, was whispering my name at the root vegetable isle. At the cheese counter, I had the urge to grab a morsel of the decadently creamy Saint Augur blue cheese, but I also wanted to give the soft goat cheese a chance. Had I thrown all of the above together, the result would have been no doubt autumnal, but also chaotic. The solution I came up with, a compromise of sorts, was to serve everything separately together: two salads on one platter. That way all of the great ingredients would have their part of the limelight. I kept the base and dressing same for both salads, so there really isn’t twice the trouble, either.
Speaking of the dressing, it’s actually performing a double duty: it’s also the marinade for the beets. Rowan trees here in Finland are currently bearing a heavy load of bright orange tart berries so I decided to add them to the dressing, too. You can skip them if not available, or substitute with other tart berries, like redcurrants.
Assemble the salad on a big plate instead of a bowl so the ingredients stay neat and everyone can pick out their favourites on their plate. It also looks prettier.
Pear-Blue Cheese-Hazelnut Pears
Creamy blue cheese (e.g. Saint Augur, gorgonzola, Peltola Blue)
Hazelnuts
Honey
Rowan Berry Vinaigrette /Marinade ½ dl olive oil
¼ dl cider vinegar or white wine vinegar
1 tbsp. honey
½ dl Rowan berries
Salt and pepper
Base Dark green leafy greens (spinach, sorrel)
Cavolo nero or kale
Rocket
Boil the unpeeled candy cane beets whole for about 20 minutes, or until a skewer goes in quite easily. Cool the beets in cold water. Cut away the ends and peel the beets with your fingers or a spoon.
Make the dressing: measure the vinegar, honey, salt and pepper in a bowl. Push the rowan berries through a sieve to get rid of the skins and seeds, and add the puree into the bowl. Add the olive oil in slowly while whisking vigorously.
Slice the beets horizontally to expose their striped pattern. Put the slices in a jar and pour the vinaigrette over them and shake gently. Let marinade in room temperature for a while, or store in the fridge overnight.
Remove seeds and cores from the pears and cut the fruit into slices.
Toast the hazelnuts and walnuts on a dry pan lightly. Stir constantly to avoid burning the nuts. Crush the nuts lightly.
Cut the stiff stems off the kale and cut the kale into strips. Dress the strips in olive oil and squeeze with your hands to soften the kale.
Assemble the salad: spread the base (meaning the kale and other leafy greens) on the platter. On one half of the plate, place the beet slices, quartered figs, morsels of the goat cheese, and walnuts. Sprinkle this side with balsamic vinegar.
On the other side of the plate, place the pear slices with crumbled blue cheese and hazelnuts. Drizzle this side with honey.
Spoon the rowan berry vinaigrette over both sides. Serve with crusty white bread.
Sometimes a compromise is more than any of the original options, like here you get two salads with one effort. The salads can, of course, be served separately, but do remember to indulge yourself with the seasons best offerings.
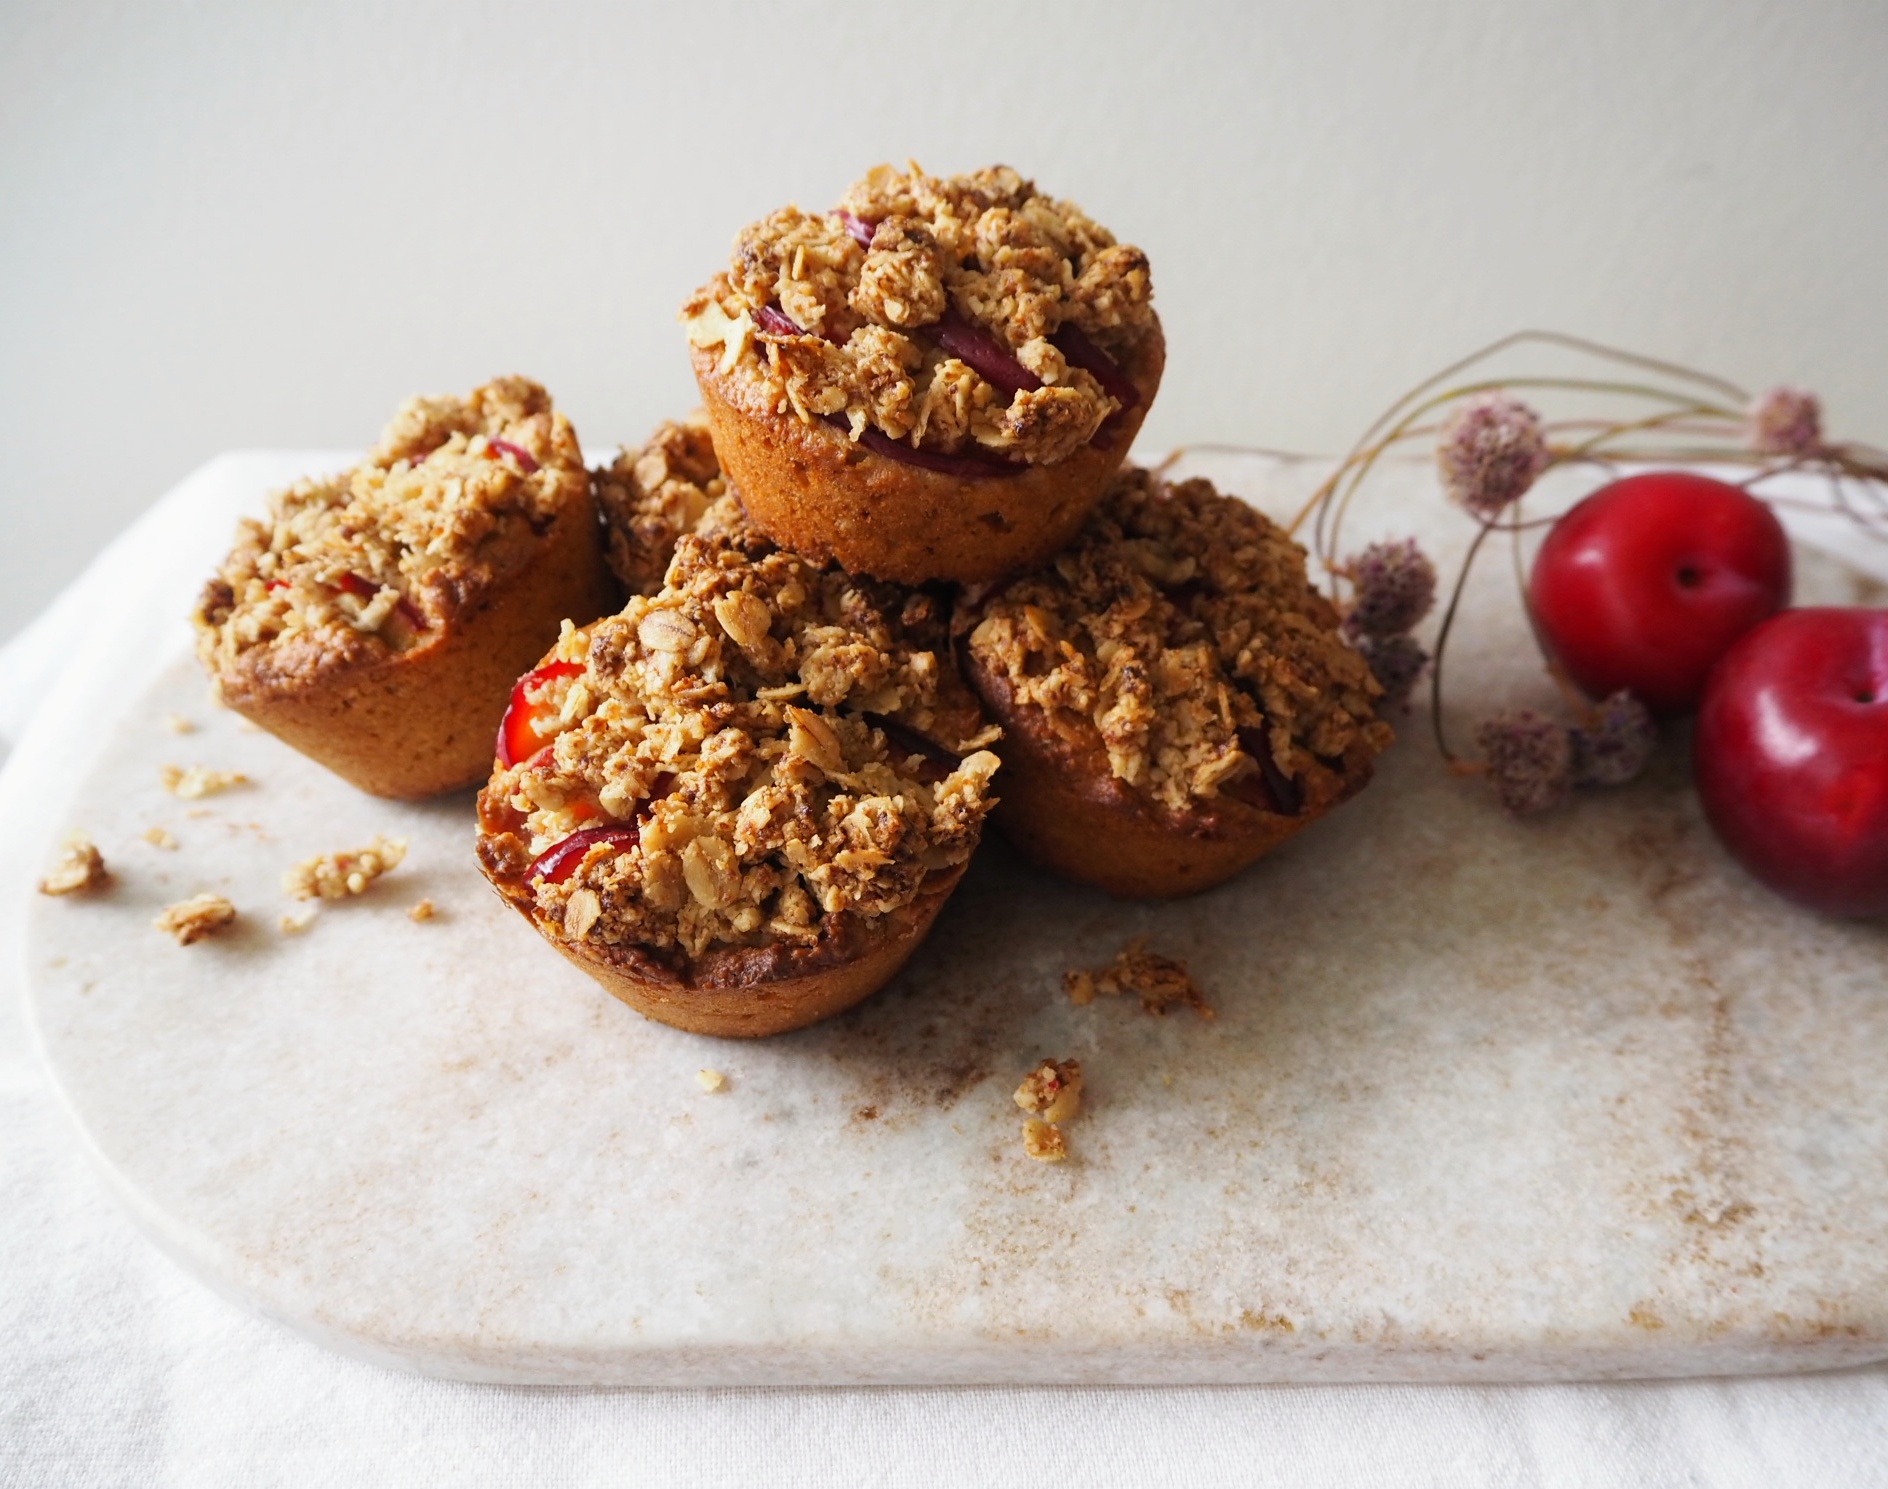
Syksyn satokausi on kuumimmillaan, kun kirsikat ja muut marjat kypsyvät nopeasti, ainakin täällä etelässä. Kirsikoista teinkin jo piirakan pariin kertaan ja muutama täytyy varmaan vielä tehdä, tuoreita hapankirsikoita kun ei kauaa ole saatavilla. Viinimarjat myös kiinnostaisivat, mutta niistä on jostain syystä vaikeampaa keksiä kokattavaa. Ehkä jonkinlainen kastike jollekin suolaiselle ruoalle…
Seuraavaksi kypsyvät pian luumut, kriikunat ja sensellaiset. Sitten onkin jo omenoiden aika. Ne kaikki sopivat upeasti murupaistokseen (jonka reseptiä voi vilkaista raperperipaistoksen ohjeesta), mutta myös hieman helpommin käsiteltäviin muffineihin. Tämä on yksi niistä reseptikirjan tähdistä, jotka ovat jääneet erityisesti mieleen siksi, että tein näitä evääksi kun syksyisin veimme opiskelukaverin kanssa Tampereelle saapuneita vaihto-opiskelijoita syyskävelylle Pyynikille, Pispalaan ja Tahmelaan. Noihin seutuihin harva tajuaa mennä tutustumaan munkkikahvilaa syvemmin vaikka syytä olisi – Pispalanharjun Pyykkimettä-nimisestä puistosta nimittäin aukeaa yksi Tampereen hienoimmista näköaloista. Rappusseikkailu alas Tahmelaan ja sieltä Varalan kautta Rosendahliin ja eteläpuistoon muodostaa upean, joskin aika rankan kävelylenkin, joten eväille on varmasti kysyntää.
Tein tämän reseptin gluteenittomana, koska kaapissa lymyili puoliunohdettu kaurajauhopussi, mutta muffinit voi tehdä myös vehnäjauhoista. Valkoista sokeria vältin käyttämästä, joten makeutta leivonnaisiin tulee aavistuksen terveellisemmästä kookossokerista, jota saa aika laajalti jo marketeista. Se on myös hieman valkoista sokeria makeampaa ja tuo leivonnaisiin fariinisokerimaista makua. Muffineista ei suhteellisen pienen sokerimäärän vuoksi tule liian makeita, joten ne ovat omiaan väli- tai aamupalaksi.
Luumujen sijaista voi käyttää oikeastaan mitä tahansa marjoja tai hedelmiä, joten nämä onnistuvat kyllä muinakin vuodenaikoina. Myös pakastetut sesonkiherkut sopivat hyvin, koska uuniin ne päätyvät kuitenkin. Kotona tarjoiltuna muffinin kylkeen voi valuttaa vaniljakastiketta tai kermavaahtoa, syysretkellä ne maistuvat sellaisenaan.
Mittaa voi ja piimä pieneen kattilaan, raasta mukaan sitruunan keltainen kuori. Laita liedelle ja kiehauta ja jätä sitten jäähtymään.
Sekoita keskenään kuivat aineet, eli kaurajauhot ja -hiutaleet, suola ja leivinjauhe.
Vatkaa kulhossa kookossokeri, vaniljajauhe ja kananmuna kuohkeaksi vaahdoksi. Lisää vaahtoon vuorotellen kuivia aineita ja piimä-voiseosta kunnes kaikki ainekset ovat sekaisin.
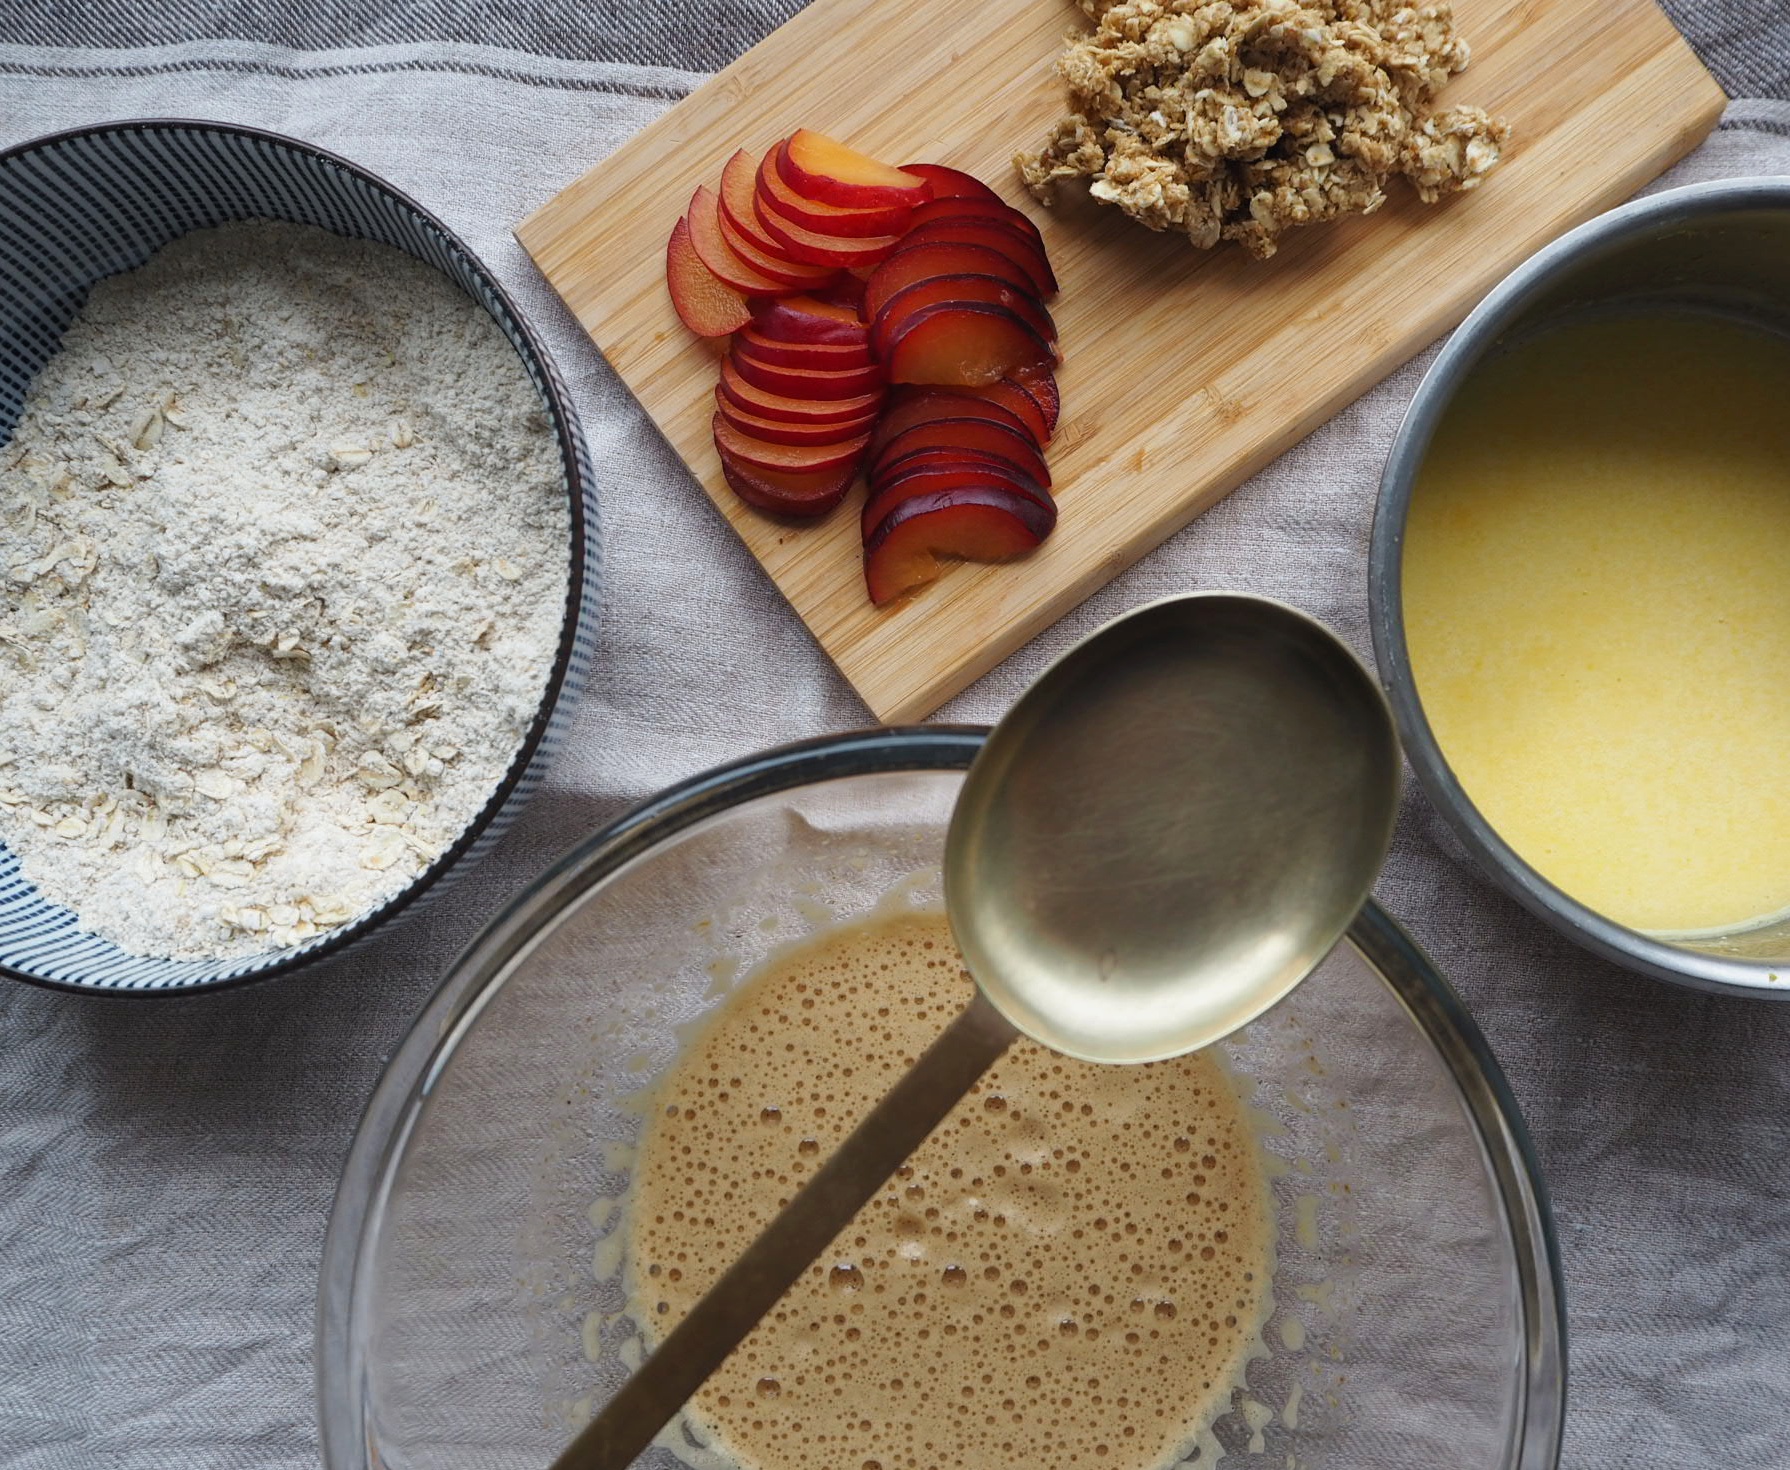
Poista luumuista kivet ja leikkaa luumut ohuiksi viipaleiksi.
Sekoita murun ainekset pienessä kulhossa ja nypi sormin tasaiseksi.
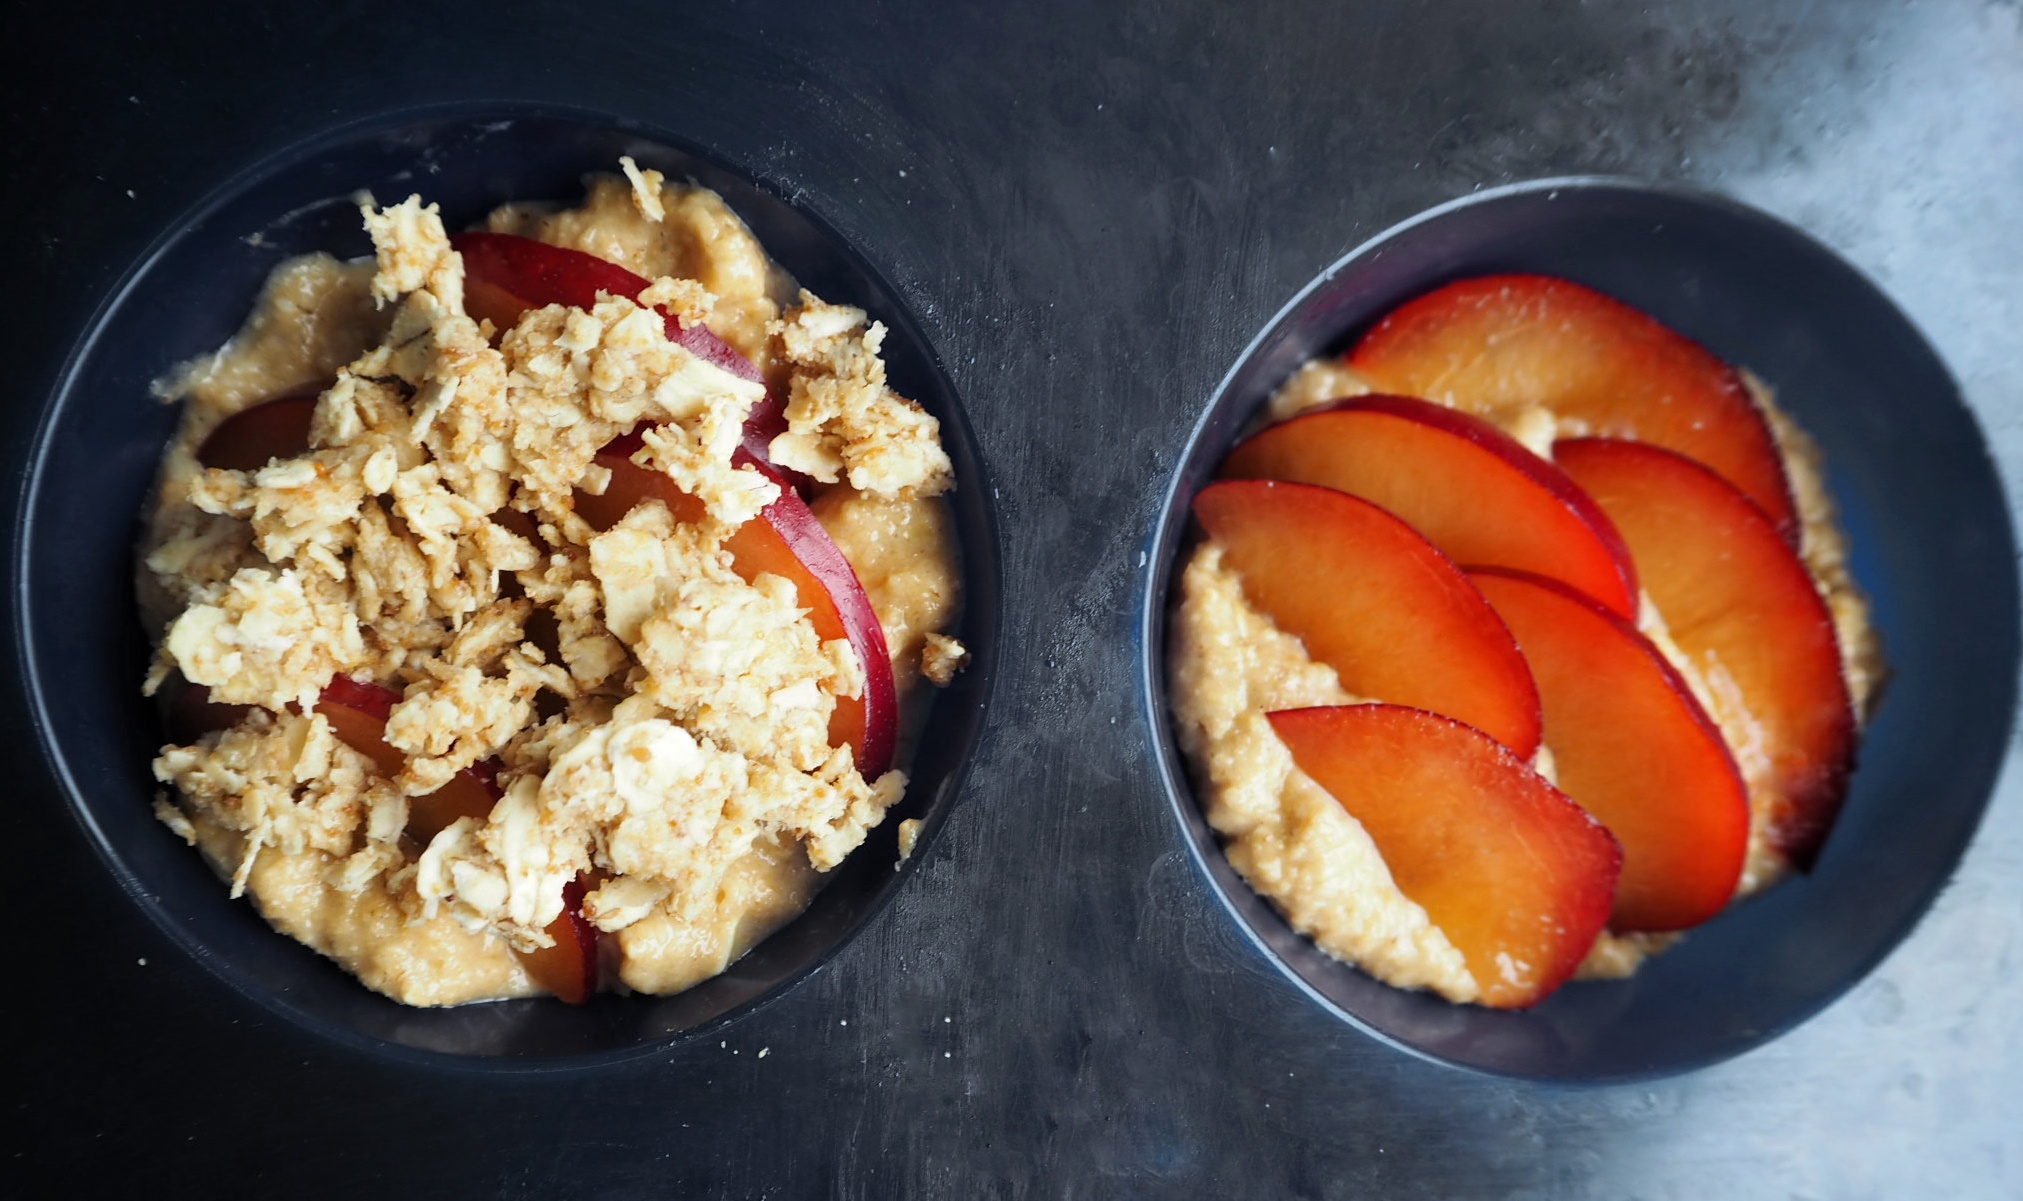
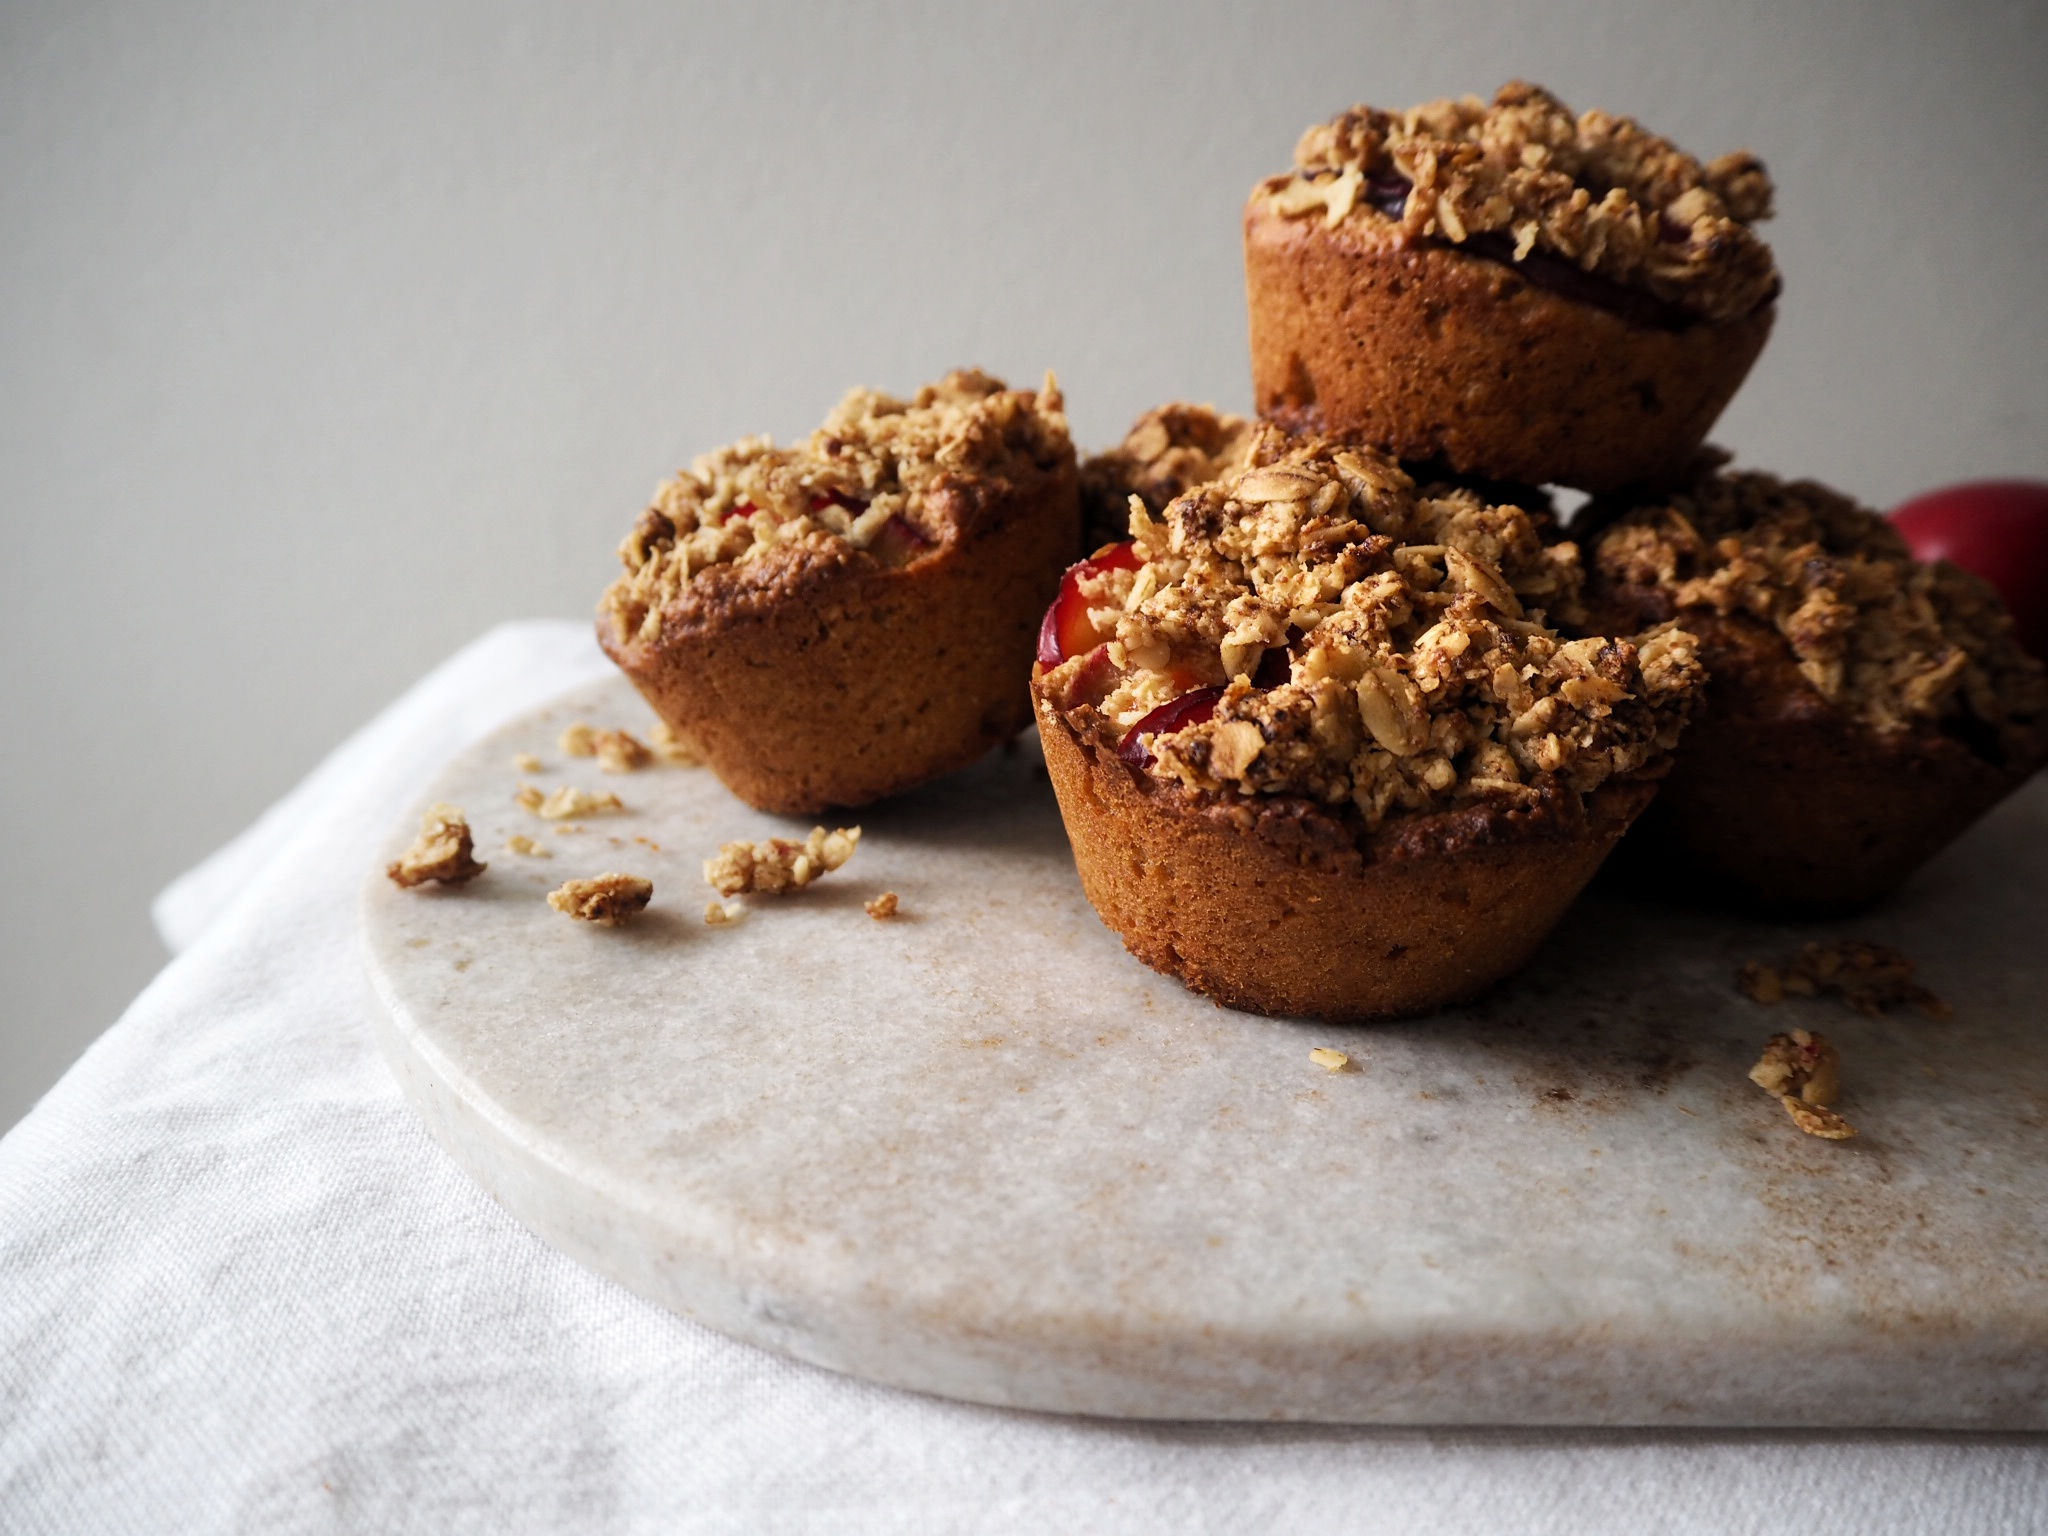
Jaa taikina kuuteen muffinivuokaan. Jos käytät metallivuokaa, vuoraa kupit paperisilla vuoilla, jotta valmiit muffinit irtoavat helposti. Asettele päälle luumuviipaleita ja ripottele lopuksi muruseosta muffinien päälle. Paista uunissa keskitasolla noin 20-25 minuuttia, tai kunnes muffinin keskelle pistetty puutikku tulee ulos puhtaana.
Tarjoile muffinit sellaisenaan tai vaniljakastikkeen tai kermavaahdon kanssa.
-Toni
—
The harvest season is gathering momentum as cherries and berries are ripening fast here in Southern Finland. I already made a couple sour cherry pies from the cherries in my family’s garden, but I think I’ll have to do a couple more as the cherry season is awfully short. Fortunately, frozen cherries work well in a pie, too. Currants, on the other hand, interest me greatly but I’m quite baffled about what to do with them. Maybe a sauce for a main course…
The next wave of the harvest will be plums and damsons, and then apples. All of them are prefect for a crumble (the recipe of which can be found here), but also for muffins that are easier to travel with and therefore are more than well suited for picnics. This recipe from the leaf-covered recipe book has some special memories attached to, as I used to make these muffins when me and my friend from the university took our exchange students that arrived for the Autumn semester to see the best views and nicest hiking trails in central Tampere. The Pyynikki-Pispala-Tahmela-Rosendahl area on the southern bank of the isthmus on which Tampere is located is a wonderful recreational and residential area which hosts gorgeous views on both lakes and features surprisingly vast forests in the ridge area, considering the central location. The route we took with the exchange students was quite long and hilly, so well-prepared snacks were on high demand.
I made this batch gluten-free as I had some leftover oat flour at hand, but you can also use wheat flour. Additionally, I avoided using white sugar and opted for coconut sugar instead, which is supposed to be a tiny bit better for you. Personally, I like the deeper taste it brings to the muffins, similar to brown or muscovado sugar.
Instead of plums of damsons, you can use basically any and all fruits and berries for these muffins, even frozen ones as they all end up being baked in the oven. When served indoors, some vanilla custard or whipped cream would be a nice addition to the muffins. Outdoors on a picnic or a hike they will be great as a snack on their own.
Oat and Plum Muffins 6 pc.
Ingrefients 50 g butter
1 dl buttermilk
zest of a lemon
1 egg
¾ dl coconut sugar
pinch of vanilla
2 dl oat flour
1 dl jumbo rolled oats
1 tsp. baking powder
pinch of salt
2-3 plums
Measure the butter and buttermilk into a small saucepan. Grate the zest of the lemon and add it to the saucepan. Put on heat, bring to a boil and set aside to cool.
Mix together the dry ingredients: oat flour and rolled oats, salt, and baking powder.
In a bowl, beat the coconut sugar, vanilla, and egg until a fluffy. Add half of the dry ingredients and half of the butter and sour milk and mix, then add the rest and mix again.
Remove pits from the plums and slice thinly.
Mix the ingredients for the crumble in a small bowl and rub with fingers to make an even crumble.
Divide the batter into 6 muffin cups. If using a metal tin, line the slots with paper cups to make sure the muffins come out easily. Place plum slices on top of each muffin and finish by sprinkling with crumble. Bake in the centre of the oven for about 20 to 25 minutes, on until a wooden skewer inserted in a muffin comes out clean.
Serve the muffins as is or with vanilla custard or whipped cream
Useita viikkoja ehti taas vierähtää edellisestä kirjoituksesta. Suurin syy siihen on se, että olen pyörinyt viime aikoina keittiössä minimaalin vähän . Kesä on siitä loistavaa aikaa, että suurin osa kasviksista on täydessä sesongissa ja parhaimmillaan, joten ne eivät kaipaa krumeluureja tai monimutkaista reseptiikkaa ympärilleen loistaakseen. Varhaisperunat ovat tietenkin se kuuluisin esimerkki: ne eivät tarvitse keittämisen jälkeen kuin nokareen voita kylkeensä, eikä niiden herkullisuutta saa siitä oikein enää lisättyä kikkailulla. Samalla tavalla monia kauden herkkuja kannattaa syödä yksinkertaisesti maustettuna ja grillattuna, jotta laadukkaat ainekset pääsevät oikeutetusti parrasvaloihin.
(Yhden sesonkivinkin voisin kyllä antaa ihan siltä varalta, ettei joku ole sitä vielä muualta lukenut: grillikasvisten raikkain kaveri on nimittäin pieni sydänsalaatti, joka leikataan puoliksi, maustetaan oliiviöljyllä, sitruunamehulla ja suolalla ja pippurilla ja sitten grillataan pari minuuttia. Kokeile ihmeessä!)
Kesällä juomat nousevat tärkeämpään osaan, kuin muina vuodenaikoina, koska vedentarve yleensä lisääntyy lämpimällä säällä. Itse en oikeastaan tykkää juoda hanavettä jostain syystä (paitsi todella kylmänä), joten jääkaapissa on usein jos jonkinlaista jäähdykettä. Viime vuodet vakiokaveri on ollut kylmäuutettu tee (vesikannuun muutama teepussi ja pala sitruunaa, sitten jääkaappiin pariksi tunniksi, sokeria ei tarvitse lisätä), mutta toinen kesäsuosikki kauden hedelmistä on persikoista tai nektariineista tehty lemonade, joka maustetaan rosmariinilla. Rosmariinia harvoin käytetään makeissa resepteissä, mutta tässä se korostaa hienosti persikan makua jo tuo viilentävää yrttisyyttä sekä syvyyttä makuun.
Tämä juomasiirappi on myös varsin helppo tehdä, eikä se vaadi mitään erikoistyökaluja. Kannattaa vain valita mahdollisimman kypsiä persikoita tai nektariineja. Tämä on myös aivan erinomainen resepti niille persikoille, jotka ovat menneet ryppyisiksi ja ylikypsiksi (mikä tapahtuu ainakin minulla silmänräpäyksessä). Sokeria voi käyttää tai olla käyttämättä oman maun mukaan, samoin sitruunamehua. Rosmariinia riittää yksi oksa, joten koko puskaa ei tarvitse kyniä. Valmis tiiviste laimennetaan vedellä, kuplavedellä tai sitruunalimsalla suoraan kannuun tai lasiin. Ginger beer sopii myös kokeilunhaluiselle lantringiksi!
Täällä rosmariini kasvaa kasuaalisti seinää pitkin | Here in the south rosemary is a casual weed
Persikka-rosmariini limonadi Ainekset 1 kg persikoita tai nektariineja
3 dl vettä
sokeria
sitruunamehua
1 oksa rosmariinia
Pilko persikat tai nektariinit neljään osaan ja poista niiden kivet. Laita lohkotut hedelmät kattilaan ja lisää vesi. Laita kattila liedelle ja kuumenna kiehuvaksi välillä sekoitellen. Laske lämpötilaa ja anna poreilla hiljakseen vartin verran, tai kunnes hedelmät ovat pääosin hajonneet ja liemi on muuttunut sakeaksi. Lisää sokeria oman maun mukaan ruokalusikallinen tai enemmän, sekoita.
Laita siivilä kuumuutta kestävän kulhon päälle ja kaada hedelmäliemi siivilän läpi kulhoon. Painele siivilään jääneistä hedelmistä vielä mehut lusikalla. Laita rosmariinioksa liemen joukkoon ja anna maustua vartin verran. Ota sitten rosmariini pois ja lisää sitruunamehua sen mukaan, kuinka kirpeää limonadia haluat. Pullota ja laita jääkaappiin viilenemään. Valmis tiiviste säilyy jääkaapissa viikon verran.
Sekoita lasissa tai kannussa noin kolmasosa tiivistettä ja kaksi kolmasosaa vettä, kuplavettä tai limsaa. Tarjoile jääpalojen kanssa. Voit koristella lasin rosmariinioksalla.
Vinkki! Voit lorauttaa myös tujauksen giniä lasiin, jos alkoholillista versiota kaipaat.
No nyt on kesäjuomat kohdillaan, joten kesälaitumille siitä ilakoimaan!
-Toni
—
Hi there!
Several weeks passed by since the last post. The main for that is the fact that I have not spent many moments in the kitchen lately. Summer is feast of seasonal fruit and veggies, and they don’t really need any complicated recipes to give them a boost; they are more than fine on their own. New potatoes are a prime example: they are best freshly picked and boiled and served with a little bit of butter, and no fancy recipe is gonna top that. Similarly, most of the seasonal treats are at the best when seasoned lightly and grilled. That way you can showcase the magnificent ingredients.
(I do have one seasonal veggie tip, in case you haven’t heard it somewhere else: little gem lettuces are the newest addition to grilled vegetables and the most refreshing one: just half the lettuces, season with olive oil, lemon juice, salt, and pepper, and grill for a few minutes. Delish!)
One thing about summer is special compared to other seasons: the need for hydration is greatly increased. So it’s time for drink recipes! I personally don’t like to drink tap water (except if it’s really cold), so there is usually a brigade of drinky things in the fridge. Lately my go-to drink has been cold-brewed tea (pop a couple tea bags in water jug with a slice of lemon and let brew in the fridge for a couple of hours, no sugar required), but my other summer favourite is peach and rosemary lemonade. Rosemary is rarely used in sweet recipes, but in this recipe it highlights the peach (or nectarine) and brings some much-needed herby refreshment and deepness to the flavour.
This syrup is easy to make, and no special equipment is required. I recommend choosing very ripe peaches or nectarines. Also, this is a perfect recipe for those over ripened and wrinkly peaches (my peaches always go from ’raw’ to ’overripe’ in a heartbeat). Sugar can be added (or withheld) to your liking, same with the lemon juice. One sprig of rosemary is plenty, so no need to trim down a whole bush. The syrup can be topped with water, sparkling water, or even lemon soda, if your sweet tooth is acting up. If you are an adventurous spirit, do try ginger beer as well!
Peach and Rosemary lemonade Ingredients 1 kg peaches or nectarines
3 dl water
sugar
lemon juice
1 sprig of rosemary
Quarter the peaches or nectarines and remove the stones. Place the quartered fruit into a sauce pan and add the water. Turn on the stove and bring the mixture to a boil, then reduce heat to simmer. Cook for about 15 minutes on low heat, or until most of the fruit has been reduced to a pulp. Add some sugar (from 1 tbsp. to 1 dl) and mix.
Place a sieve on a heat-resistant bowl. Pour the fruit mixture through the sieve. Press the fruit pieces in the sieve to extract all of the juice. Place the rosemary sprig in the bowl and let steep for about 15 minutes. Then remove the rosemary, and add lemon juice until desired level of acidity is achieved. Bottle and cool in the fridge. The syrup should keep for about a week in the fridge.
When ready to serve, mix about one third of syrup and two thirds water, sparkling water or soda in a glass or jug. Serve with ice and garnish with a rosemary sprig.
Tip! Feeling boozy? Add a splash of gin to your drink.
So there you have it, summer refreshment in a glass. Off you go to play in the sun (but don’t forget your SPF!)